Thread: Oil pan removal: my how-to, my hell

Page 1 of 3 123 LastLast
Results 1 to 20 of 52
  1. #1 Oil pan removal: my how-to, my hell 
    SE Level Member
    Join Date
    Mar 2011
    Location
    Tucson, AZ
    Posts
    66
    Thanks (Received)
    0
    Likes (Received)
    0
    Dislikes (Received)
    0
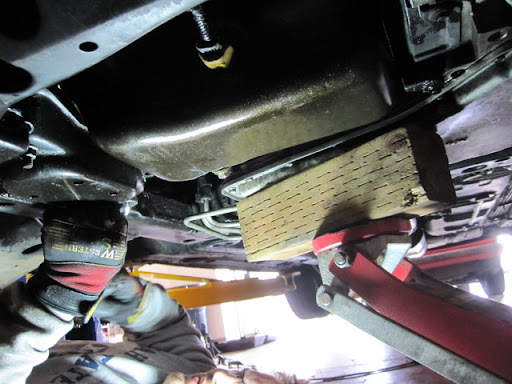
    I can't believe how much hell one must endure just to remove the oil pan on a 3.8 Grand Prix. I did it by myself, and in the pouring rain. With that said, this is what I did to accomplish this feat--

    Tools I needed:

    3/8" drive ratchet
    1/2" drive impact gun or ratchet (I'm sure a 3/8" drive would do just fine)
    Medium/long 3/8 drive extension
    Large screw driver
    15mm standard depth socket
    15mm wrench (ratchet wrench would have saved me an hour and 987 swear words)
    18mm 1/2" drive socket
    16mm wrench -- I'll explain later
    3/8" socket
    medium/long 3/8" drive extension
    2" x 4" long enough to go from fender to fender, atop the engine
    tow strap
    bottle jack
    floor jack


    Preface
    This is how I saw it best to remove the pan. It may not be the only or even the best way, but it worked well for me. If you have suggestions or input, feel free to post them.

    1) Break lug nuts free on passenger front wheel-- obviously not necessary if you have an impact gun

    2) Using your floor jack, jack vehicle up as high as you can, support with jack stands

    3) Remove passenger front wheel

    4) Remove serpentine belt

    5) Lay the 2"x 4" from one fender to another, directly over the crank pulley-- I placed two small pieces of 2" x 4" underneath the long 2" x 4" so it rested on them, instead of the top part of the fender

    6) Hook one end of the tow strap to the rear engine hook, wrap it around the 2" x 4" a few times times, then wrap it around the crank pulley, then wrap it around the 2" x 4" a few more times, then hook the other end also to the rear engine hook-- ensure the strap is taut, since it will help support the engine once you've dropped the cradle (sub-frame)

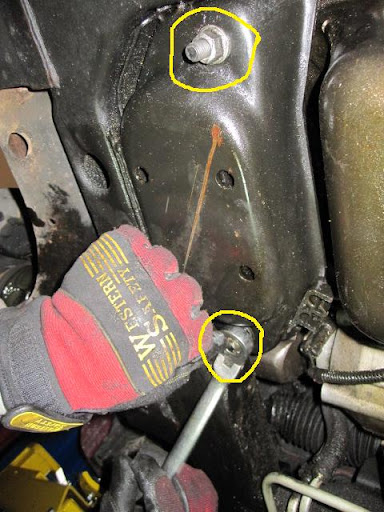
    7) Remove the two 15mm nuts on the bottom of the passenger motor mount-- I had to use a 16mm wrench to secure the top of the front motor mount bolt as I loosened the 15mm nut on the bottom, since it was a through-bolt and would spin unless I held the top still. I'm not sure if this is factory, but it's what I had to do on my car.

    8) Remove the two 15mm nuts on the top of the passenger motor mount

    9) Disconnect harness clip from the sensor in the oil pan

    10) Place floor jack under front lateral bar on cradle, barely touching it.

    11) Loosen the rear driver side 18mm cradle bolt until it's almost all the way out, but not so much that it unthreads entirely

    12) Loosen and remove the rear passenger side 18mm cradle bolt, and loosen and remove both front 18mm cradle bolts-- allow the floor jack that you placed underneath the cradle to slowly lower; this will cause the front part of the cradle to dip downward. If your tow strap/2" x 4" contraption works correctly, the engine will remain up as the cradle dips. My engine dropped a little as the tow strap tightened, but it held up nicely. I noticed the 2" x 4" bowing a bit, which concerned me because I was about to go underneath the engine and preferred it not drop on my head, so I took a bottle jack and placed it below the transmission oil pan. Between the jack and the pan, I put a 3/4" thick piece of wood in order to disperse the stress throughout the pan rather than in a single spot.

    13) Remove the 15mm bolts that secure the AC compressor to its mount, set the compressor aside. You do not have to disconnect the lines!!

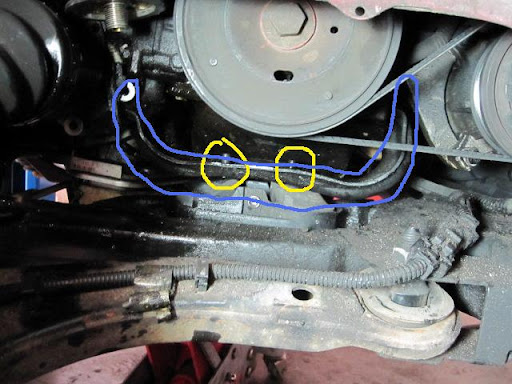
    14) Remove the front 2-3 15mm bolts that bolt the motor mount bracket to the block

    This is the passenger motor mount and the motor mount bracket I'm referring to:


    Uploaded with ImageShack.us

    15) Remove the rear 15mm motor mount bracket bolts (2-3 bolts on the rear)-- this is where your 15mm ratchet wrench comes handy, it's a VERY tight fit!!!

    16) Remove the motor mount bracket

    17) Remove the 2-3 flex plate inspection cover bolts with a 10mm socket and extension

    18) Remove oil pan bolts using a 3/8" socket and extension

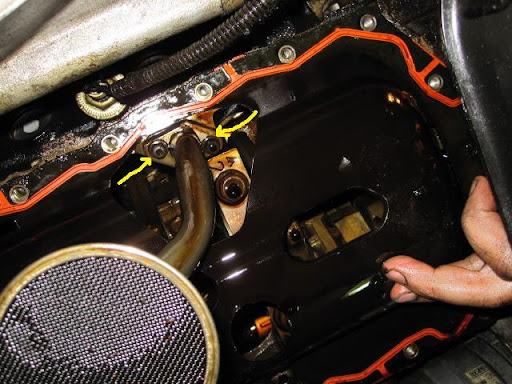
    19) Drop oil pan-- I needed a pry bar to separate the pan from the engine. Becareful not to gouge either the pan's mating surface or the block's, and of course don't damage the pan by beating on it. Also, be aware the pick-up tube routes into the oil pan through an oil baffle and can be tricky to manipulate.

    ---------------------------------
    To reinstall, perform the reverse of the above-mentioned steps. However, when aligning the cradle, you may need to use your large screwdriver to manipulate the cradle side to side or front to back in order for the cradle bolts to align properly; there are holes in the cradle that allow you to stick the screwdriver through and prop against the body of the vehicle to help you with this task. Remember: the rear cradle bolts are shorter than the front.

    I used the impact gun to remove the lug nuts, to loosen and tighten the cradle bolts, and to remove the oil pan bolts. When installing the oil pan bolts, I recommend NOT using an impact-- if you do, you run a higher risk of stripping the threads.

    You may also want to loosen the driver side motor mount, but I chose not to. When the cradle dipped, I noticed the mount streetttccchiiinggg like it was a go-go gadget motor mount, but it didn't rip.


    Conclusion
    Now that I've done this once, I'm certain I could do it a second time in half the time-- especially if it's not raining-- and with help, it could probably be completed within a single hour. Not fun, but thankful for the experience.

    Last edited by fju2; 12-20-2011 at 01:50 AM.
    Reply With Quote  
     

  2. #2 Re: Oil pan removal: my how-to, my hell 
    I live here. brandonl2000's Avatar
    Join Date
    May 2010
    Location
    Grand Rapids, MI
    Posts
    6,705
    Thanks (Received)
    0
    Likes (Received)
    0
    Dislikes (Received)
    0
    nice write up

    im sure it'll get moved to the how-to section.
    2003 Grand Prix GTP-3.5 setup, sold it, miss it
    2002 Grand Prix GT-top swap, GT1 Cam, SD Headers, 90# springs, 42.5 injectors, 3.4 pulley - sold
    2012 Chevrolet Cruze LTZ-Summit White, 1.4Turbo
    Reply With Quote  
     

  3. #3 Re: Oil pan removal: my how-to, my hell 
    Awaiting Confirmation
    Join Date
    Jul 2009
    Location
    aowdnawi
    Posts
    23,292
    Thanks (Received)
    0
    Likes (Received)
    1
    Dislikes (Received)
    0
    Done.

    Many thanks.
    Reply With Quote  
     

  4. #4 Re: Oil pan removal: my how-to, my hell 
    GT Level Member glendayle's Avatar
    Join Date
    Sep 2009
    Location
    Salt Lake City
    Posts
    328
    Thanks (Received)
    0
    Likes (Received)
    0
    Dislikes (Received)
    0
    Here's my writeup. Basically what you have, but I have a couple additional pics. Hope I'm not stepping on any toes. I've since replaced my subframe with an AL one and switched to the AL pan.

    This is from about 1 year ago.

    I've had a bad oil pan gasket for quite some time now. I finally got mine replaced yesterday. I'm sure that there is more than one way to do some of the steps in this repair, and you may opt to do some steps in a slightly different order, but this is what I did and it worked great for me. A few things to consider while doing this. Check the condition of your motor mounts prior to doing this repair. Many stock motor mounts fail, yours may need to be replaced, and there would not be a better time to do this. If your motor mount has been bad for a long period of time, your motor mount bracket may be damaged as well. As far as the gasket itself. I ordered the lower engine gasket set from rockauto and it cost about $30 or so. Also, I attempted this repair and was thwarted and had to do it again later. The one item I would suggest picking up is an extra long 15mm open ended wrench. While this is not necessarily needed, the motor mount bracket bolts were difficult to get to and for me I was unable to get them without this tool. I purchased an extra long 15mm open ended wrench for the 2nd oil pan replacement attempt and it made all the difference for me. *added* The other tool I forgot to mention that I bought was a deep double offset wrench(15mm) that was useful on the front motor mount bracket bolts.

    You will need to raise the motor in the engine compartment. Depending on what equipment you have, this can be accomplished by raising the engine from above via cherry picker/engine bar or from below. I opted to use a floor jack from below. Please know how to safely use any of this equipment before you start so that you don't cause any damage to your vehicle, or worse yet, to yourself.


    1. Support vehicle

    2. Remove oil plug to drain oil and remove oil filter.

    3. Disconnect the dogbone bolts so that the engine can move freely within the engine compartment(15mm).

    4. Loosen the rear cradle bolts(not necessary, but I found this helped me, plus I already had it loose from a sway bar swap)
    Loosen(but don't remove) the engine mount bolts(15mm). There are 5 all together(2 on the front side, 3 on the back). The upper one on the front was difficult to get to, but a deep offset wrench works. The 3 in the back were removed with a long 15mm wrench.


    5. Place floor jack under transmission pan. I used a 4x4 block to prevent any damage to the pan.


    6. Now you can remove the motor mount bolts altogether.

    7. Remove the 2 bolts(15mm) that connect the motor mount to the cradle.


    8. Remove the 2 bolts(15mm?) that connect the motor mount to the motor mount bracket. I've also outlined in blue the motor mount bracket just in case you aren't sure what that is.


    9. Now you can carefully raise the engine using the floor jack.

    When you have moved this enough, you will be able to remove the motor mount and the motor mount bracket. Some have said that if you leave one of the bolts, you can just swivel the motor mount bracket out of the way. I had to replace my bracket, so this was not an option for me. I don't know how well that works.

    10. Remove the fly wheel cover.

    11. Disconnect the oil level sensor, and then remove the oil level sensor. I used an adjustable crescent wrench. This sensor is very fragile and can easily be damaged. Mine needed to be replaced anyway so I didn't care, but It is easily damaged.

    12. Remove all of the oil pan bolts(3/8")

    13. Gently remove oil pan. Be careful not to bend the pan. The drivers side rear corner will be very close to the transmission, but you can work it out.

    14. Remove the oil return tube. There are two bolts on either side that have to be removed. Once you remove the oil pickup tube, you can remove the oil pan gasket. *****You may not have to remove the return tube. The shape of the hole in the oil pan gasket is designed to be able to be removed without taking off the return tube. I couldn't get the angle on the gasket to get around the large end of the return tube so I removed it. If you are able to get it off, you can skip removing the return tube.******


    15. Carefully clean the areas where the old gaskets were. This is your chance to completely clean out your oil pan as well.

    16. Install oil level sensor. I chose to install the new oil level sensor on the pan at this point. *****You may choose to do it after the pan is on. If you do it like me, you do need to be aware that you can break it on the oil return tube if you are not careful. The GM service manual suggests installing this after the oil pan is in place on the engine.*****

    17. Place the new oil pan gasket in place and then install the oil return tube and gasket with the 2 bolts.

    18. Put the oil pan back into place. I finger tightened about 4 or 5 bolts evenly around the oil pan. Then you can install all of the oil pan bolts and tighten them(13 ft/lbs), and replace the fly wheel cover.

    19. Reinstall the motor mount bracket. This can take some time to get the bolts started. They are a pain to get to.

    20. Install the motor mount.

    Once I got the mount into place, I carefully lowered the engine a little bit until I was able to line up the posts in the holes for the bracket as well as the cradle. Once I had all of the nuts started, I lowered the engine the rest of the way until it rested completely on the mount as it should. I then tightened all 4 of the bolts with my ratcheting wrench.

    21. Don't forget to tighten your cradle bolts if you loosened them.

    22. Replace your dogbone bolts.

    23. Put on your new oil filter and replace the oil drain plug. Put in your new oil, and you are done.

    I think I've gotten everything, but if you feel I've missed something, please let me know. I realized that I've missed a few pictures, but I will try to add some in when I can get them. If you are attempting this for the 1st time and have questions please PM me. Now that I've attempted this repair twice and succeeded once, I feel that I could do it in about 2 hours. If you are attempting this for the 1st time, I'd be prepared for at least 4 hours if you are doing nothing else while you are in there.
    Reply With Quote  
     

  5. #5 Re: Oil pan removal: my how-to, my hell 
    SE Level Member
    Join Date
    Mar 2011
    Location
    Tucson, AZ
    Posts
    66
    Thanks (Received)
    0
    Likes (Received)
    0
    Dislikes (Received)
    0
    So if I'm reading that correctly, you didn't lower the cradle? I found that the job was nearly impossible without lowering the cradle to provide clearance to access oil pan bolts and even to remove the pan once all bolts were removed. Also, I don't see that you removed the AC compressor to reach the front motor mount bracket bolts-- is this correct? It's been a few days, but I don't recall this being possible.
    Reply With Quote  
     

  6. #6 Re: Oil pan removal: my how-to, my hell 
    GrandPrix Junkie Sandman's Avatar
    Join Date
    Jan 2009
    Location
    Tallahassee, FL
    Posts
    3,538
    Thanks (Received)
    0
    Likes (Received)
    0
    Dislikes (Received)
    0
    I could've used this a couple of months ago. It is a huge pain when I did it. I had to pull off my tranny pan to get the oil pan to come out and even that was me really pulling one it.
    05 Saab 9-2X Linear (Saabaru)
    77 Morris Garage B
    Quote Originally Posted by TLSheff View Post
    You said "I'm done with it"... car says "Oh, really? *trollface*"
    Reply With Quote  
     

  7. #7 Re: Oil pan removal: my how-to, my hell 
    GT Level Member glendayle's Avatar
    Join Date
    Sep 2009
    Location
    Salt Lake City
    Posts
    328
    Thanks (Received)
    0
    Likes (Received)
    0
    Dislikes (Received)
    0
    I lower the cradle(step 4 in my writeup, but I don't remove it. I just get an extra few inches of clearance to do it this way), but you do not need to remove the AC compressor to reach the front MM bracket bolts. Although if you have trouble imitating gumbi it might be easier to remove it. I usually loosen it with deep double offset wrench and then put my arm through the passenger wheel well to remove it. It's a tight fit though. You can also reach up and over/around the compressor from below but again, it's not a position I like.
    Last edited by glendayle; 12-22-2011 at 08:18 PM.
    Reply With Quote  
     

  8. #8 Re: Oil pan removal: my how-to, my hell 
    SE Level Member
    Join Date
    Dec 2010
    Location
    Racine WI
    Posts
    7
    Thanks (Received)
    0
    Likes (Received)
    0
    Dislikes (Received)
    0
    well, Here's what I got.

    My '04 GP, no SC. I've disconnected the following:
    main motor mount attached to the infamous U-bracket, the rear motor mounts (passenger side 15mm nut, 16mm head, driver had 18mm nut and head) both sides of the sway bar, both rear cradle mounts. I've tried to disconnect the front cradle nuts, but it seems as if the bumper support is under the cradle, not the other way around. Not sure how the front is going to drop out unless I take the wheel well skins off and find a nut in there. No AC compressor removal yet, but it looks imminent. Engine is supported both front and rear engine supports by a support bar going parallel with the engine.

    I'm just not sure how the subframe drops out. If I let the frame go with the jack, the engine drops too far down. Maybe I need to take up some slack on the engine. If I support the engine more with the jack, the subframe just doesn't go anywhere to make the u-bracket any easier to get to.

    HELP!!!!- TIA
    Reply With Quote  
     

  9. #9 Re: Oil pan removal: my how-to, my hell 
    SE Level Member
    Join Date
    Dec 2010
    Location
    Racine WI
    Posts
    7
    Thanks (Received)
    0
    Likes (Received)
    0
    Dislikes (Received)
    0
    my solution- called my mechanic. Says 3.2 hours labor, $288. Done. Putting the stuff back together and will let him do it!!
    Reply With Quote  
     

  10. #10 Re: Oil pan removal: my how-to, my hell 
    GT Level Member glendayle's Avatar
    Join Date
    Sep 2009
    Location
    Salt Lake City
    Posts
    328
    Thanks (Received)
    0
    Likes (Received)
    0
    Dislikes (Received)
    0
    Since the clearance with the U bracket is between the trans and the motor, you don't get any additional room regardless of where the motor is. You don't need to remove the cradle, but if you lower the rear 2 bolts and let the cradle hang down 2-3 inches you get some additional room to work with. Go ahead and remove the motor mount altogether(remove it from the chassis and u bracket and remove it completely. Make sure to inspect it because it probable needs replacing too). This will give you some additional room. I've done this gasket replacement 4 times between my car and other cars. You don't need to remove the compressor. You also do not need to remove the front cradle bolts just leave them alone.
    Reply With Quote  
     

  11. #11 Re: Oil pan removal: my how-to, my hell 
    GXP Level Member Timing's Avatar
    Join Date
    Feb 2012
    Location
    gardner,mass
    Posts
    2,141
    Thanks (Received)
    0
    Likes (Received)
    0
    Dislikes (Received)
    0
    Thankyou i got a leaking oil pan and i was dreading doing this now i have a good idea since my chiltons explanation is bull****
    Reply With Quote  
     

  12. #12 Re: Oil pan removal: my how-to, my hell 
    SE Level Member jaked1985's Avatar
    Join Date
    Jan 2012
    Location
    West Union, Iowa, United States
    Posts
    79
    Thanks (Received)
    0
    Likes (Received)
    0
    Dislikes (Received)
    0
    Same here.... this makes it seem not so bad, still looks like a royal p.i.t.a. If I could find someone to do it for $300 I'd pry just pay to have it done, and I HATE paying people to work on my car... lol
    Reply With Quote  
     

  13. #13 Re: Oil pan removal: my how-to, my hell 
    GT Level Member glendayle's Avatar
    Join Date
    Sep 2009
    Location
    Salt Lake City
    Posts
    328
    Thanks (Received)
    0
    Likes (Received)
    0
    Dislikes (Received)
    0
    Quote Originally Posted by jaked1985 View Post
    Same here.... this makes it seem not so bad, still looks like a royal p.i.t.a. If I could find someone to do it for $300 I'd pry just pay to have it done, and I HATE paying people to work on my car... lol
    Wish you were closer to me. I'd do it for half that not including parts. I'm not afraid of this repair anymore, but I certainly wasn't fully prepared for it the 1st time I did this.
    Reply With Quote  
     

  14. #14 Re: Oil pan removal: my how-to, my hell 
    GXP Level Member Timing's Avatar
    Join Date
    Feb 2012
    Location
    gardner,mass
    Posts
    2,141
    Thanks (Received)
    0
    Likes (Received)
    0
    Dislikes (Received)
    0
    Oil pan all done but guys seriously take the tools he has into great concideration befor attempting this i managed with a reg 15 mm wrench but holy **** 12 hours and my car almost coming off my lift but im done and will never do this again but again thanks for the help

    another thing make sure you have a offset 15mm or your life will be a living hell
    Last edited by Timing; 02-18-2012 at 05:11 PM.
    Reply With Quote  
     

  15. #15 Re: Oil pan removal: my how-to, my hell 
    SE Level Member
    Join Date
    Feb 2012
    Location
    USA
    Posts
    120
    Thanks (Received)
    0
    Likes (Received)
    0
    Dislikes (Received)
    0
    Get on engine support
    1000 LB Engine Support for Motor Tranny Transmission | eBay

    This will make this job 90% easier. 3-4 hours and ur done. Work smarter not harder
    Reply With Quote  
     

  16. #16 Re: Oil pan removal: my how-to, my hell 
    SE Level Member
    Join Date
    Feb 2012
    Location
    NY
    Posts
    80
    Thanks (Received)
    0
    Likes (Received)
    0
    Dislikes (Received)
    0
    Thanks for the write ups guys. My pan is gushing oil pretty good, about a solid cup of oil daily if I drive the car.

    It doesn't seem too bad from the write up, but with how tight things are in the engine bay- I'm sure it'll be a b****.

    I don't have a Hanes or Chiltons manual yet, but out of everything here- which bolts are torque to yield and must be replaced? I know the ac compressor ones are, the write up made it sound like the dogbone bolts are too?

    Thanks.

    Edit:

    Also, what brand/ source for a gasket would you guys recommend? My autozone has these:

    Oil Pan Gasket | 1999 Pontiac Grand Prix 6 Cylinders K 3.8L SFI OHV | AutoZone.com

    Azone usually carries crappy parts though.
    Reply With Quote  
     

  17. #17 Re: Oil pan removal: my how-to, my hell 
    The mod from over yonder TheOtherNick's Avatar
    Join Date
    Sep 2008
    Location
    Charles City, IA
    Posts
    9,955
    Thanks (Received)
    0
    Likes (Received)
    0
    Dislikes (Received)
    0
    dont have to replace any bolts for oil pan removal an replacement.
    01 gtp-big cam e85 dd 78dodge- guzzling fuel 05 cummins- rollin coal
    SMGPFC Two Nipple General
    Reply With Quote  
     

  18. #18 Re: Oil pan removal: my how-to, my hell 
    GT Level Member glendayle's Avatar
    Join Date
    Sep 2009
    Location
    Salt Lake City
    Posts
    328
    Thanks (Received)
    0
    Likes (Received)
    0
    Dislikes (Received)
    0
    Quote Originally Posted by nitroheadz28 View Post
    Thanks for the write ups guys. My pan is gushing oil pretty good, about a solid cup of oil daily if I drive the car.

    It doesn't seem too bad from the write up, but with how tight things are in the engine bay- I'm sure it'll be a b****.

    I don't have a Hanes or Chiltons manual yet, but out of everything here- which bolts are torque to yield and must be replaced? I know the ac compressor ones are, the write up made it sound like the dogbone bolts are too?

    Thanks.

    Edit:

    Also, what brand/ source for a gasket would you guys recommend? My autozone has these:

    Oil Pan Gasket | 1999 Pontiac Grand Prix 6 Cylinders K 3.8L SFI OHV | AutoZone.com

    Azone usually carries crappy parts though.
    Felpro is fine, but you can get a kit with a bunch of additional gaskets from RockAuto for less. All bolts are reusable. You don't need to remove the AC compressor.
    Reply With Quote  
     

  19. #19 Re: Oil pan removal: my how-to, my hell 
    Turbo is the way to go. BillBoost37's Avatar
    Join Date
    Jul 2009
    Location
    W Spfld
    Posts
    26,833
    Thanks (Received)
    53
    Likes (Received)
    90
    Dislikes (Received)
    1
    That is the lower conversion kit.
    I drink..so consider that when reading my posts.

    2010 Audi A6 Dual IC's
    Reply With Quote  
     

  20. #20 Re: Oil pan removal: my how-to, my hell 
    SE Level Member
    Join Date
    Feb 2012
    Location
    NY
    Posts
    80
    Thanks (Received)
    0
    Likes (Received)
    0
    Dislikes (Received)
    0
    Quote Originally Posted by BillBoost37 View Post
    That is the lower conversion kit.
    Thanks!!! I looked for it on rockauto but coudln't find it before. That set is still a few bucks cheaper than just the oil pan gasket from Azone. Thanks again.
    Reply With Quote  
     

Page 1 of 3 123 LastLast

Similar Threads

  1. What the hell?
    By JoshsGTP in forum Off Topic Discussion
    Replies: 3
    Last Post: 08-09-2011, 11:46 AM
  2. Hell yes!
    By whitehead in forum Off Topic Discussion
    Replies: 0
    Last Post: 08-03-2011, 01:20 AM
  3. dtc's from hell
    By sca555 in forum 3.8L V6 Naturally Aspirated (L36)(L26)
    Replies: 4
    Last Post: 05-09-2011, 05:44 PM
  4. Where the hell did this car go?
    By Street Wolf in forum Off Topic Discussion
    Replies: 51
    Last Post: 09-09-2008, 09:30 AM
Tags for this Thread

View Tag Cloud

Bookmarks
Bookmarks
Posting Permissions
  • You may not post new threads
  • You may not post replies
  • You may not post attachments
  • You may not edit your posts
  •