Hey Guys,
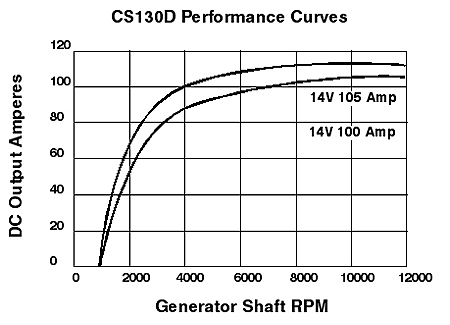
I've had a few ask to do a write up on the CS144 swap, and I haven't really found information on it in all one place, so here goes. The CS130D has an internal fan which makes the entire thing run hotter causing reliabilty problems. The CS144 has an external fan and the case is bigger (130mm vs 144mm) so it runs a lot cooler. They say the external fan is louder, but I never noticed a difference. Here's some output comparisons, the pullies are basically the same size:
It's just shy of a 1:3 ratio on 3800s, so at 1,000 engine RPM the alternator's RPM is 3,000. So at idle, the CS130D puts out around 90a while the CS144 puts out just under 120a. That's a pretty big difference, and obviously it has the higher max output. For $100-$150 you can upgrade it to 200a with simple tools as well, so that's a big plus. Anyways, here's the parts list:
CS144 Alternator out of a:
- BUICK LESABRE (1996 - 1999)
- BUICK PARK AVENUE 1996
- CHEVROLET LUMINA (1998 - 1999)
- CHEVROLET MONTE CARLO (1998 - 1999)
- OLDSMOBILE 88 (1996 - 1999)
- OLDSMOBILE 98 1996
- OLDSMOBILE LSS (1996 - 1999)
- OLDSMOBILE REGENCY(1997 - 1998)
- PONTIAC BONNEVILLE (1996 - 1999)
Mounting bolts out of the above vehicles; 2 bolts. One bolt goes through the alternator, through the alternator bracket, and threads into the head. The other bolt goes through the alternator and threads into the bracket. Reuse your stock bolts for the other holes to mount the bracket.
CS144 harness\plug from one of the above vehicles.
New belt 93.985 inch Model K060935. You stock belt will most likely be too small, but try it if you wish.
Upgraded charge wires (you should have done this already)
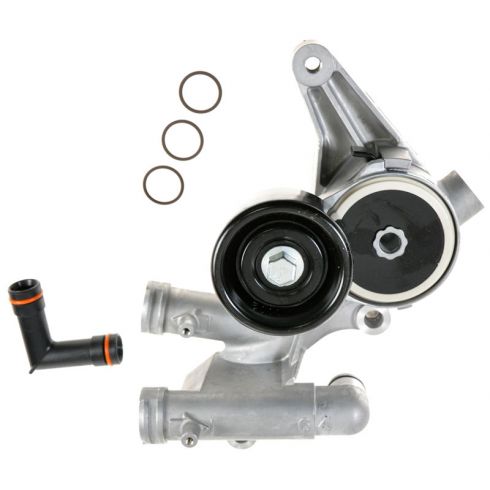
Alternator bracket out of a 99 Camaro 3.8l. It may be available in other vehicles, but Rockauto has conflicting information on it. (optional on 97-98 Grand Prix)
Now a 97-98 Grand Prix alternator bracket will work, but the coolant elbow that goes into the timing cover is cast into the bracket so it can break the timing cover on removal. This is the 97-98 Grand Prix bracket:
Here's what it can do:
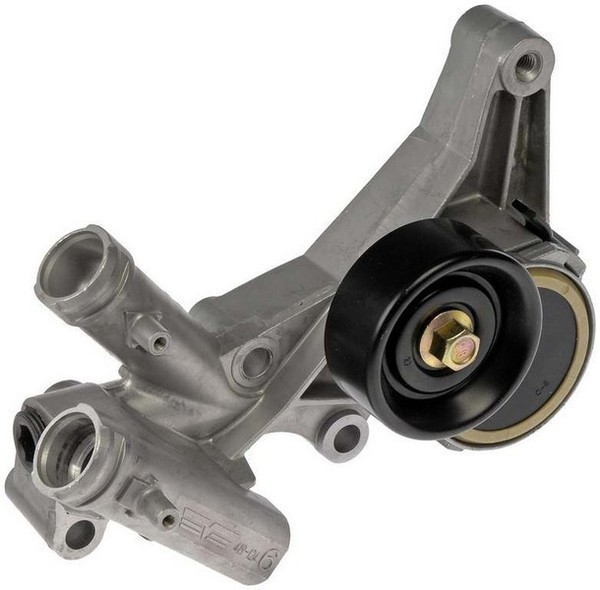
Here's the Camaro bracket:
Pay attention to the heater hose angles, they can be 180* or 90* make sure you get the same angle you currently have (180*). Not all of the fittings bolt on the same way, as you can see in my picture of the installed bracket:
You can also see the 2 bolt holes for the CS144 in that picture. Be sure to use the aluminum coolant elbows:
Now that the bracket and everything is ready for the alternator it's time to wire it up. It's 2 wires if you choose to run the sense wire. The sense wire is not required, but it is the most efficient way for the alternator to monitor voltage. Without the sense wire, the regulator will just monitor the voltage of the output stud and adjust the alternator's output from there. I have ran it both ways and never really noticed a difference though. The S wire is the sense wire, and you can run it to the battery's positive post or the fuse box, or just not use it at all up to you. I wouldn't reccomend using the factory orange wire for sense, it's too small and adds resistance making the alternator think there is less voltage than it really is. The L wire goes to the factory (small) red wire. NOT the charge wire, the smaller red wire that went to the CS130D plug originally. Take the orange wire and tape it off, it won't be used. Here's a pic:
From here, if you have a Gen III or are N\A, you bolt the alternator in, hook it all up, put the new belt on, and you are done. If you have a Gen V supercharger, you'll need to grind the back of the alternator to clear the longer case of the supercharger:
Now that I have a final setup for it all, I'll eventually upgrade my charge wire to 1\0 AWG, the wires in this pic are just to get me by til then. You can also see there is an extra ground wire on the back of the case. If you choose to ground the alternator, this is the place to do it. The pink wire in the picture is the sense wire and leads to the fuse box.
If anyone has any input or questions, feel free to ask. I'll make another thread on upgrading the CS144 to 200a if needed.