Both of my front hubs came in more than one piece. Neither one gave me an exceptionally hard time coming out though.
The rear came out in one piece though.

|
|


Both of my front hubs came in more than one piece. Neither one gave me an exceptionally hard time coming out though.
The rear came out in one piece though.


Well, just an endorsement for RockAuto, I shipped the 'bad' hub back on Thursday, prepaid by RA and received the replacement yesterday! Apparently, when they get notification that you've shipped the part back, they cross ship the replacement, no down time really. So honestly, I'm not too worried about the hub, 1 year, three years, bottom line is I'm covered! I could've went Timken, but now I'm committed to Moog for 3 years
I'll come back and update if the hub ever fails, noting mileage too. No worries : )


I just wanted to drop in a few photos of my own of a method that has helped me in the past.
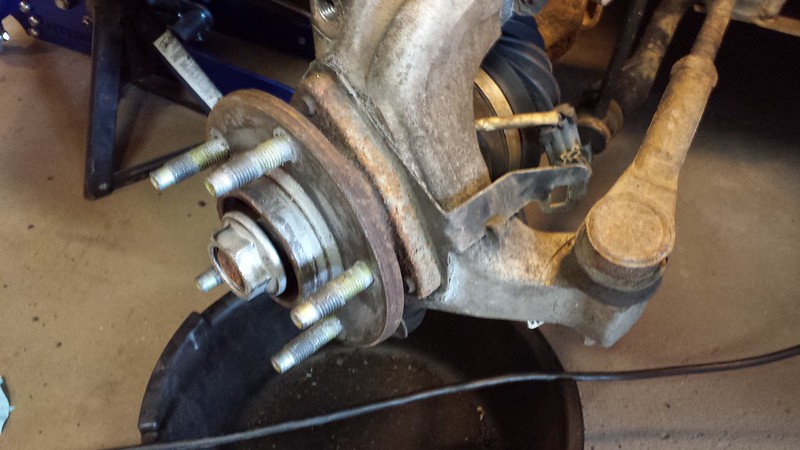
First thing I tried was to hammer a chisel between the knuckle and the hub, but this didn't work. I also used a sledge on the hub and it didn't want to budge. I don't really spend much time on these other methods because this is a really easy technique for me. What we are about to do here, is use the knuckle to push the hub off with a couple of grade 8 bolts.
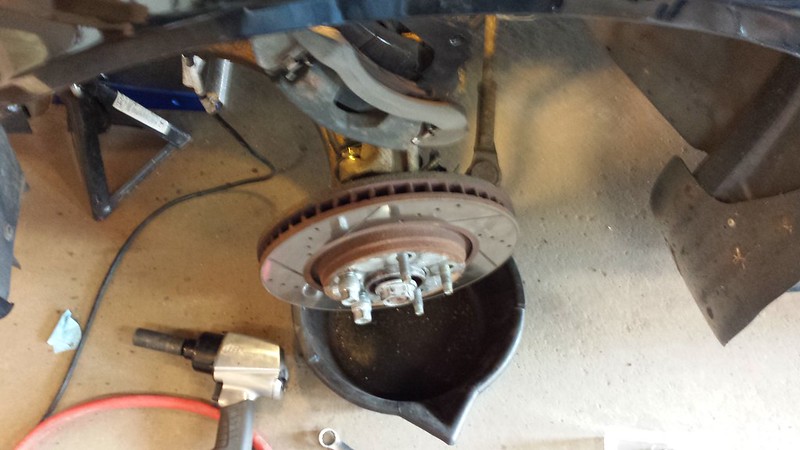
This works just the same for rotor that are rusted to the hub.
As you can see, I have a bare hub that doesn't want to come off.
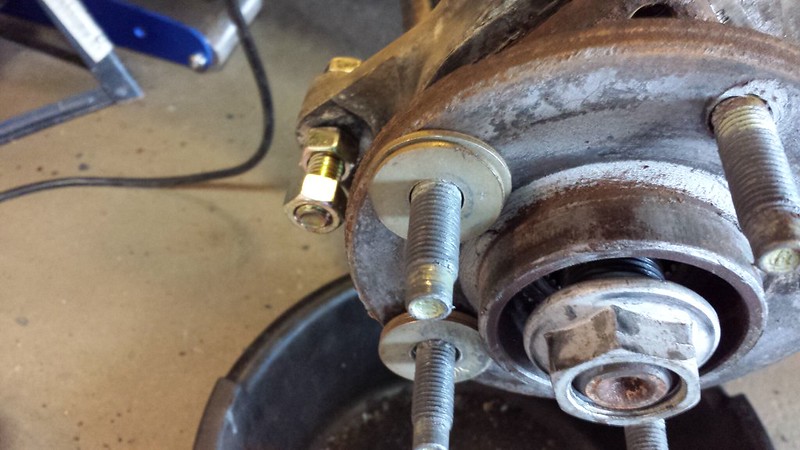
Optionally, I put a couple of grade 8 washers behind the rotor to give myself a little room to work. This isn't always necessary. As a matter of fact, on my truck I used old brake pads to fill in the space.
Secure the rotor back on the hub with a couple of lug nuts.
As pictured here, put a bolt through each hole for the caliper mounting bracket and thread two nuts on. I cheat and do this before putting the rotor on, but back the bolt almost all the way out. In the picture, the outer most nut is there to protect the threads at the end of the bolt. It's not 100% necessary, but I have mushroomed the bolt before and made it hard to remove.
Put a wrench on the nut closest to the knuckle, and a socket wrench on the bolt head. Slowly tighten the bolt down, alternating between the two, pushing the hub on the way. With a rusted rotor, they usually break loose with a loud *PANG* but the hubs usually just come out slowly. Some hubs just fall out, and others like this one came out in pieces. This did not completely remove my hub, but it opened a nice 1/2" gap that I could now easily work my chisel around the other half and pry it out.
Alternatively you can put the bolts in and tighten them down before you put the rotor on. Then use the lug nuts to pull the hub free. This is quicker as you can use an impact to do it, but I prefer to use hand tools to get a sense of how much tension I'm putting on it.
Extra tip: Don't cheap out. Buy the replacement bolts from a GM dealer. I cheaped out, and rounded all three off trying to torque them. I think my 1/2" torque is a bit to big to keep squared off in this case too. No problem with the removal of the bolts, but torquing them was a pain.
Last edited by Buggsy; 04-28-2014 at 02:37 PM. Reason: broken pics

I just hit the back of the wheel part of the hub with a hammer, and it pushes it right out with a few whacks...

Just a note....beware of the damn ABS connector....I didn't check wire lengths, and my right (passenger) side connector ripped off of the bracket
and bit into the outer cv bootWhat I did after I discovered it was undo the clips holding the wire bundle on the A arm and got a little more slack
....


why not just unplug the hub before you rip it off the car? seems logical.........thats all ive ever done.

Um, yeah, what Scotty said. You simply unplug it before you even start and voila, no issues.
actually guys that was post replacement....I had completed the job and had been driving for a while....It was when I was looking at the catalytic convertor that I noticed the grease on the steering knuckle etc that I saw the wire and the bite it took out of the outer boot
| « Previous Thread | Next Thread » |
| Tags for this Thread |
| Bookmarks |
Bookmarks |