badass!

|
|


badass!


When can you make me one?
I am still listening to the video......... have watched it 10 times so far, and cannot stop!!!
EDIT: I just noticed at 10seconds into the video the belt jumping when the car is started. won't this eat the belt teeth after a while?
Last edited by UR LOSN; 01-08-2009 at 05:44 AM.

sure will.Originally Posted by UR LOSN


Thanks for the comments.
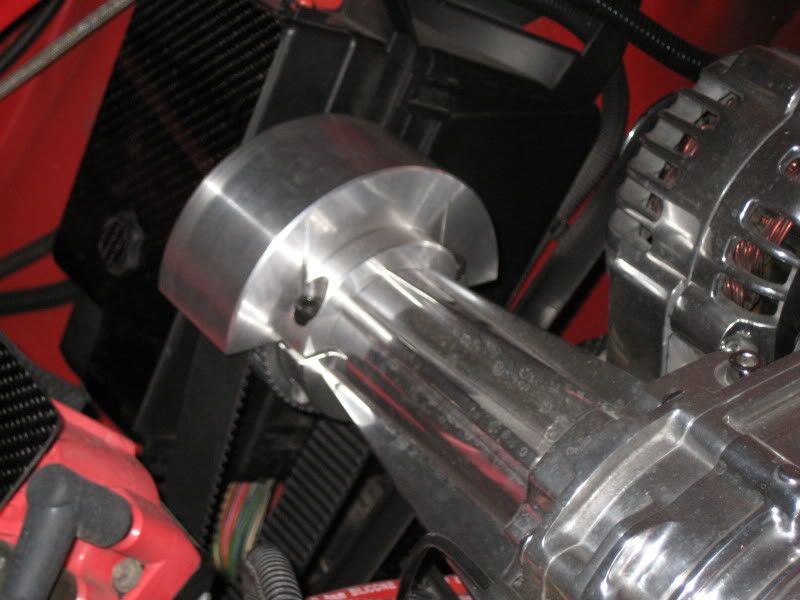
Brand new belt was installed for this video, once its warmed up, and ran in, it meshes with the pulleys perfectly. New, its meshes fine, but tends to ride on the tippy-top of the splines till its been properly ran in. Little around town diving takes care of that real quick. Total run time for this new belt was under 5 minutes at the time abouts.
Regardless of belt tension, or type of tensioner used, (spring of fixed) the cogged belt will wear out much faster than a serpentine belt. Fact of life you cant change.
Glad the belts are cheaper than the "true" supercharger belts. $30.00 odd some dollars a pop for mine vs. $150.00+ and still have the same amount of the short life span.
I'll keep my "cheap ass" little timing belts any day.
~F~
You just post up when you have everything worked out. I want one. It may be over kill but i want it.
How long is the life expectency of the belt?
Yea I can't wait for this but I'm doubting I'll be able to afford it right away... bleh stupid bills
Well I don't have belt slip with my 2.8 on a stock belt system. I just think it would be bad ass. Maybe by the time it is done this won't be my DD anymore. Wich will offset the belt costs.
eitherway, count me in on one! I LOVE that sound!!!
plus with it being that loud, I am SURE people would turn heads when you drive into the parking lot... and especially with a radical cam.....
..... I believe I just wet myself...
I DID!!! I DID!!!


i wouldnt be laughing, let alone admitting that to the world!


My nitrous spacer plate is almost done, being revamped to the GenV, cause when I built it, I was still running a GenIII, and I also changed a few small things on it for how the N20 is injected through it to hit each intake runner. Its going to be pimp for sure, cant wait to sit that under my new supercharger, and run the giggle juice again.
Farns, I want to see and hear more details on this project!
Just a 1" thick piece of aluminum that sits under the supercharger.
I then added my correct fitting(s) according to my system onto the front of the spacer.
The inside...thats where it got interesting and I prefer to keep to myself cause I tested several different ways, and have several nice machined billet aluminum paperweights because of my efforts...I was able to have some damn good direct port nitrous injection with out having to install more parts, other than this spacer. Such as the direct port spacers that go under your fuel injectors made by many of the nitrous kit companies with a lot of additional plumbing required.
The spacer has one single line to it, because I run a dry set up, and I am still able to change my jets (my HP Shot) as easily as before.
It just goes into the intake runners better and evenly now, vs. going through the supercharger, and over loading a few cylinders and starving a few more.
Though I am not all crazy with the giggle juice, this will insure my motor stays together a lot longer, than it would before I made this.
I just feel better and safer running it this way is all. The part was not out there...so I just made it myself.
I'll have a quick little video to show you what I want to, on how it works off the engine, don't worry.
~F~
Last edited by GR8racingfool; 01-12-2009 at 04:23 PM. Reason: spelling, go figure.
Update? And Video?

NO kidding Jason. I've always wanted to see your nitro plate.
Update?
Ya, here is a big one for you all.
June 4th 2009,
Been a while...have some new developments. ;D
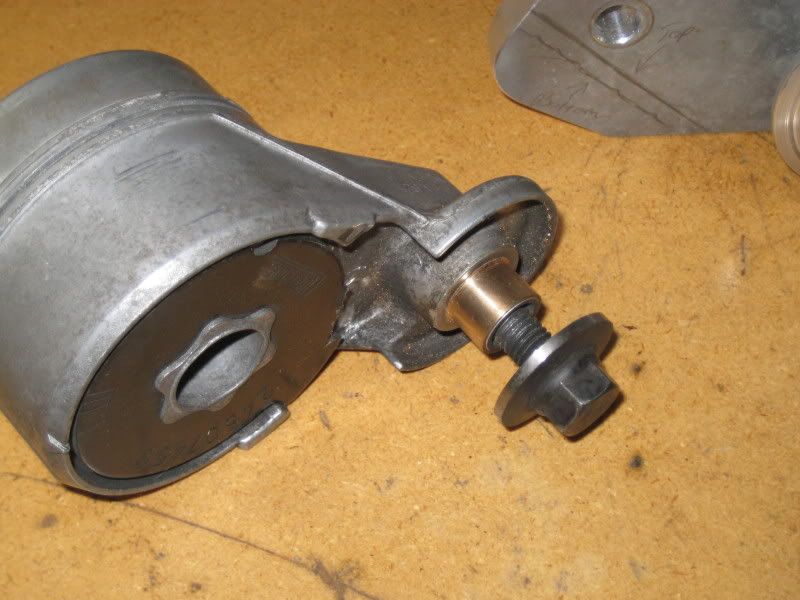
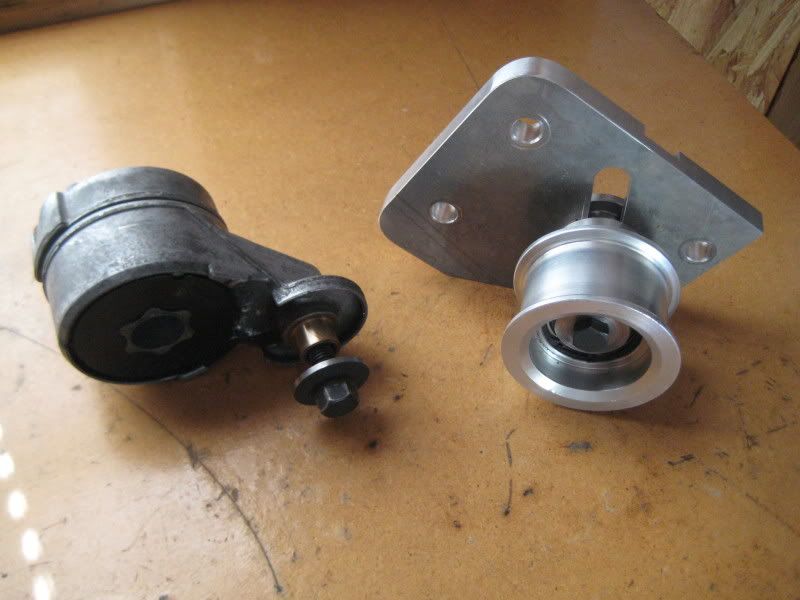
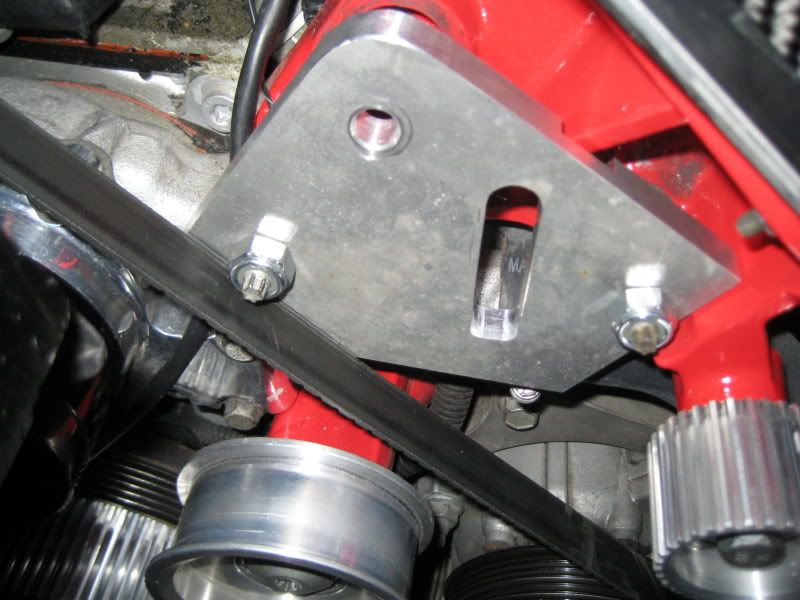
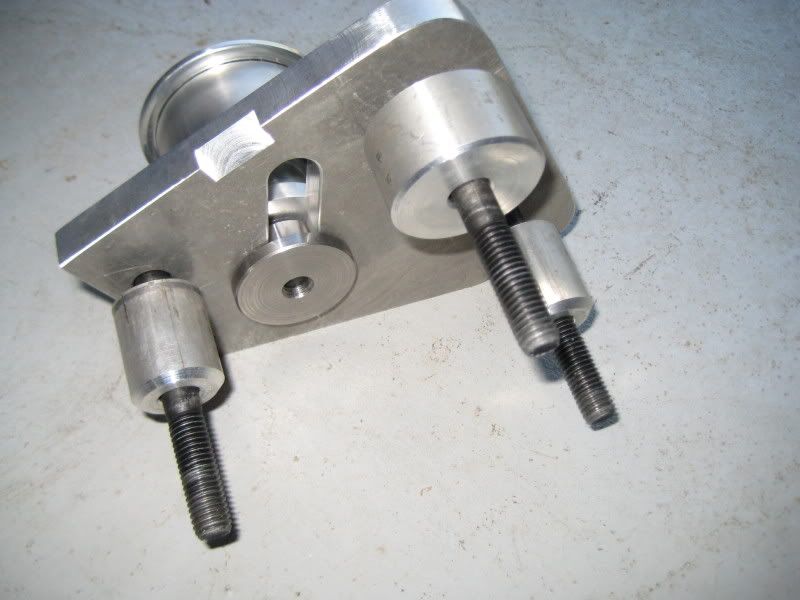
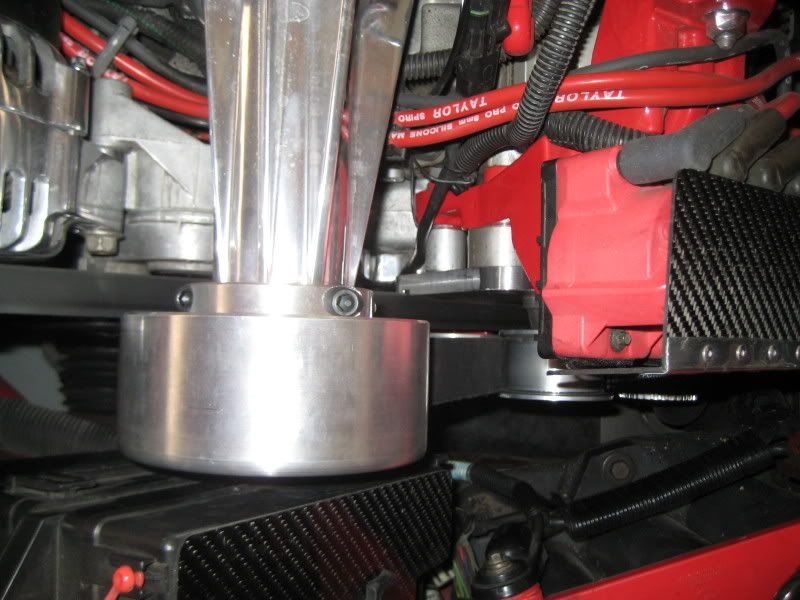
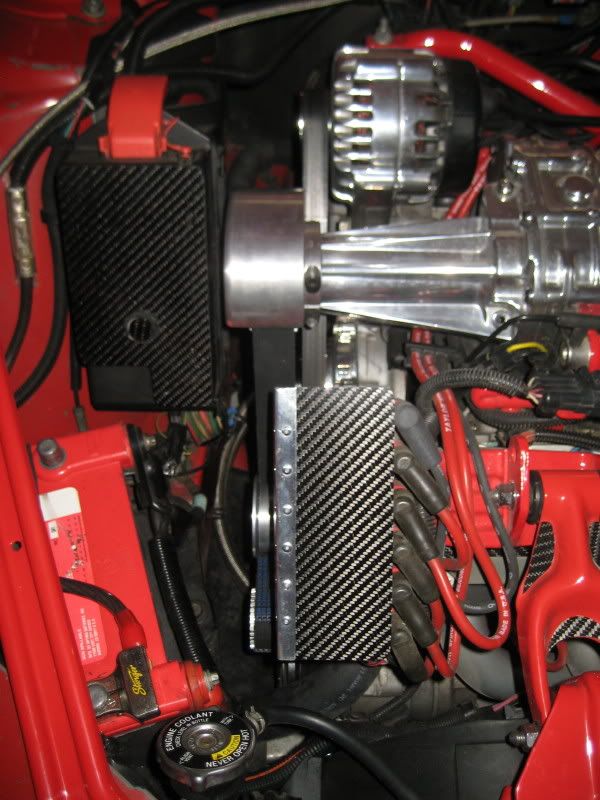
The old, modified stock spring tensioner.
Modified, because the cheap aluminum casting where the pulley bolts to, was actually cone shaped, so it would come out of the mold easier we believe. Because of this, there was some excessive play in the pulley, on top of the standard internal play of the Timkin bearing in the pulley its self.
So, what we did was machine the stud down, and installed a bronze bushing to stiffen the pulley up, problem solved.
Till I dug up my little black book of ideas, and brought to life a new belt tensioner design I created/drew up like 7 years ago.
The purpose of this new design is to eliminate the need to carry two or three different supercharger belts depending on what sizes of pulleys many run on the street and at the track. You simply adjust according to the size of the belt.
Also, changes the belt routing, creating even more belt wrap around the supercharger pulley.
I adapted it, for this particular set up at hand, and this is my prototype creation. More or less I needed to totally LOOSE the spring tensioner all together for this cogged set up, as it was allowing too much belt deflection, and under a heavy load, the teeth of the belt would skip just enough to miss the teeth of the first pulley. They would mesh eventually, but only after slightly chewing up the belt first. Do this for a few weeks, and months...and ya...problem becomes obvious when you look at things.
So...my creation.. my solution for the total loss of the spring tensioner and the installment of a fixed belt tensioner.
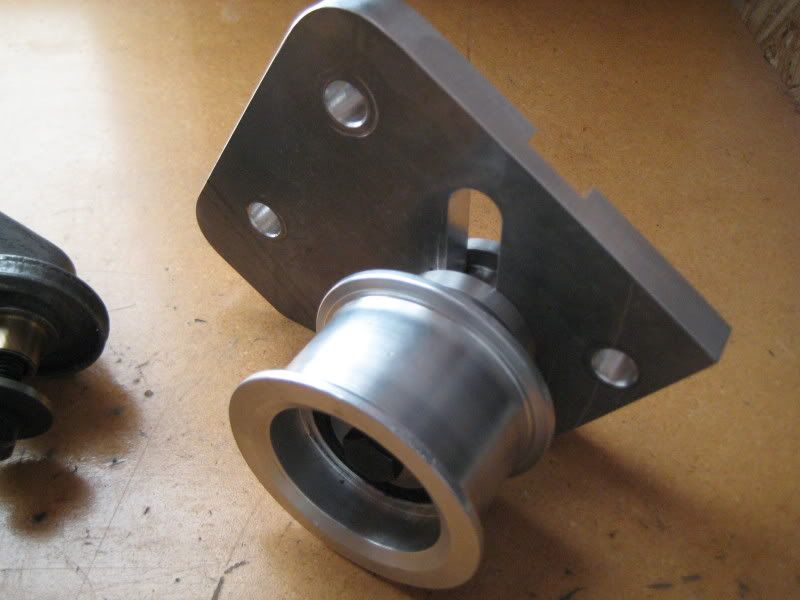
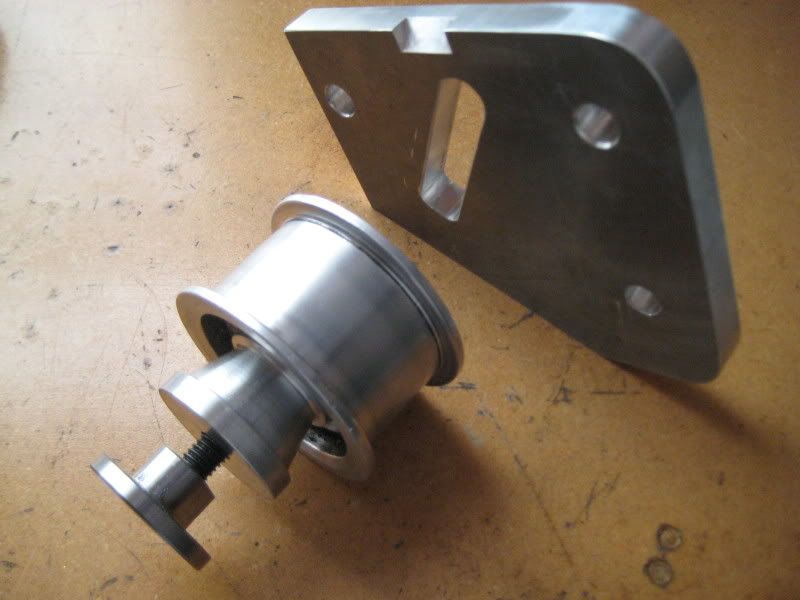
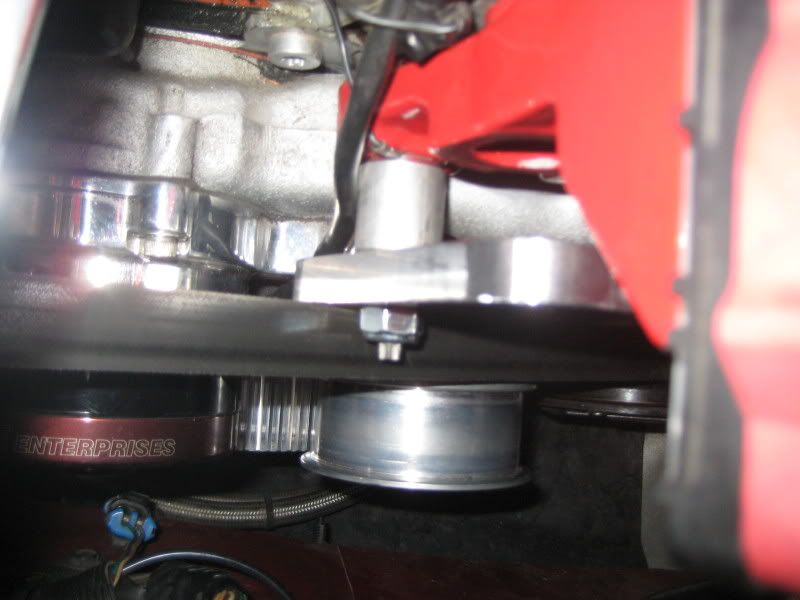
Back side:
back side with pulley assembly removed:
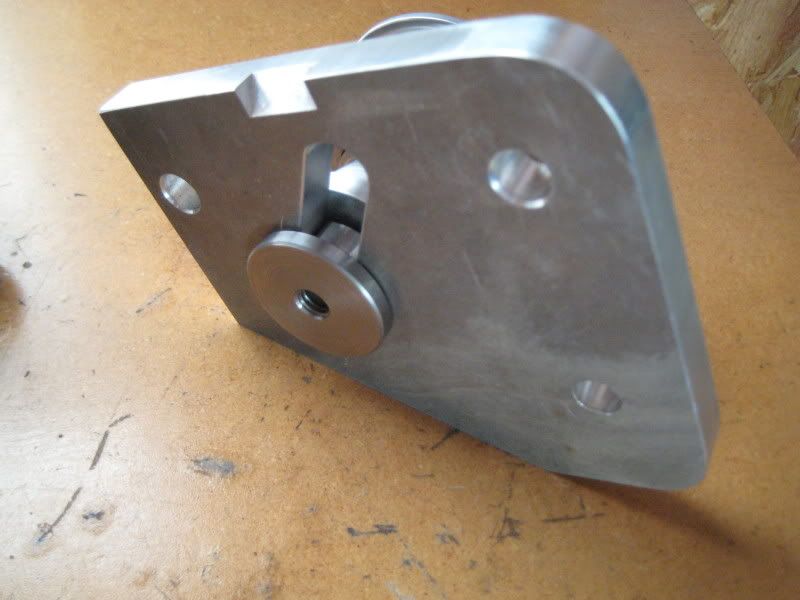
The assembly removed close up:
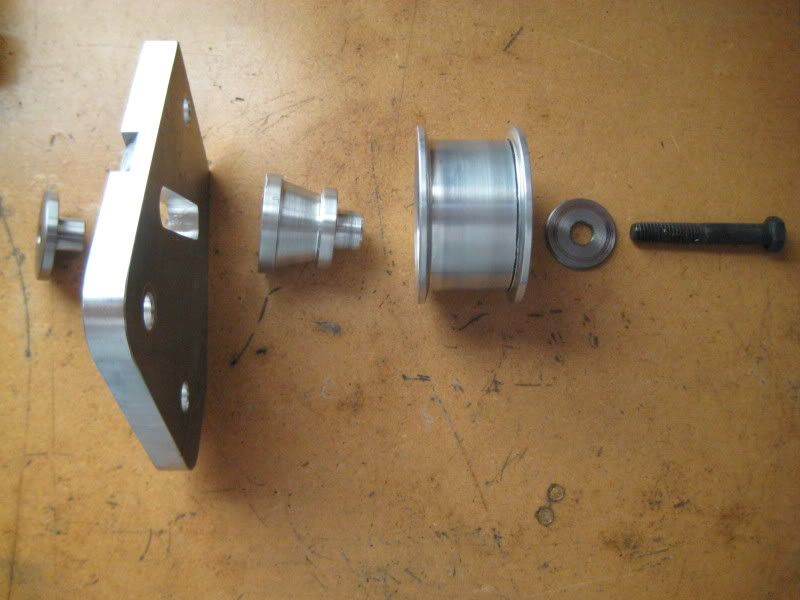
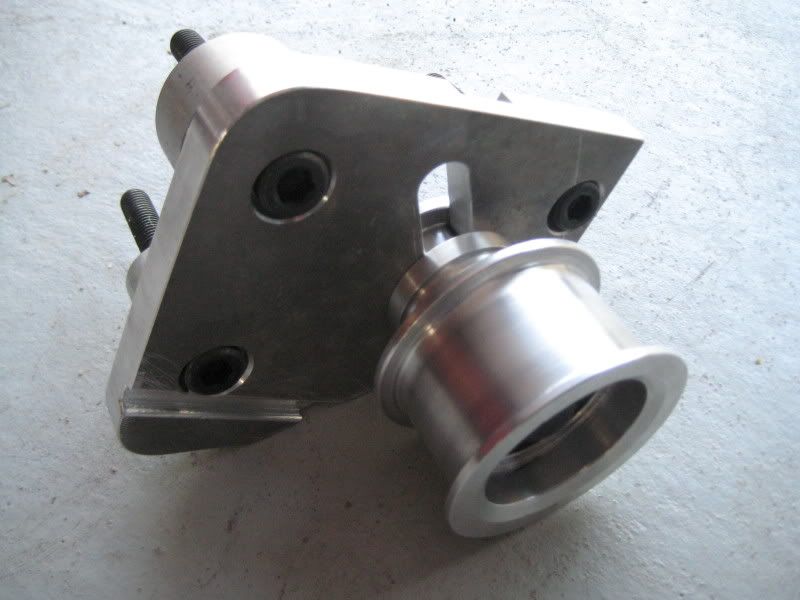
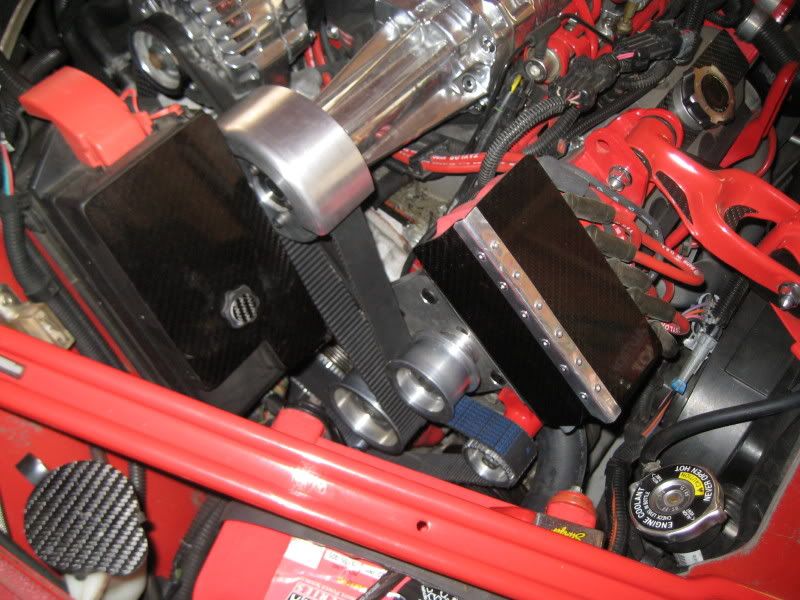
exploded view:
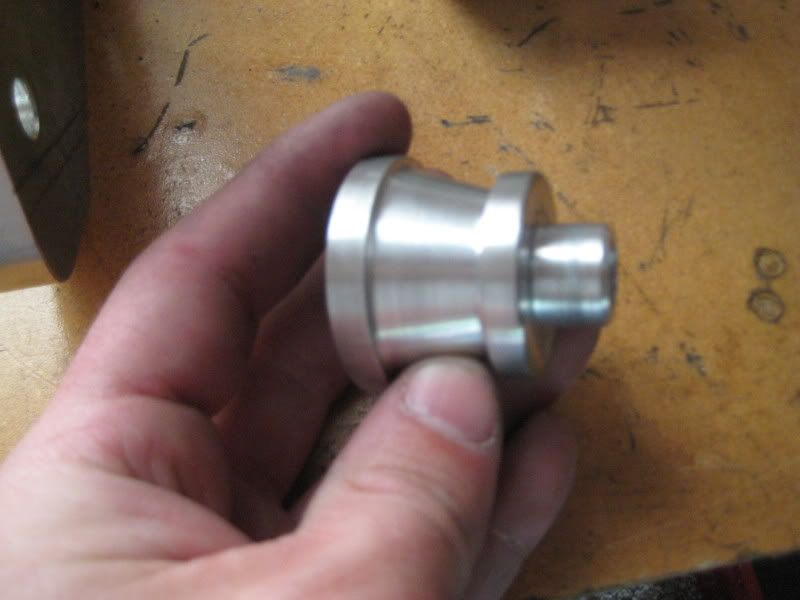
this is the billet aluminum 6061 spacer:
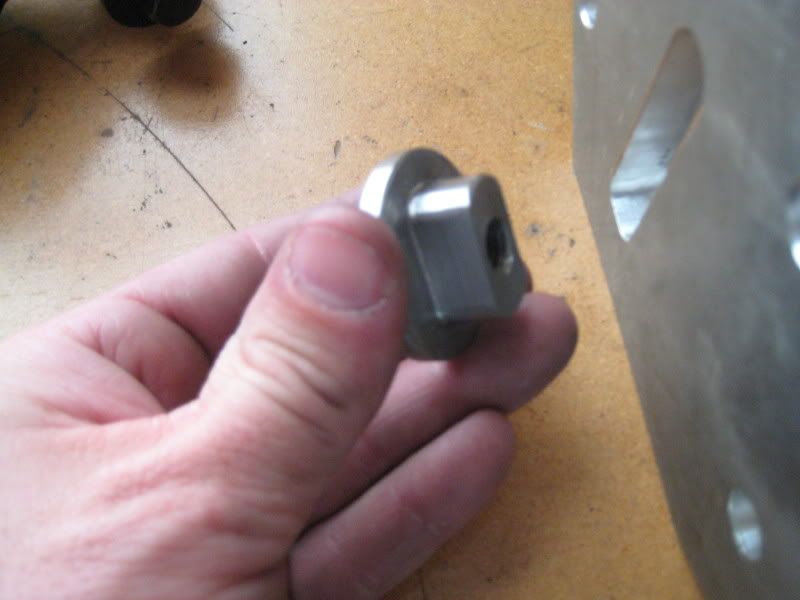
this is the keyed nut so to say, also billet, but machined out of heat treated 4340 steel.
It is 40 to 44 hardened steel, (not sure if any of you know of the Rockwell scale "c-scale" or not) so it should be more that strong enough for this application.
The main base, is billet aluminum. Nothing too special about it. Just machined in the right spots so it will fit past the cast iron coil bracket/motor mount bracket. To space it out correctly, I have some billet aluminum round spacers.
~F~
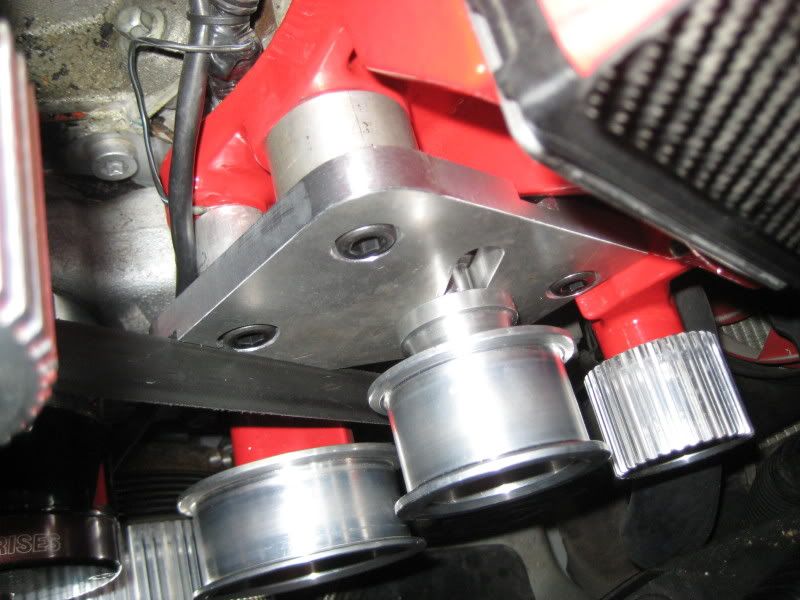
Mock up:
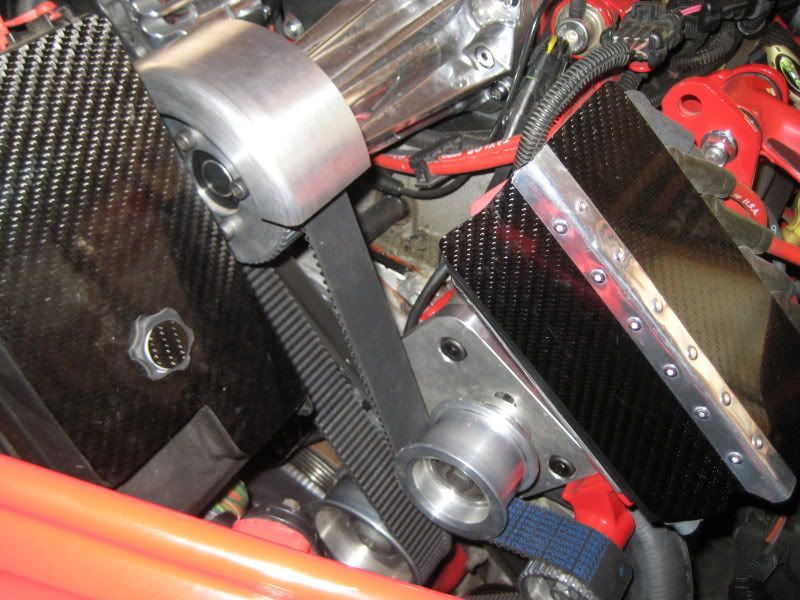
As with anything...I always find some flaws in my designs but I am learning. The main problem I discovered when I got home to install this on my engine in my car, is the spare engine I have at the machine shop does not have the alternator, AC compressor, or the power steering pump, so there is was no serpentine belt. So, as you can see, if this was ran, the belt would be rubbing on the plate.
Oops. :-[
So, planning to just run a end mill across the edge of that, and either make me a groove, or just cut the whole end of it off so the belt will have enough room to move. Only bad thing is...if there is enough belt deflection, it will rub regardless...so I will see if this does happen or not once its fired up and cross that bridge when it comes.
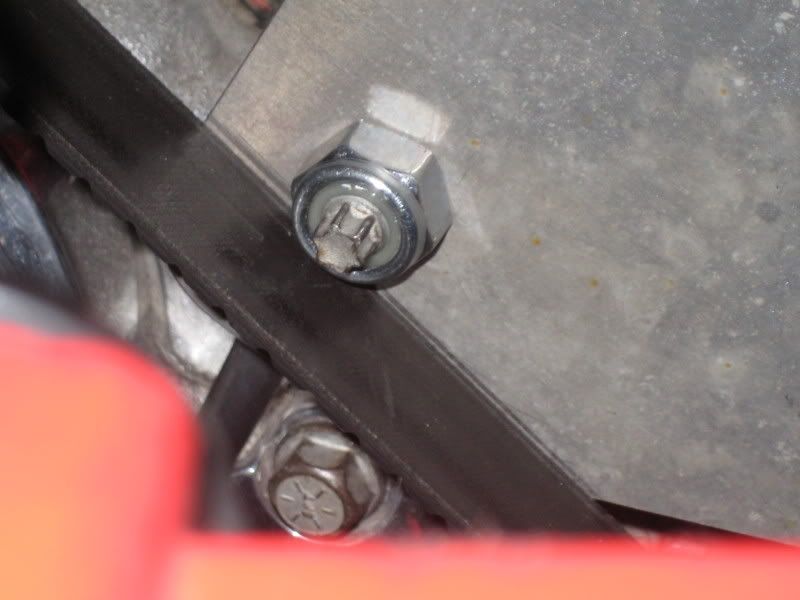
Instead of using the factory Torx studs as seen in the picture, three of them cause I added one where there WAS a short stud for the ICM ground in my mock up, I am going to use some socket head bolts, and counter sink into the plate so its nice and flush mounted. I still can do this, though there are holes drilled through the plate already.
Then...might show you the "other" cool thing I made specifically designed for my supercharger. Its kinda a cool thing I think, but others may think its stupid or not necessary.
~F~

Muahahahaha...can't hide the cool things from EVERYONE Jason...but I won't tell
June 8, 2009
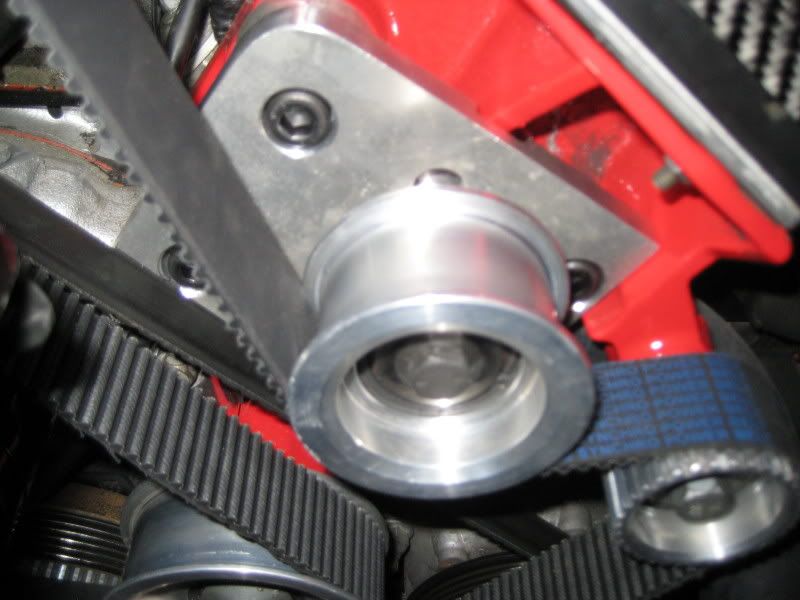
Well, remachined the plate a little more, now its about where I want it. Did away with using the knuckle busting Torx Studs, and went with some recessed allen head bolts.
I will try out the belt groove, and see how well that works out, I have a feeling I will want to, and need to make it a little wider, and deeper to prevent any belt rubbing.
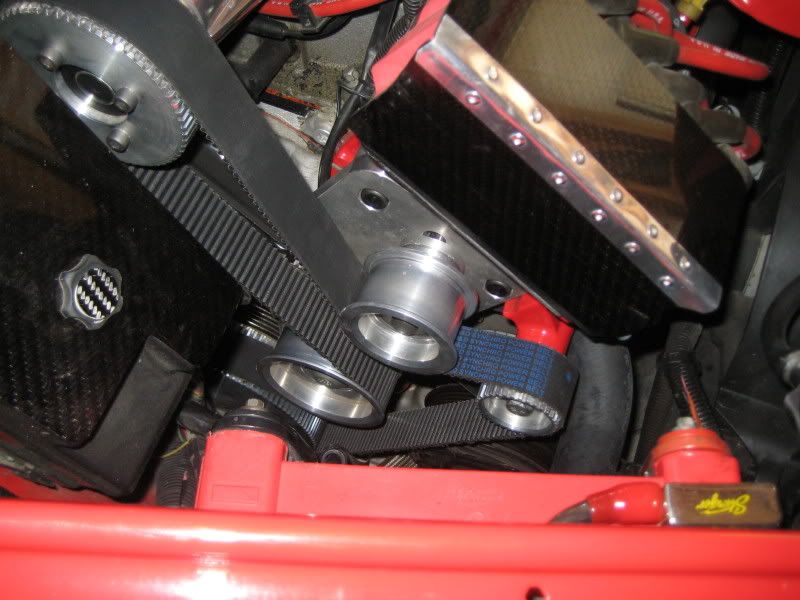
The tensioner assembly as a whole:
Installed:
Next project at hand...the fabrication of my custom, direct port, N20 plate for under the supercharger. Been designing this for some time, but ideas conflict with new ideas, and then I run into limitations of what the machines are capable of doing, so redesign after redesign...I have the design down to two very plausible designs.
Going to have a conference call with Holly in a few days, to get some more insight, and get suggestions or get answers to some lingering questions I have. Pretty much I have a general idea that it will work, just want some reassurance before we put the mill to the metal.
~F~
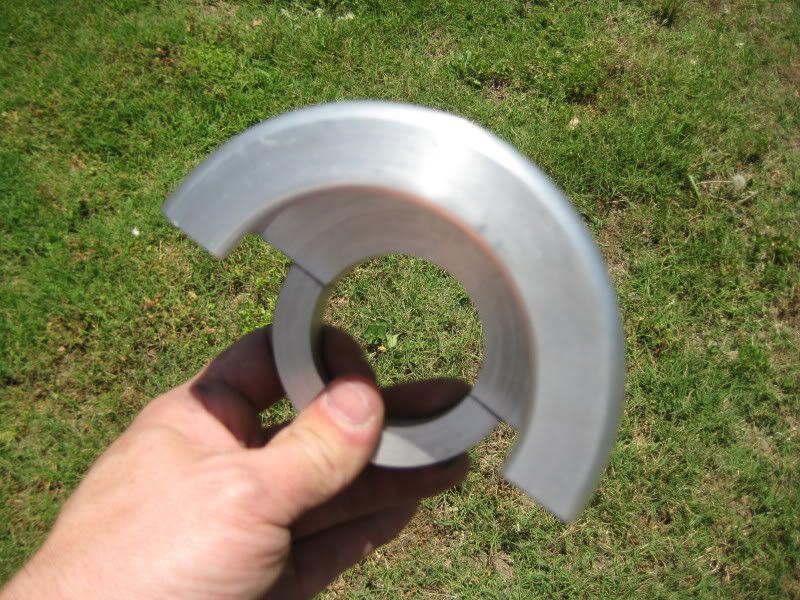
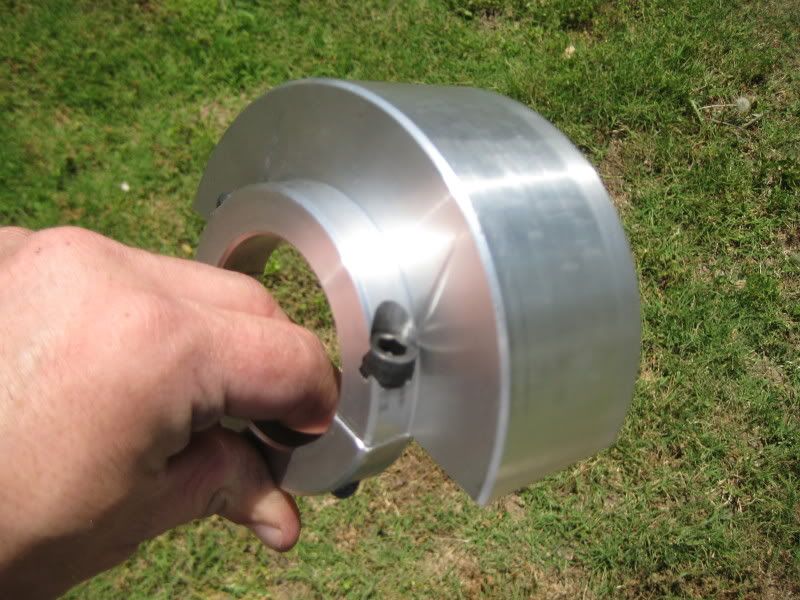
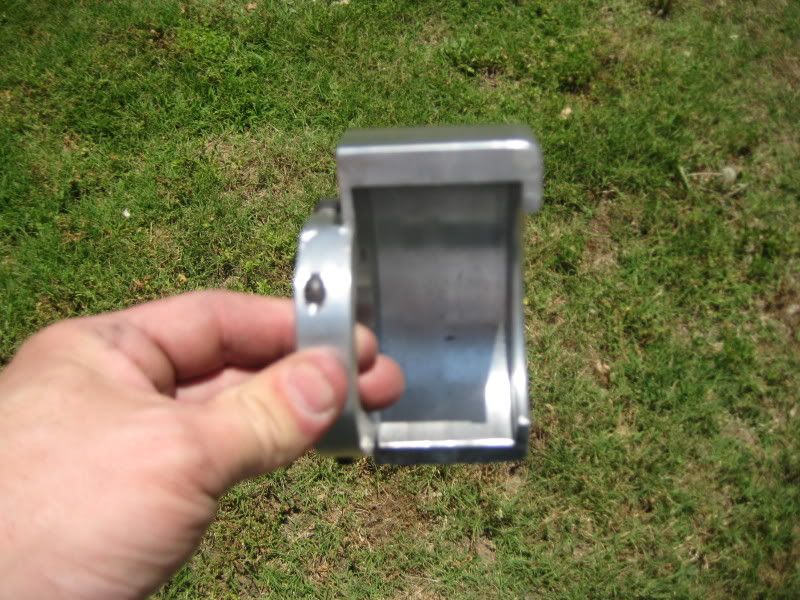
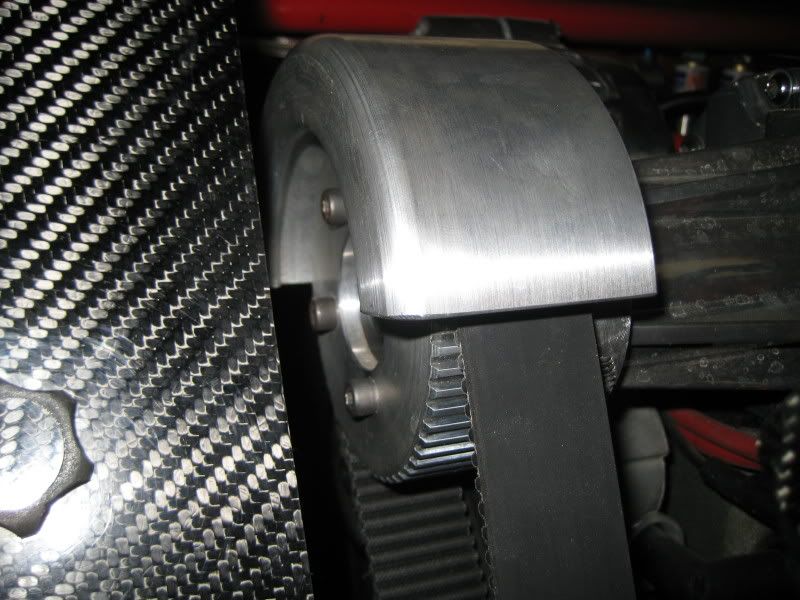
Alright...Just because I am in a giving mood, I guess I will show you the other special thing I created.
It does serves a purpose, cause when the last belt let go, the underside of the hood was taking a beating as it rotated.
Got to protect that fiberglass of the F1 hood ya know.
So...
Building it around my little goof up years ago, when I machined my snout I was told how much to remove and spin it down to, but not how much to machine in as far as the depth went, so went a little too far compared to others.
Now that goof, turned into something useful. ;D
All billet, spun on a lathe from a solid piece of aluminum. It was quite simple to make really. Maybe in the future, it will be polished all bling like. 8-) (along with the plate, and other pulleys)
Installed:
~F~
Not much of any eager reply's on the local forum anymore. Guess everyone is getting tired of updates, and pictures of stuff.
~F~
Oh hell I always thought it was a awesome deal you took on and made it work...Cog Belt setup = 110% of WIN in my book
Now...if I ever get a damn job and have some money I'd get one from ya...
| « Previous Thread | Next Thread » |
| Tags for this Thread |
| Bookmarks |
Bookmarks |