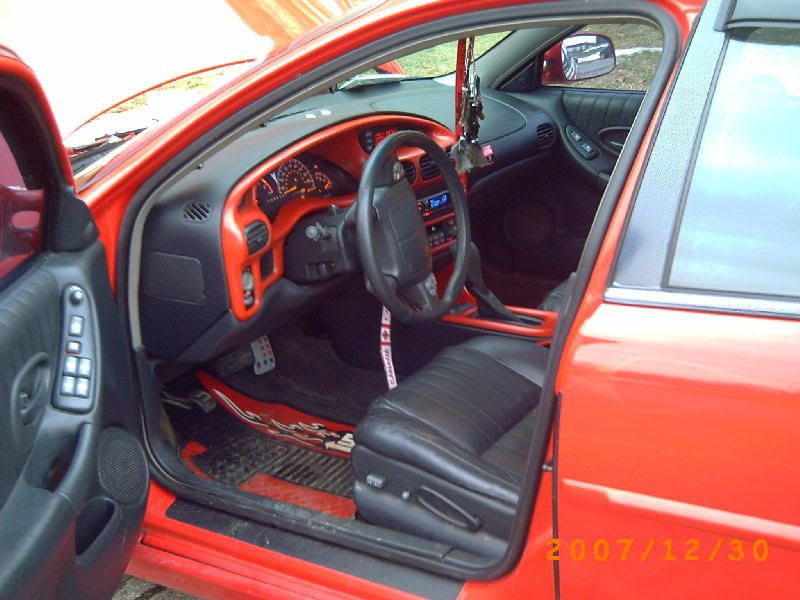
My son is pulling his dash trim and center console for prep and painting. Any steps on how to properly do this to make it look good? Also is there a way to remove the vents? They appear to be melted into place. Like melted plastic rivets.

|
|


My son is pulling his dash trim and center console for prep and painting. Any steps on how to properly do this to make it look good? Also is there a way to remove the vents? They appear to be melted into place. Like melted plastic rivets.


Not sure about the vents but make sure and get a good sanding to begin with. Get rid of all that Armorall and other contaminants. Then get a light base coat of primer in a color that can be fairly easily covered up by your paint. Use lots of light coats when painting. Don't worry even if you don't hit all the area in each coat, especially in the beginning. Try not to start spraying in the middle of a piece, start at the edge and spray across and off the other side so you don't get hard lines. Sand in between coats lightly with some 600 or so. Get some nice clear on when it all looks about the color and evenness your looking for. Sand in between with a higher grit... 1000-2000 or so should be good. Wet Sand it if you feel like it. If you've got any parts to mask off I've had good luck feathering the first coat just along the edge of the tape to get a good seal/mask then put the rest of the coats on. It may be a little bit of luck, but peel up the mask when the last coat is still slightly tacky and hopefully it won't give you any troubles.
Hope that helps... seems like maybe a bit of a ramble.
Sounds good to me. Thanks!Originally Posted by TyroElite

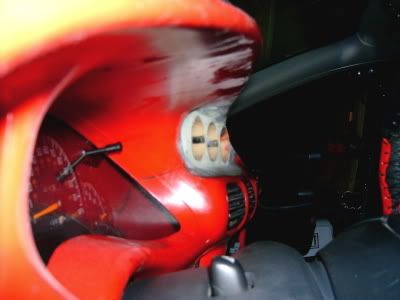
The vents don't come out fella. I vaguely remember a post awhile back on ClubXX where someone was doing the exact same thing and they tried to take them out and broke them. Some people claim that you can remove them will a small flathead screwdriver but i wouldn't reccomend it. You know how flimsy ABS plastic can be....so i would just reccomend covering the vents with painter's tape. After the dash trim piece is off just move the vents up and down, manipulate them however you need to, and try to "thread" the tape from the back of the dash trim piece(in the area surrounding the vents) over the top of the vent, over the front of it, and again over the bottom part of the vent...hope that makes sense. Good luck!


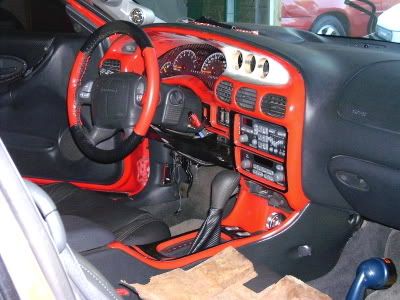
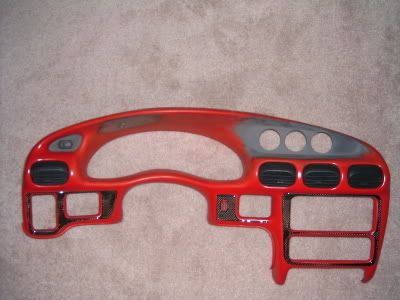
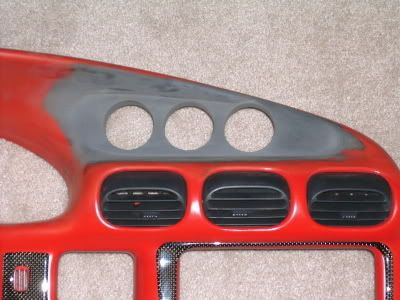
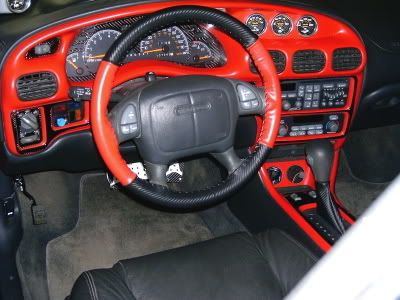
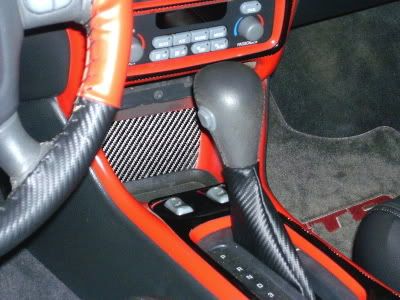
I Just done mine and i took the vents out...
to put into the one i just painted up..
Take a soilding gun and just touch the tips to losen them up..
If your doing one that already has vents just tape them off and paint.
I gave mine a light sanding then painted it with Krylon Fusion Paint
it is for plastic..
On the can it says you do not have to sand or prime but in my case i did as the trim was scatched up alot....
I did how ever use a clear coat on the trim as it does scratch...
Good luck with the mod
John
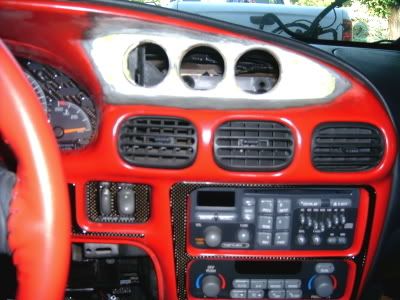
By the way the top left hand side rocker switch is like the vents it does not come out,
it is also on short wires so be carefull when removing the trim ok
there are two tabs to pull up on and the rocker switch will stay behind ....
Tilt wheel as far down as it will go and dash trim will come out.
Last edited by J_Ferguson; 12-31-2007 at 08:33 AM. Reason: By the way
Thanks, and the pictures are nice. One our our local club members let me know he removed the vents in the same way you did. His trim looks good like yours only a different color. I found out my son wants to paint his vents too. Not sure how that will turn out, plus this is not the best weather to do a painting project. He'll have plenty of prep time waiting for better weather.
Just read your edit...thanks again.
Last edited by IndeedSS; 12-31-2007 at 08:39 AM. Reason: read edit
I seen a Ride with the trim painted Red and they did the vents in White.
It looked really good by the way..
I will see if a i can find a pic of it and if i do will post it up..
I painted the vents in mine, and the only bad thing is that when they move, it removes a bit of the paint on the top. However, I keep mine all facing straight, so it doesn't matter to me.
A good sanding, a good coat of primer, and good paint.
good info guys

When I did mine, this is how I did it....
Rough up the area you want to paint and then wipe it down with Alcohol.
Tape off the vents (unless you want to paint them too)
Spray a coat of ADHESION PROMOTER This is designed to help the paint stick to plastic and not peel down the road.
By Duplicolor
Help protect against weather conditions and corrosion with Dupli-Color® Adhesion Promoter. This durable primer provides great adhesion when painting plastic, fiberglass, bumpers and aluminum trim molding.
Improve adhesion of all paints
Quick drying clear primer
Ideal for automotive plastics
Interior/exterior
Then put on your color coat very thin. You dont need full coverage, that is for the 2nd coat.
Within 5 min, apply a 2nd coat, not to thick, but you want full coverage.
If needed put on a 3rd coat of color or clear.
webracin


sand down the rough texture with 180 grit
primer 2 coats
sand with 320 or 400 grit if texture is all gone procede. if not more primer and sand as stated above.
2 coats of color
2 coats of clear
i use all automotive grade products and a spray gun here.
Zach should stop in and post pics soon.

Lee here you go


What I did was wash the dash well, making sure to remove any and all "cleaners" that were or may have been used on it. Warm soapy dish soap works wonders.
When its dry, you want to spray an adhesion promoter onto the plastic. I bought some "BULL DOG ADHESION PROMOTER" from O'Reillys and follow the instructions on the can. Then, choose what color paint you want. I used the red-ist red I could get through Krylon. My paint code of the red is: 2108 "Banner Red Gloss". I think I used about 3-4 light coats to fully cover it. Came out good IMO.
I changed my dash, and removed my DIC and made a gauge pod that holds 3 after market gauges. This is the prototype test fit:
Added primer:
all done!
I had two gauges mounted in the center storage hole, and you can see the old holes left behind in that last picture. So for the mean time I made a carbon fiber cover to hide the holes till my "new" dash is done.
Many sand the dash before paint, but I didn't, and the paint laid smooth, and stuck good. Its been on my dash since 2001, so were pushing 7 years with a rattle can paint job. So I call that pretty damn good.
I did not clear coat my dash because I did not want it to be shinny, and reflect light while driving. I consider a shinny dash a driving hazard.
Good luck and enjoy the project with what ever route you go!
~F~
Last edited by GR8racingfool; 01-01-2008 at 09:03 PM. Reason: photo edit
Wow so many different ways to achieve the same result. It's nice to know about the options and that they all work.
As a side note ~F~, that is a good point about the reflective properties of the clear coat. I would hate that myself. Drew is using a black metallic paint , which may be a little annoying even w/o clear coating.
Thanks again everyone for the help.
On a side note, I was painted mine like the Daytona editions (Silver) and it turned out nice, but I used a textured paint. If I do it again, I will not go that route again. It makes it to hard to clean. The microfiber towels stick to it like glue, and paper towels leave lint all over it. Keep it smooth and some form of semi-gloss or flat, and use Adhesion Promoter.
webracin
Thanks Chris. The advice about not using textured paint is a good one and makes sense. Drew was going for the slick look on his GTP, but I so wanted stucco dash trim in the SS.

X2 on the adhesion product from duplicolor
I did a prime then sand method then used the adhesion stuff then like 10 coats of white on my dash and center console. The only problem I have is where the lower console and main piece comes together, constant nicks. Sort of away from paint, but I also have the colored shift boot, Great set off to the other work done. Post pic soon
How do you remove the ashtray? I didn't look at it, but Drew said he couldn't figure it out.
I didnt remove the ashtray, I left it the color like the A/C control panel. Thought it would look better with it left alone
This is still the same set up only Ive added a white shift boot and a white gauge faceplate
| « Previous Thread | Next Thread » |
| Tags for this Thread |
| Bookmarks |
Bookmarks |