Thread: Cleans Official Retrofit Thread. Pictures of Work.

Page 1 of 24 12311 ... LastLast
Results 1 to 20 of 476
  1. #1 Cleans Official Retrofit Thread. Pictures of Work. 
    Banned
    Join Date
    Apr 2010
    Location
    Mansfield, Ohio
    Posts
    745
    Thanks (Received)
    0
    Likes (Received)
    0
    Dislikes (Received)
    0
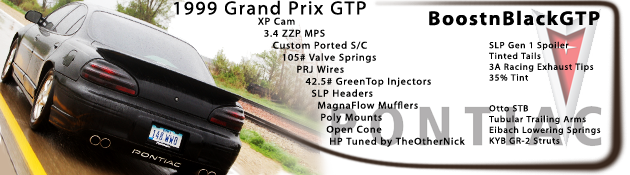
    Here's some pics for you guys with the black oem style housings installed on my car. I will get output picks maybe tonight. Looks good need to adjust the drivers capsule down just a tad but can do that via the adjuster.


    I'm definitely keeping these I'm loving the all black look,


    First time turning the all on, this is Morimoto low beam and DDM 880 HID fogs. Didn't get any shots of the bi-xenon, just got them hooked up last night. Had to switch the pins around in the wiring harness (9007 bi xenon relay harness from TRS). I can provide you the wiring if you use this harness.


    Drivers lense needs to go down just a bit, no biggy!


    DDM 880 fogs with DDM relay harness...


    Mori low beam and fogs of course, lenses need buffed haven't even cleaned them yet. They're fingerprinted like crazy!


    Bi xenon solenoid activated, cutoff shields down!

    You can wire the relay harness to work like factory where the hid fogs shut off when you click your high beams. You can also wire it to have just low beam projectors on but when you click your hi-beams the hid fogs turn on. It has pro's and con's about wiring it either way.

    I will continue to post information and answer any questions about what to get and what not to get. This is just my personal opinion, you're entitled to like what you like!!! Enjoy
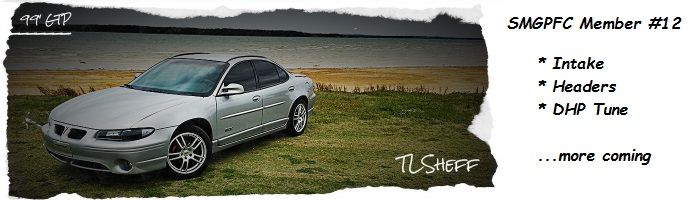
     

  2. #2 re: Cleans Official Retrofit Thread. Pictures of Work. 
    Donating Users BoostnBlackGTP's Avatar
    Join Date
    Sep 2010
    Location
    Waterloo, Iowa
    Posts
    1,251
    Thanks (Received)
    0
    Likes (Received)
    0
    Dislikes (Received)
    0
    looks AMAZING man. Have u tried them at night time or not yet?
     

  3. #3 re: Cleans Official Retrofit Thread. Pictures of Work. 
    The Blue One blueguy's Avatar
    Join Date
    Jun 2008
    Location
    Dirtyzville, Missery
    Posts
    31,287
    Thanks (Received)
    1
    Likes (Received)
    2
    Dislikes (Received)
    0
    +1 for awesome.
    Sold WBody's: '03 Blue GTP/'98 Green GTP/'98 Silver GT/'05 GXP
    '99 Chevrolet Silverado Classic Z71 4x4 - K&N Intake/Gibson Exhaust #TRUCKTHINGS
    '12 Buick Regal Turbo - ZZP CAI/20% Tint/HID's
    '89 Ford Mustang LX Notchback - LM7 5.3, 4L80, 9", HX40
    '04 Chevrolet Corvette MRM A4/LS1 - TSP LT's, 3"O/R X, AFE S2 CAI
     

  4. #4 re: Cleans Official Retrofit Thread. Pictures of Work. 
    Banned
    Join Date
    Apr 2010
    Location
    Mansfield, Ohio
    Posts
    745
    Thanks (Received)
    0
    Likes (Received)
    0
    Dislikes (Received)
    0
    Have not got the car out of the garage in like 3 weeks...

    I'm going to a basketball tourney tonight in Fostoria Ohio, I hope to get more pics on the way home. I need to bring the cutoff down just a tad on the drivers side from what I see. My adjusters work fine so getting it where I want won't be a problem. I'll try to get outside pictures also durning the day but I'm in a rush....

    Hope you guys really learn a lot from this thread. You can do it pretty cheap if you do it yourself and there's way more pro's than cons compared to ebay projectors... just sayin
     

  5. #5 re: Cleans Official Retrofit Thread. Pictures of Work. 
    Banned
    Join Date
    Dec 2009
    Location
    Sioux Falls, SD
    Posts
    737
    Thanks (Received)
    0
    Likes (Received)
    0
    Dislikes (Received)
    0


    Looks mean!! I Like!!
     

  6. #6 re: Cleans Official Retrofit Thread. Pictures of Work. 
    I live here. TLSheff's Avatar
    Join Date
    Dec 2009
    Location
    Durant, Oklahoma, United States
    Posts
    8,033
    Thanks (Received)
    0
    Likes (Received)
    0
    Dislikes (Received)
    0
    can you get a shot from further away. Always thought about these but seen a couple base shots and didn't like the appearance. Possibly can change my mind with some nice full car shots

    Look good inside and up close tho GREAT JOB!!!

    Quote Originally Posted by AmericanSoldier View Post
    ...not scanning/monitoring your motor is like bangin a hooker and you just HOPE your not infected.
     

  7. #7 re: Cleans Official Retrofit Thread. Pictures of Work. 
     

  8. #8 re: Cleans Official Retrofit Thread. Pictures of Work. 
    GrandPrix Junkie Sandman's Avatar
    Join Date
    Jan 2009
    Location
    Tallahassee, FL
    Posts
    3,538
    Thanks (Received)
    0
    Likes (Received)
    0
    Dislikes (Received)
    0
    Quote Originally Posted by Bio248 View Post
    make a write up. do it.
    this

    I'll have to do the retro this summer
    05 Saab 9-2X Linear (Saabaru)
    77 Morris Garage B
    Quote Originally Posted by TLSheff View Post
    You said "I'm done with it"... car says "Oh, really? *trollface*"
     

  9. #9 re: Cleans Official Retrofit Thread. Pictures of Work. 
    Banned
    Join Date
    Apr 2010
    Location
    Mansfield, Ohio
    Posts
    745
    Thanks (Received)
    0
    Likes (Received)
    0
    Dislikes (Received)
    0
    I will do a write up sometime here pretty soon. It's easy but still hard if you know what I mean. Frustrating when you run into a setback. I had the black housings all ready to go. When cutting the shrouds test fitting them a few times I scratched the housing. So I had to repaint the housings. Stupid little stuff happens sometimes but for the most part if you have a dremel it's not to bad.

    I just got home from driving it for the first time with the black housings. I will say chrome housings are brighter imo. Plus I have them adjusted up and it's not to my standards. I have to take the lense back off and space them more. I'll have to find 1/4in rubber spacer on the bottom 2 corners of the projector housing. That way I don't have to have the adjusters cranked all the way up. I mean they still look good and are bright but I'm actually leaning toward the 55 watt H1 kit now. Then they'd be perfect, I'm starting a chrome housed set, might paint the shrouds all gunmetal or black in chrome housings.

    Here's some pics you can see they're definitely to low, with the bi-xenon hi beams on they're bright. Low beam, they should be about 4 feet high at 25-30....


    with fogs...


    hi beams,


  10. #10 re: Cleans Official Retrofit Thread. Pictures of Work. 
    GPFs Sexy Ginger. SilvaMan61's Avatar
    Join Date
    Jan 2010
    Location
    MA
    Posts
    3,619
    Thanks (Received)
    0
    Likes (Received)
    0
    Dislikes (Received)
    0
    +1 for write up. wif pleenty of pics.
    SMGPFC Member #9
     

  11. #11 re: Cleans Official Retrofit Thread. Pictures of Work. 
    Banned
    Join Date
    Apr 2010
    Location
    Mansfield, Ohio
    Posts
    745
    Thanks (Received)
    0
    Likes (Received)
    0
    Dislikes (Received)
    0
    I will note that the way GP's headlights are the low beams will be to low if you don't space them on the bottom of the projector housings. This black housed set needs more spacing. Rubber spacers, metal washers, however you have to do it, do it. I would call this set perfect if the low beam was 4 ft high at 25 feet with adjusters not cranked up.

    Don't get me wrong they're still plenty bright, didn't get flashed by oncoming traffic 1 single time. I may throw some 55 watt ballasts in them to see the difference and take pics of the differences.

    I'm wanting to start a chrome set this week and use different shrouds. The mini gun's look good but I don't like them that much and there's a lot of cutting to make them work.
     

  12. #12 re: Cleans Official Retrofit Thread. Pictures of Work. 
    Bastard Reptile's Avatar
    Join Date
    Dec 2007
    Location
    Kansas City, MO
    Posts
    3,459
    Thanks (Received)
    0
    Likes (Received)
    2
    Dislikes (Received)
    0
    I'm gonna go as far as to say I don't think that looks good on red.....GREEN maybe.

    :hint hint:

    j/k, I love 'em
     

  13. #13 re: Cleans Official Retrofit Thread. Pictures of Work. 
    GrandPrix Junkie PurpleGuy's Avatar
    Join Date
    Aug 2010
    Location
    Never Never Land
    Posts
    4,864
    Thanks (Received)
    1
    Likes (Received)
    10
    Dislikes (Received)
    1
    sub'd for the chrome ones....thats what i would want if i did it.
    2001 Regal GS, PLOG, 3" DP, 1.9's/L76 springs. 21* of timing on a 3.4"
     

  14. #14 re: Cleans Official Retrofit Thread. Pictures of Work. 
    Banned
    Join Date
    Apr 2010
    Location
    Mansfield, Ohio
    Posts
    745
    Thanks (Received)
    0
    Likes (Received)
    0
    Dislikes (Received)
    0
    Mind you all these pics are from a 3.2 sony megapixel camera. I'm going to buy a better camera pretty soon. The quality of the photo's diminish how good it really does look. The low beams are simply to low but I can shim them up just have to take lense back off. I'm starting 2 more pair as soon as I get the housings in the mail.

    Low beam


    Low beam, notice the dark shadow in front of my car. If the light started at about that crack in the road they'd be perfect. It's still bright wasn't even really dark when I took the pics but I just got back from getting the dexcool flushed out and green coolant in so I snapped a few more shots...


    Needless to say if you want to be a wise guy by not shutting your brights off coming at me I will make you! Bi-xenon solenoid activated, I actually used this method of helping someone shut their brights off last night hahaha!


    They don't really glare I swear it's the camera

    Last edited by cleangtp; 02-17-2011 at 07:32 PM.
     

  15. #15 re: Cleans Official Retrofit Thread. Pictures of Work. 
    GXP Level Member txslow6's Avatar
    Join Date
    Oct 2010
    Location
    Texas
    Posts
    2,652
    Thanks (Received)
    0
    Likes (Received)
    0
    Dislikes (Received)
    0
    LOL I saw the firs post with the pic and I was like where the hell are they. Then I saw them in the next couple of pics and was like oh my likes!

    Nice job man looks killer
     

  16. #16 re: Cleans Official Retrofit Thread. Pictures of Work. 
    Banned
    Join Date
    Apr 2010
    Location
    Mansfield, Ohio
    Posts
    745
    Thanks (Received)
    0
    Likes (Received)
    0
    Dislikes (Received)
    0
    Gonna get a new camera my wifes cell phone takes better pics than this crap. I may just sell this retro I could've done it wayyyy better. Rushed it because I had to take the car out of town. Shouldn't have sealed them up before I aimed them. No biggy I learn more and more as I do more. GP housings pretty much suck, other cars are sooo much easier....
     

  17. #17 re: Cleans Official Retrofit Thread. Pictures of Work. 
    Banned
    Join Date
    Apr 2010
    Location
    Mansfield, Ohio
    Posts
    745
    Thanks (Received)
    0
    Likes (Received)
    0
    Dislikes (Received)
    0
    Just a little update on the latest retro I'm working on. I use to purchase the black housed oem style headlights from Zonkspeed. The headlights he sells have a very weak silicone and peeling the lenses was pretty easy.

    However I purchased these housings below from a different seller. The headlights are nicer and sealed 1000x's better which in turn makes them harder to seperate the lenses. I had to put these housings in the oven at 200* for 10 minutes. I tried to seperate the lenses with no luck. So then I stuck them in the oven at 275* for 11 more minutes. This did the trick on the first one which seperated perfectly. The second housing had already cooled to much but I eventually got it to seperate however the silicone wasn't soft enough and chunked the lip out in two spots.

    Instead of throwing these in the trash I went to Harbor Frieght and bought some filler, JB Stick. This stuff is the real deal cut off what you need from the stick, get your fingers damp, and mix it until it's a uniform color. You have about 2 minutes to get it formed to what you need, anything longer and it's hard as a rock. It takes 3-5 minutes to harden then 1 hr it's solid as steel. I sanded it to create as close to the stock edge as possible. Once the clear headlight lense is installed you won't even be able to tell. I still have to clean and paint the housings but they're still going to be very nice when they're done. Here's a few pics of what I had to work with.....

    Notice I used speaker wire to create the lip, just had to trim the edge with a sharp knife when it started to harden up, ecxcellent engineering!


    Just some of the hiccups and bs you have to go thru sometimes on retro's, finished with the lip, need to clean and paint the housings still, not sure if I'm going to leave the backs chrome or just spray the headlight to be blacked out.


    Notice here where I took out the raised chrome ring on the inside of the headlight. It's thinner on the fender side of the headlight. I need to round the edge yet but this is about as close as you can come to removing the cross beam. There may be a bit of cross still but the beams 60+ feet wide so I don't worry as much about that compared to making sure the projectors are at the proper height and rotationally correct.


  18. #18 re: Cleans Official Retrofit Thread. Pictures of Work. 
    Banned
    Join Date
    Apr 2010
    Location
    Mansfield, Ohio
    Posts
    745
    Thanks (Received)
    0
    Likes (Received)
    0
    Dislikes (Received)
    0
    Here you can see I've pretty much eliminated all of the cross beam, still haven't decided how I'm going to paint the housings. I was just going to leave them how they came until the lip cracked off in two spots. Looks like about a nickel sized spacer will keep these rotationally correct even though the projector I have in the passenger side should be in the drivers side lense.


    It's very wierd because the 9007 bi-xenon harness from TRS is made for cars with batteries on the drivers side of the car. The bi-xenon solenoid pnp wire connectors are swapped so for them to connect to the appropriate female/male connector I have to cut and solder the connectors on opposite sides of the harness. I emailed Matt at TRS to ask what's up with this..... I'll wait for his response.

    Here you see obviously this projector must go in the drivers side, like I said the bi-xenon wire connectors don't match up since the battery is on the passenger side on GP's no biggy just have to cut the connectors off and solder and heat shrink them on opposite sides.


    Don't have the lock rings very tight at all nor the headlights just trying to get an idea of height I'll work on rotation after I cut the shrouds.

    Notice here even though it's a 3.2 mp picture how awesome the cutoff color is, nice and purple. The cutoff is sharp as a knife the camera makes it fuzzy. These are also Morimoto H1 3five bulbs at 5000k, they rock DDM bulbs all day long!!!!!!


  19. #19 re: Cleans Official Retrofit Thread. Pictures of Work. 
    Donating User Swiggles's Avatar
    Join Date
    May 2009
    Location
    Quincy, Mass
    Posts
    2,226
    Thanks (Received)
    0
    Likes (Received)
    3
    Dislikes (Received)
    0
    Do you have pics of where you had to cut the headlight houseing, i know the back outer ring gets cut off but what about the top?
    No more GP 04 Impala SS Indy:
    Gen V 3.4”|FWI|N* TB lq4 MAF|1.9 Modded Rockers|F&R Plogs|ZZP 3" Catted DP|ZZP 2.5" Catback|
     

  20. #20 re: Cleans Official Retrofit Thread. Pictures of Work. 
    Banned
    Join Date
    Apr 2010
    Location
    Mansfield, Ohio
    Posts
    745
    Thanks (Received)
    0
    Likes (Received)
    0
    Dislikes (Received)
    0
    Quote Originally Posted by Swiggles View Post
    Do you have pics of where you had to cut the headlight houseing, i know the back outer ring gets cut off but what about the top?
    You do not have to cut the top of the headlight housing!
     

Page 1 of 24 12311 ... LastLast

Similar Threads

  1. The OFFICIAL GoPro thread
    By Pkorn in forum Off Topic Discussion
    Replies: 52
    Last Post: 04-23-2013, 05:32 PM
  2. the OFFICIAL t-shirt thread
    By SilvaMan61 in forum Off Topic Discussion
    Replies: 10
    Last Post: 10-12-2011, 04:10 PM
  3. Official Wallpaper Thread
    By rocafella2032 in forum Off Topic Discussion
    Replies: 8
    Last Post: 10-30-2009, 01:07 AM
Tags for this Thread

View Tag Cloud

Bookmarks
Bookmarks
Posting Permissions
  • You may not post new threads
  • You may not post replies
  • You may not post attachments
  • You may not edit your posts
  •