First off I would like to say that I got this from SupraForums.com.au and it was written by Solman, but if you plan on using this writeup you have to pay me a finders fee of at least one polished part for my car. I figure if 20 of you use this writeup, my whole engine should be showcar ready within the year.
Disclaimer: I have not tried to do this but it should be common sense that if you attempt to do this you could remove too much metal and make the part that you are attempting to polish structurally weaker and it could fail in the future if you are not careful when attempting this process.
DIY: How to polish engine parts:
This is a guide on how to polish engine parts. An intake manifold is used to show how, but this can be done on just about any metallic engine part (piping, cast aluminum, sheet metals and others)
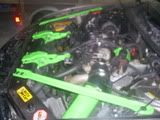
Before:

After:
Tools require and costs:
Brown Buffing soap $10 approx
White buffing soap $10 approx
Loose buffing wheel $20 approx
Stitched buffing wheel $20 approx
Bench grinder $50 - $300 depending on brand
Adapter for wheel $20 approx

Angle grinder $50 - $300 depending on brand
120grit sanding disk $15 approx

Wet and dry Sand paper:
2 x 120grit $2
2 x 240grit $2
1 x 400grit $1
1 x 800grit $1
1 x 1200grit $1
1 x 2000grit $1
Disposable gloves $7 approx this is optional just makes it easier to keep hands clean
Step 1 Tape (Optional):
Tape up intake manifold to avoid aluminum bits getting inside it while sanding. Still clean it out with degreaser once your done, this just makes it easier to clean afterwards.
Step 2 Using the angle grinder:
The manifold is a cast aluminum part so there are lots of “pores” that need removing. Other metal parts may not require this level of sanding as they are relatively smooth all ready.

Ok some people may be afraid to take an angel grinder to their engine parts, but the sanding disk that is used is fairly fine, so it should be ok as long as you don’t sit there for half an hour on one spot. Apply light even pressure and “brush” it along the part.
If your really worried skip this step, but if your sanding down cast aluminum like the intake manifold, then either your patient as hell or you will reconsider.
You want to make sure you remove all the pores!

After using the grinder you will end up with something like this:
Step 3 Manual sanding:
Ok now that the pores are removed we need to smooth out the surface. Use the same grit as the disk here (120grit) to even out the lines and unevenness left by the sanding disk.
After dry sanding, spray some degreaser and then do a wet sand which gives a better finish.

This is how it looks after the wet sand:

Continue doing the same with 240, 400, 800, 1200, and 2000 grit.
After 400 grit:

After 800 grit:
You should be able to see it becoming more reflective.
After 1200 grit:
Here you can see the difference between a wet and dry sand (top being wet)

And Finally after the 2000 grit:

Step 4 polishing (cutting stage):
Ok now that the hard part is complete all we have left is to polish the surface. The finish of your product will depend on how much effort you put into your sanding, and the smoother the sanding the better the polish.
Setup your bench grinder with the tapered tool and the stitched wheel, this wheel is a cutting wheel which “cuts” the material to give it a better finish.
Use the brown buffing soap with this wheel.

Take your time and try to work every area. Make sure you reapply more buffing soap on your wheel now and then.
This is the finish product after the cutting wheel.

Step 4 polishing (Final polish):
Ok now change the buffing wheel to the loose buffing wheel. Use the white buffing soap with this wheel to give the metal a better overall finish.
This is how it should look after this stage:
Now get out there and polish away.


 Nice find.


 hogan 3inch DP u bend delete ,180*tstat, autolite 104s, LED interior, 4" FWI, 2000watt system, bullitt rims, zzp pistons, pems, alt rewire, thrush muffs, 3.4 zzp mps, transgo shift kit, triple edge performance trans. autometer triple pod :SOON: urlosn HPT PCM tune, HEADERS, 1.9's