Ive been hearing a lil bit about this stuff and since my engines high on the mileage im thinking about doing it. Anyone do this before?

|
|


Ive been hearing a lil bit about this stuff and since my engines high on the mileage im thinking about doing it. Anyone do this before?


yes, it is very good when done correctly
Ive heard your supposed to do a 1/3 in brake booster, 1/3 in enigne oil, and 1/3 in a tank.... right? then after running it for a while go get your oil changed and your all set???
I would never put a drop in my oil, no need if you use a decent oil (basically if it isn't store brand it is a decent enough oil)

Not sure bout adding to all of that other stuff. I just put the whole can in my tank at a full tank. Seems to help.
heres a write up for anyone that wants to use it; got it from a guy off that other site
How to Seafoam your 1997-2003 Pontiac Grand Prix
By Rob (caruch6392)
Things you need to Seafoam your engine: To get the full benefit of a complete treatment you will need to following items:
• 2 cans of Seafoam
• Medium sized flat head screwdriver
• Pliers
• 1 long, skinny funnel
• Measuring cup with oz. labels
• Paper or regular cup
• Sharpie, or black marker
• Extra person to help with phase 3
Things you may consider changing after a Seafoam treatment:
• Spark Plugs
• Fuel Filter (AC Delco brand is recommend as it is the OEM brand)
Note: The ACDelco fuel filter can be found at Advance Auto Parts. Part No. GF578.
Time Frame:
The time frame to complete a 3 phase Seafoam treatment is around 30-45 minutes. This includes the 20 minutes of having your car sit to let the Seafoam soak inside your engine.
What is Seafoam?
Seafoam is 100% petroleum and is not harmful to your engine with proper use. The purpose of Seafoam is to remove the carbon build up inside your engine, intake manifold and fuel injectors due to regular driving. If you are suffering from poor mileage, sluggishness or the RPM’s surging, then these instructions may help you with these problems.
Note: Seafoam can be found at any Advanced Auto Parts store for around five dollars a can. Part No. SF16
How to Seafoam your car:
Phase 1 of 3: Fuel Injector Cleaning
Note: During phase one, when pouring the Seafoam into the gas tank, your car should be turned off.
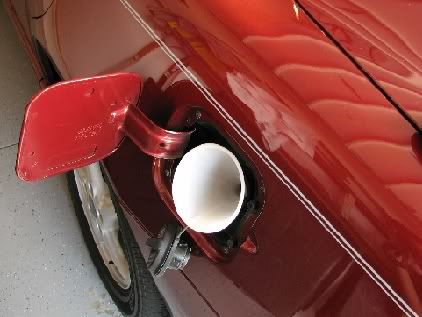
1. To start off, make sure you have a full, but not overfilled gas tank, as you will be pouring your first can of Seafoam into your gas and you do not want the concentration to be too powerful or too weak.
2. After filling up your gas tank use the long, skinny funnel and insert it into the gas tank.
Figure 1-1
3. Shake the first can of Seafoam briefly and gently, then, using the funnel, pour the entire contents of the can directly into the gas tank. (See figure 1-1)
4. After the can is empty, remove the funnel and clean up any extra drips that may have gotten on your car’s paint.
5. Now, put your gas cap back on and go for a short drive. This will let the Seafoam mix in your gas tank and slowly clean out your injectors.
Note: Because we do not want to dilute the Seafoam mixture any more, make sure you drive with this tank of gas until it gets to a pretty low level before filing up again.
Phase 2 of 3: Oil and Crankcase Cleaning
Note: During phase two, when pouring Seafoam into your crankcase, you car should be turned off and the car should be cold. We do NOT want a room temperature liquid being poured into a 200+ degree engine. This may cause some shock to valvetrain parts.
1. After your car is completely cooled off we are now ready to begin pouring a measured amount of Seafoam into your oil.
2. The measurement for the amount of Seafoam per quart of oil is 1.5 ounces per quart. Since Grand Prix’s take 4.5 quarts, we do some math and do (1.5) x (4.5) = 6.75 ounces of Seafoam that you will be pouring into the oil.
3. A can of Seafoam is 16 ounces so we will pour a little less than half of your second can of Seafoam into the oil.
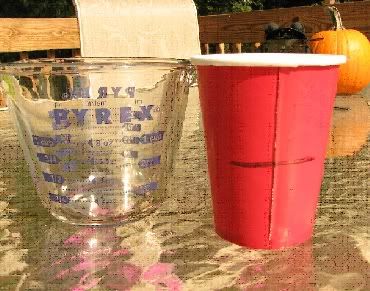
4. To get the correct amount, take your measuring cup and fill it with regular water up to the line of approximately 6.75 to 7 ounces. You don’t have to be perfect but try and get it around 7.
5. Then transfer this water from the measuring cup into your paper or regular cup.
Figure 1-2
6. Using your black marker, make a line on the outside of the cup where the water line is currently at. This marks exactly how much Seafoam you will pour into this cup in the next few steps. (See figure 1-2)
7. Now that you have the measured amount marked off, empty the cup of water and make sure the cup is dry.
8. Using your second can of Seafoam pour it into the cup up to the marked line.
Figure 1-3
9. Once that is done, open up the oil filler cap and slowly pour all the measured Seafoam into the crankcase. You can use the funnel if necessary. (See figure 1-3)
10. Put the oil filler cap back on.
11. Do not drive your car for more than 250 miles with this Seafoam solution now in your crankcase. It is safe but very aggressive. It is recommended that you change your oil and oil filter after 100 miles.
Note: Do not drive your car for more than 250 miles with the Seafoam in your crankcase. The solution is safe but very aggressive. It is recommended that you change your oil and oil filter after 100 miles.
Phase 3 of 3: Top End Clean
Note: During this phase your car needs to be running long enough to enter a closed loop. Go for a short ride so that you car warms up to normal operating temperature which is around 180 or so degrees.
Note: During this phase there may be heavy white smoke that will come out of the exhaust. Be sure you are in a WELL VENTILATED area
1. By now there will be approximately half a can of Seafoam left. This will be used for phase three.
2. For people with the L67 engine you will use the connection in figure 1-4. It is a different vacuum line to suck the Seafoam in, so you don’t strip your supercharger rotors. (Thanks to Jason who supplied the supercharger picture)
Figure 1-4
Note: For people with the L36 or naturally aspirated engine, ignore step 2 and continue on to step 3.
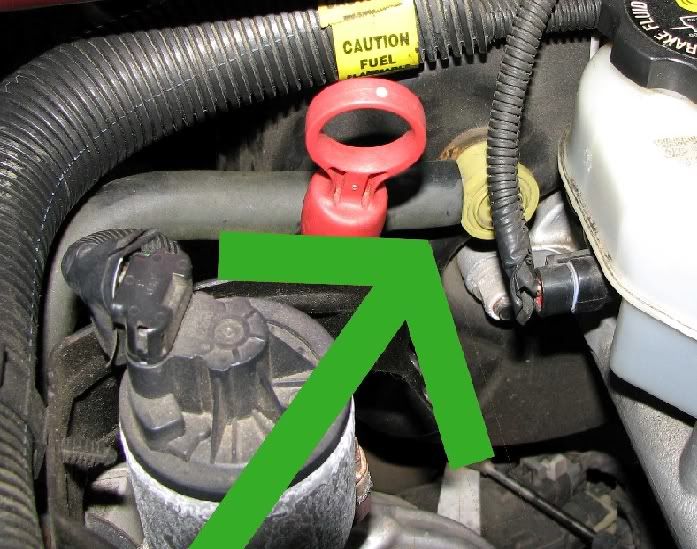
3. In order to get the Seafoam to interact with all the cylinders we need a vacuum line that goes to all cylinders. This is the brake booster line. It is the hose attached to the yellow “cap” looking piece.
Figure 1-5
4. The brake booster line is highlighted by the green arrow and needs to be pulled off. (See Figure 1-5)
Note: The brake booster line may be difficult to pull off. You may use some force to pull it off. If this fails then use a flat head screwdriver or pliers and pry the line off of the connection.
5. After the brake booster line is off, insert the long, skinny funnel into the brake booster line. Making sure it snugly fits inside the booster line.
Note: During the next step it will be hard to start the car. Keep the ignition cranking until the car starts. When it does start it may stall as we now have an enormous vacuum leak and the engine cannot stabilize itself. If it does stall, start it up again and keep it alive by holding the engine at around 2000rpm – 2300rpm. If it does not stall then simply keep the engine at a steady 2000rpm -2300 rpm.
Note: This next step is where thick, white smoke may occur.
6. Have your extra person or friend get in the car and start the car.
7. Slowly pour in most of the remaining Seafoam down the funnel.
Note: This will make the engine unstable again, and it may begin to sputter. Be sure to keep the engine at 2000-2300rpm’s.
Note: The next step we are attempting to stall the engine by flooding it with Seafoam. This will leave the Seafoam to sit in the cylinder banks and eat away at the carbon If it does not stall right away after dumping the rest of the contents of Seafoam immediately turn off the car and finish pouring the Seafoam until it’s finished..
8. When you have an ounce or two of Seafoam left, quickly dump the entire contents of the can down the funnel and have your friend take their foot off of the throttle and quickly turn off the car.
9. Remove the funnel from the brake booster line
10. Re-connect the brake booster line by pushing it back onto the connection from which you pulled it off.
11. Let the car sit for a minimum of 10 minutes. It is recommended to let the car sit for 20 minutes.
Note: For the next step it will be difficult to start the car. The engine is currently soaked with Seafoam and may take a bit of cranking to finally have the engine turn over. If you have trouble when starting the car, give the car a little extra fuel by pushing the throttle a few times.
12. After the car has been sitting, attempt to start up the car.
13. Once the car turns over, it may want to stall again. Let the car struggle but keep it alive when necessary.
14. Let the car idle for about 10-15 seconds.
Note: This next step is where thick, white smoke may occur. Be sure to be in a well ventilated area. If there is no smoke while you are driving, continue to drive aggressively to still flush out the Seafoam.
15. Take the car out for a spirited drive. Be sure to reach all areas of the rpm range. Make sure to go 100% throttle a few times to flush Seafoam out of the engine. Continue to drive aggressively until the smoke (if any) decreases dramatically.
16. Congratulations! Your car is now mostly carbon free. You should notice a smoother idle and less surging and better overall responsiveness.
17. Do not forget to change the oil and oil filter after 100 miles.

If you want a true internal engine cleaner do a search for a product called Auto-RX. I swear by this stuff and I have used it many times for my vehicles and customers.
My latest success story with it was a co-worker of mine whose wife has a Lexus car. It developed a rear main seal leak. He took it to Lexus for an estimate and they were going to charge him in the area of $1500 to replace the rear main seal.
So I told him that if the seal was not torn and was just leaking due to build up then to try a bottle of Auto-RX and see what it would do. So he bought a bottle from me. He said that at the time he poured in the bottle the leak would drip an oil spot on his driveway about the size of two half dollar coins.
Not a week later he came to me and said the leak had stopped and it has not returned since. It is by far, in my opinion, the best product out there for restoring an engine internally. It works in engines, power steering systems, transmissions, differentials, etc. I have seen it have DRAMATIC results on varnish and sludge build up. It is worth EVERY penny it costs and I usually keep three or so bottles on hand or more if I can for myself and customers.
kool thanks for the write up and all the help!
Originally Posted by SyntheticShield

huh whre can you get this stuff at?? I like seafoam also thanks for the write up
If you google Auto-RX you'll come up with the site. I dont want to post the link here and be in violation of the rules. Would look bad for an Admin.
I will also add this. That when I bought the GP I ran an Auto-RX treatment through it as well. And the oil analysis after the full treatment produced the lowest Oxidation and Nitration numbers ever on that car, single digit readings in fact. And for the sake of simplicity, what all that means is that Auto-RX did a fantastic job at cleaning everything out.
The 3800 is not a problematic engine when it comes to oil (i.e. not a sludge monster and not particularly rough on oil) but even so, there is always stuff that can be cleaned out and seals revitalized.
Once you find their site they have a few examples of the results that product can have. If you have trouble finding it, email me and I'll see what I can do.
ok cool thanks....
So would you apply this Auto-RX the same why you do seafoam? Does it have the same "smoking" effects???
No, Auto-RX is a longer term treatment. Its completely safe, and a much more environmentally safe product, though that seams like a counter productive point to make since you'll be pouring it and draining it with your motor oil, LOL.
Basically you change your oil, using a regular non-synthetic motor oil and a new filter. Pour a bottle of Auto-RX in and then the motor oil. Drive it for 3,000 miles, then drain out the oil, change the filter and put in another round of non-synthetic motor oil. Drive that for 3000 miles then drain it all out again, change the filter and then you can run/use whatever oil you want from there.
My Isuzu Rodeo I bought, Ive got it in the engine, transmission and differential. I just recently got a couple more bottles to use in the wifes Cherokee and in the power steering of the Rodeo. Im just about done with the clean cycle and will drain it out and run the rinse cycle oil.
It is by far much more effective if you can get the vehicle on the highway and drive it for a while so that everything gets up to temperature for 10 - 15 minutes or so if not longer. I drive 36 miles one way to work so this is really easy for me to do. The longer and more often you can get things up to temperature, the better.
Auto-RX does not smoke like Seafoam. So you wont be scaring your neighbors.

But how does it clean the carbon buildup in the intake? That's why seafoam smokes so much is it's in the intake then into the combustion chamber. If you only pour it in the crank case, then it will only go where oil goes....
Just a thought. Seems each cleaner has its uses.
That I would agree with. But for what its worth, carbon build up is not all that easy and simple to get out. Yes, Seafoam would probably help, but where most of the carbon is going to be if not all of it is in the combustion chamber and for that you can run a good quality fuel injector, water/methanol injection (i.e. steam clean) or get it out on the highway from time to time and get it hot enough long enough to burn the stuff out of there.
But you are correct in that the two products work on two different areas of the engine.

I've got an issue with figure 1-4. That is the same vacuum source as the brake booster, just a different T out of it. Both will lead the seafoam through your s/c rotors. The only vacuum line that won't is the one under the s/c snout mounted in the lower intake manifold.

Exactly.
so i seafoamed it. it went pretty well. Besides my friends neighbors wondering if there was a fire or somthingBut yea i can def tell a difference that she runs better when idle. also, about figure 1-4, just follow the middle line on the S/C towards the firewall untill u see a picture like 1-5 then pull it out of the firewall and do it from that side. I was kinda confused about that picture on the WU too...
glad it worked out for ya. I have never used it through a vac line only in the oil and gas...looks like it may be time to give it a try.
That's just the brake booster line. It defeats the purpose of what figure 1-4 exists for (to find a line that doesn't run seafoam through your rotors).
The only line that does is the one under your snout in the lower intake. It's the same one that runs to the FPR, boost solenoid, and map sensor. I guess you could disconnect the map sensor temporarily for the seafoaming, but that's a small vacuum line to attempt it through.
I've still got a can of seafoam just sitting here. I guess I should use it, but I don't feel like buying plugs and installing new ones yet.
 )
)
| « Previous Thread | Next Thread » |
| Tags for this Thread |
| Bookmarks |
Bookmarks |