Thread: So you want to make your own coilovers? DIY How To

Page 1 of 3 123 LastLast
Results 1 to 20 of 57
  1. #1 So you want to make your own coilovers? DIY How To 
    GrandPrix Junkie PurpleGuy's Avatar
    Join Date
    Aug 2010
    Location
    Never Never Land
    Posts
    4,864
    Thanks (Received)
    1
    Likes (Received)
    10
    Dislikes (Received)
    1
    First we'll get this out of the way. I'm not responsible if you screw something up, damage something, injure yourself/somebody else or anything of that sort.

    I'm going to make a list of part numbers and such needed for this. I'll also go over what parts do what, since not everyone knows what specific pieces do, or are for. There's little things I'll go over that someone might not think of. I'm also going to cover a couple slight differences in front struts with this whole GR2/Excel G mess. When I can get some pics of assembly and what not, I will. I don't have much at the moment, but I need to dissassemble mine and put bump stops in, so at that time I'll show the assembly of them.


    This is for 97-03 and 06+ cars. If you have an 04/05 you need to swap out your LCA's and sway bar for the 97-03/06+ versions.

    One thing i'm not going to cover is front mounts. I don't know how, and I can't weld. I bought my front mounts already modified from "91PARKAVE" on here.
    I'm also not going to get into setting up these cars for autocross using the correct spring rates, ride height, etc. This thread is simply how to make them, and slam the **** out of the car.

    Spring rates will depend on how low you want. But 400# up front and 350# out back should be stiff enough for most people. After I get my bumpstops in, i'm winding the front coils all the way down so we'll see how it is. I went with QA1 since they're a well known brand and are reputable. But if you want to go with another brand they should work. QA1's aren't that expensive so that's what I chose.

    Parts list

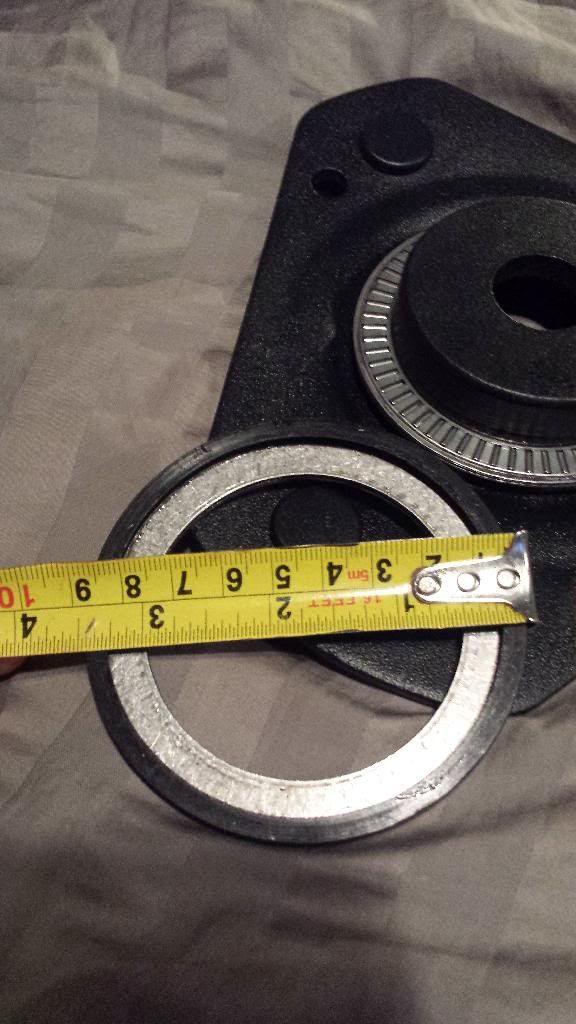
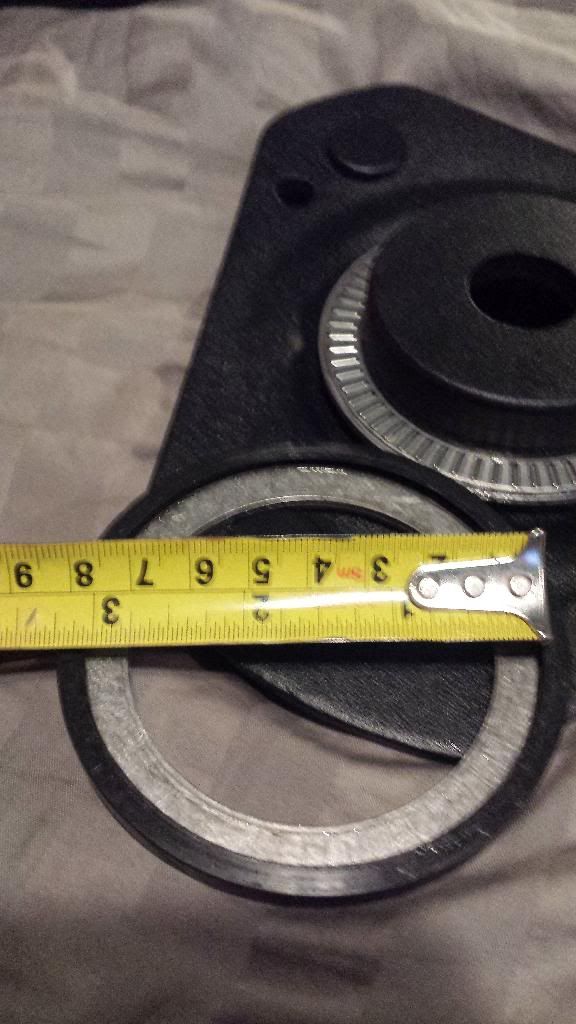
    For the front this is what you're going to need, depending on the mount style. This is the style of mount I have.

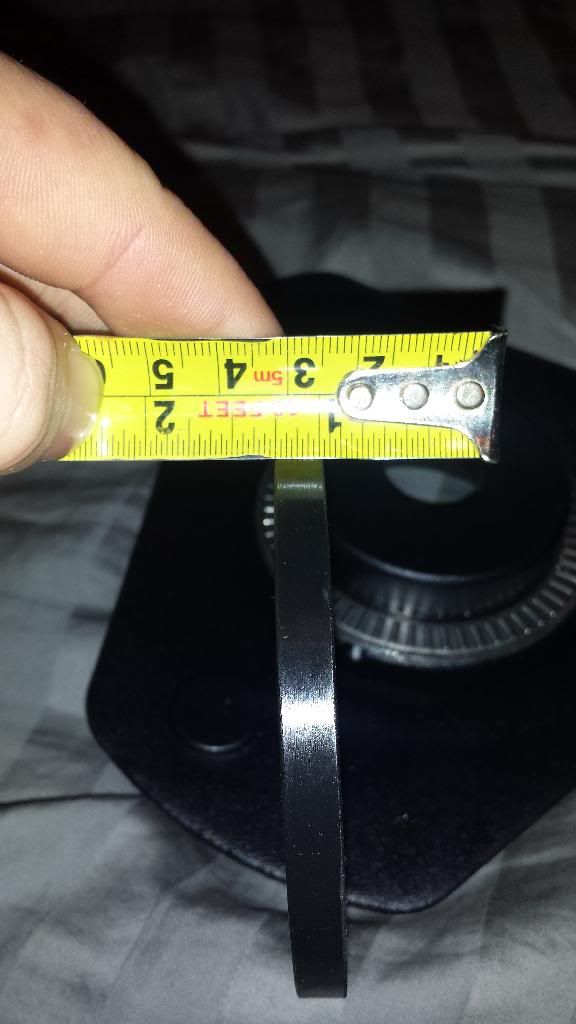
    On the bottom side of the mount, the "ring" that comes down is just small enough that a 2.5" ID spring will fit over it.

    So for the front using that style mount here's what you need.
    Springs (2): http://www.summitracing.com/parts/hal-12-400/overview/ These are the 400# springs. If you're really attempting to slam the hell out of the car you might want to go higher. But I don't have any complaints with my 400# springs.

    Sleeves (2): http://shop.a1racing.com/cok12452-h.aspx Slides over the shock body and is what the adjuster nut sits on.

    Adjuster Nuts (2): http://shop.a1racing.com/cok12460.aspx This piece is threaded and threads onto the sleeve. By turning the adjuster nut you move it up or down on the sleeve which lowers or raises the car.

    Bearings (1): http://www.summitracing.com/parts/ha...-109/overview/ They come as a kit. So one order is enough to do both of the fronts. That's all you need. Lube these up pretty good. I used white lithium grease. Haven't had any problems with it. You need these bearings on the front to help keep the steering from binding up. You can run them on the back if you want it to be easier to turn the adjuster nut, but I haven't worried about it.

    Bushings(1): http://www.summitracing.com/parts/ens-9-8106r/overview/ These bushings will be needed for going under and over the mounts to avoid metal on metal contact with the strut rod. The hole is a tad bit too small at .375". I used a drill bit and a pair of vise grips to hold the bushings and enlarge the hole till it fit on the strut rod. The box comes with 8 but you only need 4. So if you screw one up you've got extras which is good news.

    More Bushings (1): http://www.summitracing.com/parts/ens-3-6110r/overview/ These are sold as a pair. You only need one for each front assembly. So one pair is enough. You need these to avoid metal on metal contact of the spring and mount. They'll need modified a little bit and i'll show how they need to be for this particular mount style. You'll also see why this mount style isn't the best, but works.

    Aside from the items listed above you're also going to need your choice of struts. I used KYB GR2's/Excel G's. You'll need a few washers to fit over the smaller part of the strut rod. These are for the bushings. You will also need some grease for the bearings as said before. I also chose to run covers on the fronts to avoid getting dirt/sand etc in the bearings.

    These are the covers I run: http://www.summitracing.com/parts/is...0652/overview/ I don't have any complaints other than they're too long. The 14" version might work a little better. Mine are the 16" version. Whichever length you get, be sure that the diamater is 3.5". The 5" diamater will be too big.

    So now that you've got your parts, the fun starts. Modifying the struts. It's a bit nerve racking, especially if you use brand new struts like I did. But take your time, and it'll be okay. Don't be a dummy. Where so some safety glasses. Getting **** in your eyes hurts. Gloves wouldn't be a bad idea either.

    I'll go over modifying the bushings first. In this pic you can see how they come in the package.


    You'll need to cut off this piece here.


    And you'll end up with something like this. This shows why this isn't the best mount setup. It leaves part of the metal exposed which allows contact between the mount and spring. I can't say i've had any problems with it though. You can also see the part that was cut off sitting on the bench.


    And this just shows that the spring on the mount.


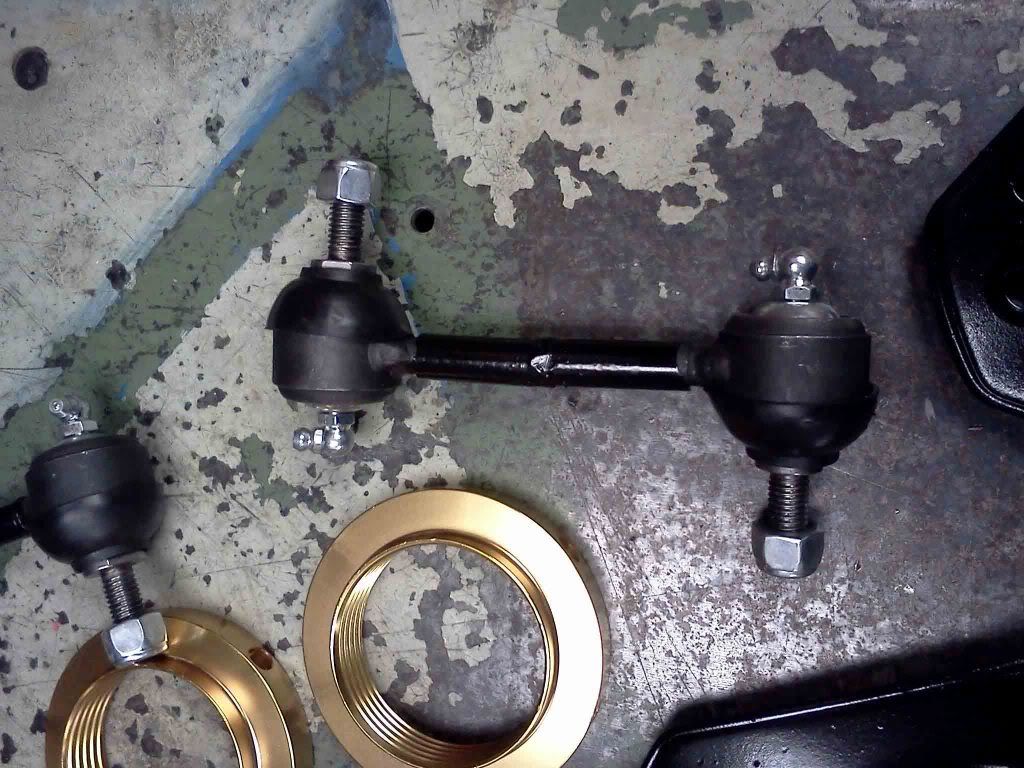
    Okay so you've modified your bushings for the springs. Now do the the smaller bushings so that they'll fit over the strut rod. This pic shows where the bushings need to be. The fronts are the black and the rear are the silver. This is obviously after I modified them.


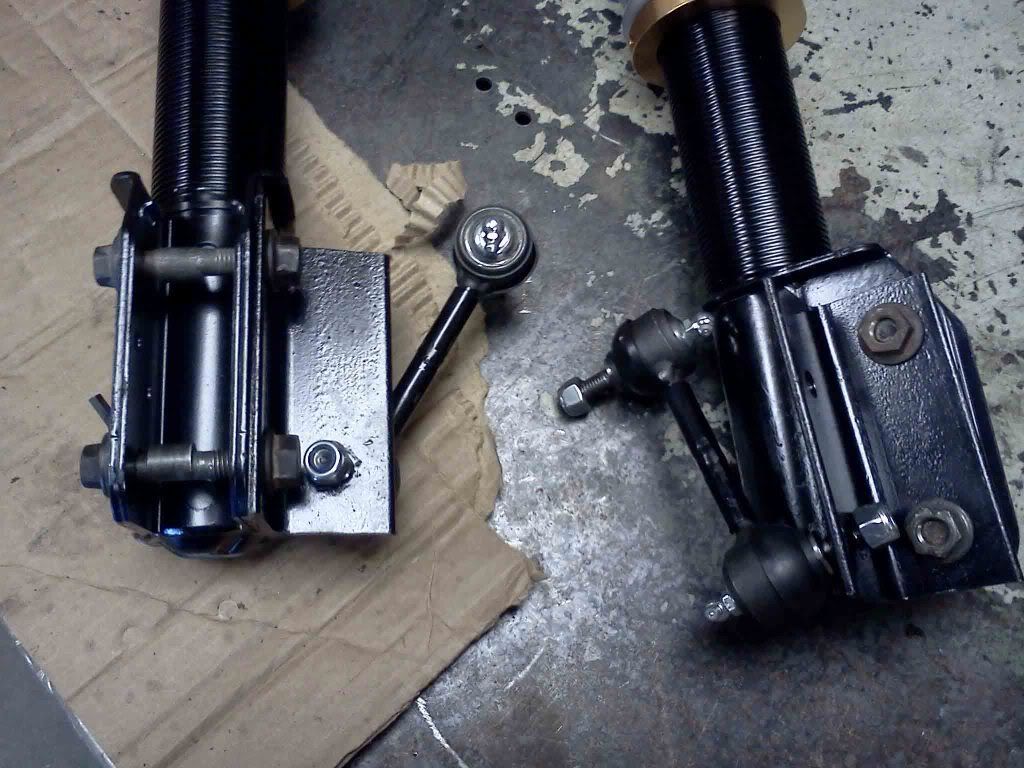
    Some of you might have noticed the black struts are different. If you didn't...look now cause you might run into this. The one on the right had a cap over it, for the dust boot from what Cam has told me. The one on the left did not have this cap and had a collar instead.

    Here's what they look like before modification.


    Here's what I discovered from doing some research when I ran into this issue myself. This is copied and pasted out of my ride thread, me talking about the one with the dust boot.

    " I got on goggle and typed in the model number hoping to find a pic of a silver GR2. I didn't look very hard but all I found was the black Excel G. But the pics I was looking at I noticed 3 things. The first is that the piece that I have is not on the pics I found. There was just simply a metal plate. The second thing I noticed is that all of these ones with the plate, were also painted flat black , opposed to my gloss black. The third thing I noticed is that they have a different sticker, in a different location. But I didn't think much assuming it was a generic pic for all their struts"

    After typing that out I checked the other box out of curiousity and saw I had a slightly different designed strut. Basically all you need to know about this mixup is that: If you get a strut with the dust boot cap thing. You can simply wedge a screwdriver and carefully pry it off. If you get one that doesn't have the cap, and has the collar instead, you have to grind it down till the sleeve fits over it.

    This just shows me popping the cap off.


    So do whatever you need to do with your struts wether it be remove the cap or grind down the collar. Once you get that done
    you need to remove the factory spring perches so your coilover sleeves will slide over the strut body.


    You can use this method here:
    http://www.grandprixforums.net/showthread.php?t=26559

    I personally don't like doing it that way. It's time consuming, and even after cutting off all those little pieces you still have to grind down the weld.
    What I did was use an angle grinder with a small disc. I don't know the size right off hand. But I cut the weld all the way around and pulled the perches off in one big piece. Much faster, much easier in my opinion. But the way shown in that link works fine. Do whatever you're comfortable with.

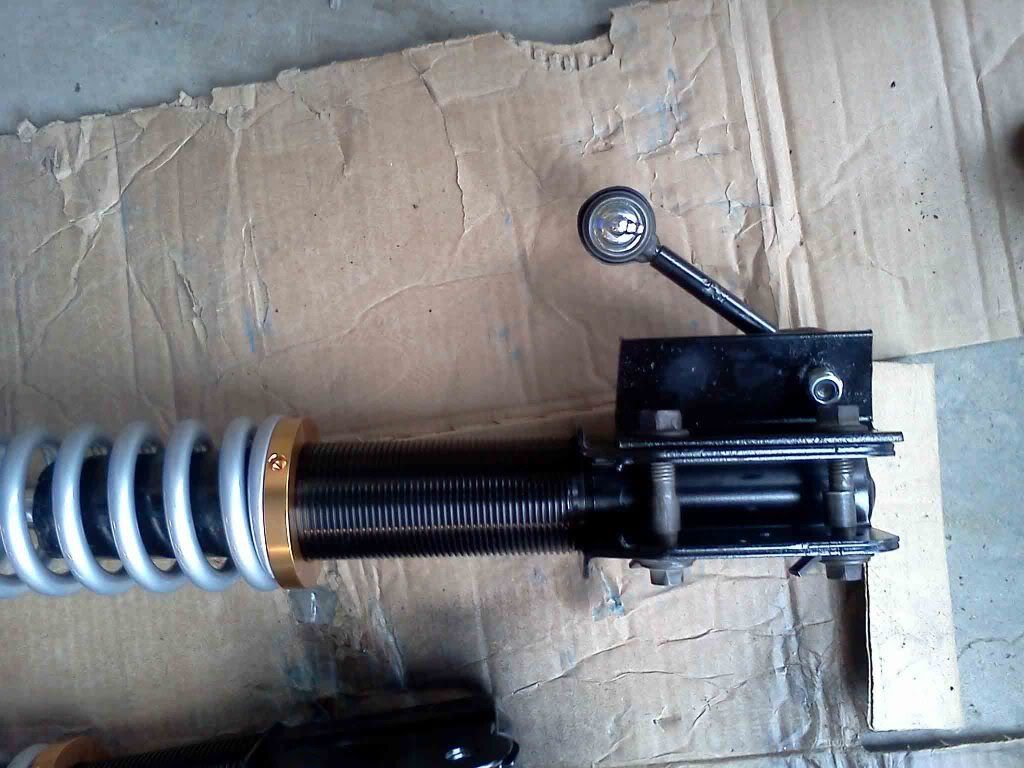
    But first you need a way to mount it. Here's what I did. I took a 2X6 and slid it in where the spindle would normally be. Had to tap it in with a hammer. After that was on, I drilled a hole thorugh, and put a bolt/nut to secure the strut to the board. This holds the strut pretty well and keeps things from getting cray cray. Allows you turn the strut every which way you need in order to grind or whatever. In short, it works great. You can use this mount setup for all 4 struts which is also nice.

    Here's a couple pix showing this little mounting setup.


    Okay...so back to getting rid of the spring perches. Here's me doing it the way shown in that link, and all the little pieces.


    Both of the rears I did that way. Then did the fronts the other way I said. I should've done all 4 the other way. MUCH easier and MUCH less time consuming. 100% recommend doing it this way.


    Okay. Sooo. After you get your spring perches cut off you'll have something like this. This is a rear but you get the idea.


    Test fit your sleeves and make sure they will slide all the way down. If the sleeves get caught up on the weld or whatever, take care of it. The only reason a front wouldn't slide down is if you have part of the weld left. The 2.17" sleeve is MORE than big enough to fit over a GR2. Once again this is a rear but you get the idea.


    After you get the perches and welds taken care of you need to paint them to keep them from rusting. I used black on all of them. No real reason. It's what I had laying around. I used an enamel since that tends to be tougher. But here's a pic of them all painted up. You can also see the washers in this pic. The mount goes inbetween the bushings.


    So you've got everything all good and modified. Your sleeves fit. Great. Time to assemble.

    Start with your sleeve and adjuster nut. I'd wind it down about half way to start with. That's around stock height..probably a little lower.
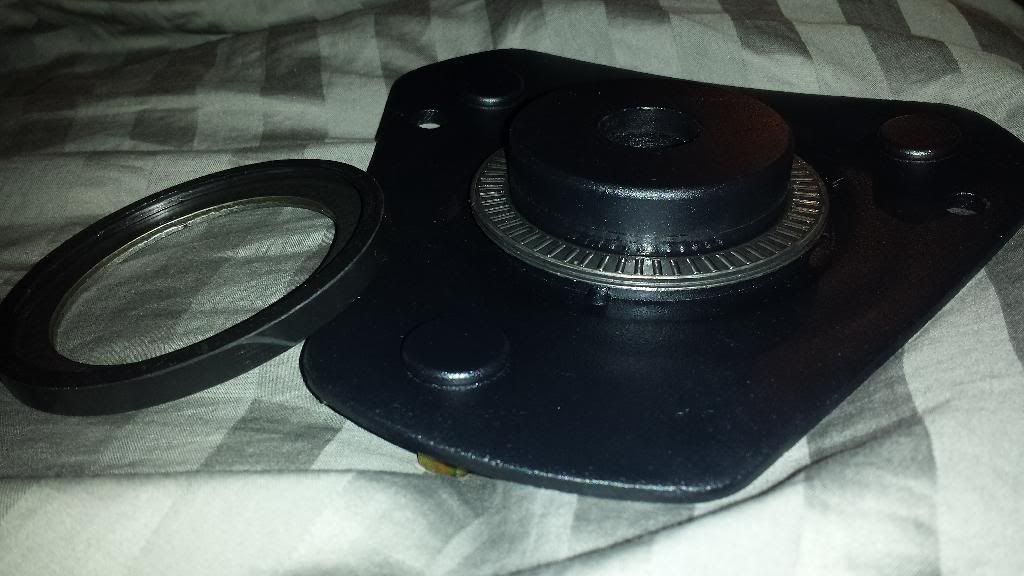
    Put your bearing on the adjuster nut, being sure to lube it up first.
    Now slide a couple of washers over the strut rod and then a bushing.
    Put your spring on the bearing. Your spring isoaltor/bushing should already be on the mount. Go ahead and put that on. The strut rod should come up through the mount.
    Put a bushing and a couple more washers on the top side.
    Finally put on the nut. I ran mine down pretty good. Probably more than needed. You should now have something like this.


    Now. What I didn't show you was a bump stop since I don't have any yet. I'm going to try something like this for a bumpstop. Not necessarily that particular one but something like it. Also without the washers and bolt/nut of course.
    http://www.oreillyauto.com/site/c/de...2267&ppt=C0367


    Rears. The rears don't need a custom mount. We'll be using a regular mount. You can buy new ones or reuse your old ones, doesn't matter. If you're old ones are crappy, get some new ones.

    Sleeves. When I ordered sleeves I ordered a 6.5"X2.1". These here: http://shop.a1racing.com/cok12457-tk.aspx. Don't do that. You don't need a sleeve that long. My car is fairly low and I have close to 2.5" of thread left underneath. That leaves plenty on the other side. The length isn't much of a problem. The problem with these is the ID is too small. They're raised on the inside and do NOT fit over the strut body. Do NOT fit. Do NOT buy them. One more time. DO NOT BUY THEM. Don't ****in do it. You'll thank me later, unless you want your car to be stock height or higher after the coilover install, cause even then your adjuster nuts will still be a good way down the 6.5" sleeve and you're going to have to do some work to make them fit. I'll post these couple pics to show why you don't want them that way you can understand what i'm talking about.

    This is the raised part on the inside that doesn't fit over the strut.


    Since I wasn't aware of this I bought these stupid sleeves...and this happened. Picked up a cylinder hone from Harbor Freight and had to hone out these sleeves which took FOR-EV-ER. (That's my buddy Rus honing out the sleeves)


    So instead of going through the hassle, buy these sleeves instead, the same ones we used on the front.

    Remember we're using a stock mount. So you're going to need a top hat for the rear.
    These are the mounts I went with.

    Right side (1): http://www.amazon.com/gp/product/B00...?ie=UTF8&psc=1

    Left side (1): http://www.amazon.com/gp/product/B00...?ie=UTF8&psc=1

    Top Hats (2): http://shop.a1racing.com/cok12470.aspx

    Sleeves (2): http://shop.a1racing.com/cok12452-h.aspx

    Adjuster Nuts (2): http://shop.a1racing.com/cok12460.aspx

    Springs (2): http://www.summitracing.com/parts/hal-12-350/overview/

    That's it for parts other than the struts and sway bar link setup. I'll get into that in a bit. I used GR2's here again. Currently i'm not running a rear sway bar since I don't care for cutting up the stock links and shortening them. I'm trying to find a link off a different car that's appropriate in length. Another option is heim joints but that will run you close to a hundred bucks, which is more than i'm willing to spend for a sway bar link setup.

    Ok. So. We're going to say you already have the spring perches and sway bar link brackets cutoff. You've already got them painted up etc. We're going to say you're ready for assembly.

    Start off the same way you do with the fronts, putting the sleeves and adjuster nuts on the body.
    Then put the spring on, and the top hat on top of that.
    Put your mount on and the strut rod should come up through once again. There will be a little sleeve that slides down inside the mount if you have a Monroe mount like I linked up there.
    Then just put the washer on that's supplied with the mount.
    Tighten down the nut and you're good.

    Here's what you should have.


    For the sway bar. Every setup i've seen is simply a piece of angle iron attached where the strut does, and then a hole drilled in it for a sway bar link to bolt onto. Easy and simple. These following three pics are from R.S. Hutchinson on ClubGP.


    I plan on running something like that but finding a link I don't have to cut up.

    That covers most of the stuff you'll need to know about making some coilovers. I'll go back later and add in how to put them on the car if someone would like.

    Enjoy the read. Hopefully it helps someone out. If I mispelled some stuff or missed some punctuation here and there...get over it.
    Last edited by PurpleGuy; 12-25-2013 at 09:18 PM.
    2001 Regal GS, PLOG, 3" DP, 1.9's/L76 springs. 21* of timing on a 3.4"
    Reply With Quote  
     

  2. #2 Re: So you want to make your own coilovers? 
    GrandPrix Junkie PurpleGuy's Avatar
    Join Date
    Aug 2010
    Location
    Never Never Land
    Posts
    4,864
    Thanks (Received)
    1
    Likes (Received)
    10
    Dislikes (Received)
    1
    Okay. I said I wasn't going to cover mounts, but 91parkave has some info on mounts i'll post if he doesn't mind. But in the meantime i'll post some stuff from R.S. Hutchinson on ClubGP.

    This is copied and pasted from his coilover thread. I don't take any credit for this. All credit goes to him.

    "First, take your mounts, pour a little gas (not a lot) on both sides of them and then light them up. It will take about 10 minutes to burn all the rubber off, I flip them half way through or so like a hamburger :P. Do this in a burn barrel or pit or something. Once the rubber is off it will turn to a chalk like substance, it won't be like a goo that sticks to everything, easy to clean up. Once that is done, depending on the mount manufacturer, there may be just one metal collar, or there may be a metal collar and another metal pipe inside.

    You'll be left with 1 of 3 types of mounts:

    - a perfect 2" round hole - best, the spring bushing fits right over this
    - a perfect 2.5" round hole w/ a lip- still good, spring bushing requires some minor cutting and you need to grind the lip on the mount down
    - a punched through 2" round hole - requires welding a small piece of 2" OD exhaust pipe on. "


    That first one. The perfect 2" round hole. That one i've been told is a Mevotech mount. So someone making their own mounts would be best off starting with that one because that would allow the bushing between the spring and mount to not be modified. You would simply slide the bushing on, opposed to cutting part of it off like I had to.

    These pics are also R.S. Hutchinson's.

    This shows the style of mount I have, the 2.5" with the lip. This one requires cutting part of the bushing off in order for the spring to sit all the way on the mount.


    This is a better donor for a mount-the Mevotech with the 2" hole.


    And here's why it's the better option.


    So I got my bumpstops put in, and also assembly pics, as well as how to remove and install these incase anyone doesn't know how.

    I'll go over removal and installation first. This is the way I prefer to do it. You may like to do it a little bit different.
    Obviously you need to get the car up in the air first. Use jack stands to support the car. Don't be a dummy.

    Start by removing your wheel and putting it off to the side. (5) 19mm


    Then I loosen up the top mount nuts. Just loosen, not remove. I leave them in just a tad so that when the lower bolts are removed the strut doesn't drop., but you still have some play to move it around. (3) 15mm nuts


    Loose but still on


    Then I start removing the lower bolts. What I do is loosen both nuts up but leave them on just barely. I do this to avoid mushrooming the end of the bolts when smacking them out with a hammer. A 13/16" is what I use for this as it's the only socket I have long enough at home. My good sockets are at work LOL

    Nuts left at the end of the bolts


    Blurry pic but shows hitting with the hammer to get them out.


    Smack them until the nuts hit the mounting flange of the strut. Then I pull the top nut off and give it one SOLID whack and it'll fly out and hit the inner fender. I dont have a pic of this, but after I get the top one out I stick a 6" 3/8" extension back in the hole to keep it from dropping and wedging the lower bolt in the hole when trying to remove it. Same thing for the bottom one. Pull off the nut and give it a good whack. This one most likely won't fly out as it will still get partially wedged in there even with the extention in the upper hole. Wiggled the extension and the bolt around and you'll get it out. Pull the extention back out one you get the bolt out.

    Once you get the lower bolts out go back up to the top mount nuts. Remember we left those loose. This is nice because you have some play to move the strut around if you need to. I'ts not really an issue with the coilovers since they're much smaller but regular struts you might need the room. While holding the strut up finsihing removing the upper nuts, being careful not to drop the strut. It hurts. Trust me. I lost a fingernail LOL Wiggle it out and you're done with removal.

    Now for the rear. I remove the nuts completely from the top mounts since you can't reach them from outside the car. I remove them completely and then do the lower bolts, attempting to not drop the strut. This is where I did drop the strut and smash my finger LOL. That's why I do the front the way I do, to avoid that LOL. You'll also have to unbolt the sway bar for the rears.

    When reinstalling the front I get it somewhat in place and shove the studs up through the strut tower and start all three nuts. Then I slide the strut onto the spindle and slide the bolts in and give em a couple good whack to get them seated. These bolts are knurled meaning they have splines on them to keep them from spinning. So all you need to do is smack them in until the knurls grab and then you can stick the nut on and tighten it up with the impact and it will pull the bolt all the way through to where it needs to be. Before tightening the bottom bolts I do the top nuts first. Just a preference, do it however you want.

    So shove the studs up through and start the nuts. Don't have a pic but you can use the pick up top where I loosened the nuts for reference.
    Then the lower bolts slid in partially after a couple hammer whacks.


    I had pics here but I hit the 25 pic limit and took these out to make room for others.
    Then I tighten up the upper nuts.

    Then I tighten the lower ones. Same pic from up top where I loosened the nuts can be referenced here.

    Make sure everything is good and put the wheel back on. Once again same pic I posted futher up.

    Okay...that was a quick and dirty how to remove and install the struts/coilovers but that's all you really need right there.


    Now i'll go over putting in the bump stops and assembly of the coilovers. We're going to assume you're assembling these for the first time and everything is off the car.

    Here's what I used for a bump stop, an expansion plug. http://www.oreillyauto.com/site/c/de...&keyword=02607

    I took the washers and bolt/nut off. Keep em, throw em away. Doesn't matter. We don't need them for this but you might find them handy for a different project.


    Then enlarged the hole using a 7/8" bit. I don't have a pic of this, but a 7/8" hole is about perfect. It fits on the strut rod but it's not loose. It's tight and will stay in place.

    So here we have our bare modified strut.


    Slide on the sleeve and adjuster nut. Your bearing goes right on the adjuster nut.


    Then slide on the spring. I missed a pic of this????? Pretty self explanatory though. Just slide the spring over the strut till it hits the bearing/adjuster nut.

    Now our homeade bump stop can go on.


    Then a couple of washers.


    Then a bushing.


    Then the top hat. Notice the bushing for the spring is already on there. If you're isn't, put it on.


    Put a bushing on.


    Then a couple more washers.


    Then tigthen up the nut.


    Easy right? Like building with Legos. I don't have rear assembly pics yet since I didn't put bump stops in the rear yet.

    Now some of you might've noticed my covers weren't very nicely placed on there. They got slid around and screwed up from me pulling the coilovers out. So here's how I did my covers, and why I recomend not geting the 16" version.

    The bottom is pretty easy. Just velcro it and zip tie it to keep the velcro from coming apart.


    Since they're too long I fold over the top, velcro it, and again, zip ties to keep it from seperating.


    And on the car...kind of a bad pic.
    Last edited by PurpleGuy; 01-07-2014 at 01:48 PM.
    2001 Regal GS, PLOG, 3" DP, 1.9's/L76 springs. 21* of timing on a 3.4"
    Reply With Quote  
     

  3. #3 Re: So you want to make your own coilovers? 
    GrandPrix Junkie PurpleGuy's Avatar
    Join Date
    Aug 2010
    Location
    Never Never Land
    Posts
    4,864
    Thanks (Received)
    1
    Likes (Received)
    10
    Dislikes (Received)
    1
    And of course pic whoring.

    These are before the rear was dropped.


    Rear dropped in these.


    Last edited by PurpleGuy; 12-25-2013 at 09:13 PM.
    2001 Regal GS, PLOG, 3" DP, 1.9's/L76 springs. 21* of timing on a 3.4"
    Reply With Quote  
     

  4. #4 Re: So you want to make your own coilovers? DIY How To 
    GXP Level Member GrandPrix06GT's Avatar
    Join Date
    Feb 2013
    Location
    Detroit, MI
    Posts
    2,800
    Thanks (Received)
    0
    Likes (Received)
    0
    Dislikes (Received)
    0
    Good stuff man! This should help a lot of people and questions, especially with updated links.
    2006 GT - SD Headers, Overkill, 3.4, ZZP FSIC, Retrofit, Borla Pro XS-DD 09 G8 GT MGM, Kooks Mids Headers, Rotofab, MagnaFlow Exhaust, 3.5" Solo Performance Tips, VMS Tune, 20" Camaros, Quad Retrofit w. Amber Halos, MM CF Grilles, Gxp Diffuser, Red/Onyx Seats & Shifter
    Reply With Quote  
     

  5. #5 Re: So you want to make your own coilovers? DIY How To 
    GXP Level Member coolone's Avatar
    Join Date
    Nov 2011
    Location
    NY
    Posts
    2,374
    Thanks (Received)
    0
    Likes (Received)
    3
    Dislikes (Received)
    0
    Great write up, but there's important information missing that'll help those decide if it is worthwhile to attempt such a project. You might want to list cost's, individually for parts or at least an overall cost, and how much time it took to complete. Not trying to discourage anyone, just want them to have all the information. : )
    Overkill BBC Cam, YT 1.8 RR's, Rhodes Lifters, STGII Heads, GenV, Pacesetters, 3" Exh to Tips, TEP Trans. N*, ID 75# injectors/E85 coming soon
    Reply With Quote  
     

  6. #6 Re: So you want to make your own coilovers? DIY How To 
    I live here. stealthee's Avatar
    Join Date
    Mar 2011
    Location
    SWPA
    Posts
    8,782
    Thanks (Received)
    1
    Likes (Received)
    2
    Dislikes (Received)
    0
    Another note that some people who do not know much about struts/springs may want to be informed of. This set up is more for lowering the car only. You might get some slightly improved handling characteristics but you are still on factory style struts. I know many people who have went with a sleeve style coilover and blew their new struts out less than 6 months later.

    Now, I'll be honest, I don't know what all is and is not available for the Grand Prix market when it comes to true coilovers, but when I priced the stuff out for my Stealth I was going to spend almost as much on sleeve coilovers and new struts as I did on just buying true coilovers. That didn't even include my time in modifying the struts.

    The best part about buying the true coilovers was the only work involved was swapping the factory struts out and bolting the new coilovers in. I guess if there are no true coilovers available in the aftermarket that this is your only option, just be wary of the issues with premature strut failure.


    2011 Mitsubishi Lancer GTS - DD mode
    1991 Mitsubishi 3000GT - Many mods to come
    Reply With Quote  
     

  7. #7 Re: So you want to make your own coilovers? DIY How To 
    GrandPrix Junkie PurpleGuy's Avatar
    Join Date
    Aug 2010
    Location
    Never Never Land
    Posts
    4,864
    Thanks (Received)
    1
    Likes (Received)
    10
    Dislikes (Received)
    1
    Listing prices isn't very useful. Prices are always changing. I bought my stuff just a couple months ago and prices have already changed. But either way. I spend $648.52 making mine.

    Steathlee I put in there that this is more for lowering the car. However guys autocross off this setup. And multiple guys, include myself have said handling is greatly improved, despite my control arms pointing up in the air LOL

    This is the only readily available option. The $1100 setup for Held is the exact same thing here, with a different top mount design.
    Way back when Prj was still active in the 3800 scene they had a very nice set. That was the best setup since you didn't have to modify struts. You got whatever specific shock you need(I don't know what it was) and assemble them. No cutting or anything required.
    2001 Regal GS, PLOG, 3" DP, 1.9's/L76 springs. 21* of timing on a 3.4"
    Reply With Quote  
     

  8. #8 Re: So you want to make your own coilovers? DIY How To 
    GrandPrix Junkie PurpleGuy's Avatar
    Join Date
    Aug 2010
    Location
    Never Never Land
    Posts
    4,864
    Thanks (Received)
    1
    Likes (Received)
    10
    Dislikes (Received)
    1
    Well I picked up what I think I can use as bump stops. I only grabbed a pair for now to make sure they'll work first. I think I'll be putting them in on Monday.
    2001 Regal GS, PLOG, 3" DP, 1.9's/L76 springs. 21* of timing on a 3.4"
    Reply With Quote  
     

  9. #9 Re: So you want to make your own coilovers? DIY How To 
    GrandPrix Junkie Sandman's Avatar
    Join Date
    Jan 2009
    Location
    Tallahassee, FL
    Posts
    3,538
    Thanks (Received)
    0
    Likes (Received)
    0
    Dislikes (Received)
    0
    Between the other parts my car handle a hell of a lot better than stock. I've done the same build but with Konis.
    05 Saab 9-2X Linear (Saabaru)
    77 Morris Garage B
    Quote Originally Posted by TLSheff View Post
    You said "I'm done with it"... car says "Oh, really? *trollface*"
    Reply With Quote  
     

  10. #10 Re: So you want to make your own coilovers? DIY How To 
    GXP Level Member Timing's Avatar
    Join Date
    Feb 2012
    Location
    gardner,mass
    Posts
    2,141
    Thanks (Received)
    0
    Likes (Received)
    0
    Dislikes (Received)
    0
    Why does that red car have its bumper parked on the curb?
    08 MazdaSpeed 3- Treadstone tr8l, Ebay Piping, Ported intake,Thermal gasket, Cs Injector Seals,Cobb intake/inlet, Autotech Internals, Poly mounts, Speed Daddy DP, Magnaflow CB,
    RPF1 17x9 255/45 Direzza Zll
    04 COMPG- Vs, getrag 284 RIP
    Reply With Quote  
     

  11. #11 Re: So you want to make your own coilovers? DIY How To 
    GTP Level Member WhiteLightningGTP's Avatar
    Join Date
    Nov 2012
    Location
    Frankenmuth, MI
    Posts
    742
    Thanks (Received)
    0
    Likes (Received)
    0
    Dislikes (Received)
    0
    Is it true that the Mevotech mount from Rockauto doesn't need to be modified?
    2004 Comp G "The Panda"- low, e85, big brakes SOLD
    2002 Trans Am- 6 speed, bolt ons or something, it's slow.
    2006 Silverado- forged ls2, 4l80e, plate kit, also slow...
    Reply With Quote  
     

  12. #12 Re: So you want to make your own coilovers? DIY How To 
    GXP Level Member 91parkave's Avatar
    Join Date
    Aug 2010
    Location
    Arizona
    Posts
    2,930
    Thanks (Received)
    0
    Likes (Received)
    1
    Dislikes (Received)
    0
    They need to be modified difference with those is you don't need to cut the isolator any.
    06 GXP | 222/227 cam/cartuning turbo kit on 8psi/meth/e85 coilovers/ still on stock trans at 130k
    Reply With Quote  
     

  13. #13 Re: So you want to make your own coilovers? DIY How To 
    GrandPrix Junkie PurpleGuy's Avatar
    Join Date
    Aug 2010
    Location
    Never Never Land
    Posts
    4,864
    Thanks (Received)
    1
    Likes (Received)
    10
    Dislikes (Received)
    1
    Quote Originally Posted by Ginseng View Post
    Why does that red car have its bumper parked on the curb?
    It clears!! Lol
    2001 Regal GS, PLOG, 3" DP, 1.9's/L76 springs. 21* of timing on a 3.4"
    Reply With Quote  
     

  14. #14 Re: So you want to make your own coilovers? DIY How To 
    GrandPrix Junkie PurpleGuy's Avatar
    Join Date
    Aug 2010
    Location
    Never Never Land
    Posts
    4,864
    Thanks (Received)
    1
    Likes (Received)
    10
    Dislikes (Received)
    1
    Quote Originally Posted by WhiteLightningGTP View Post
    Is it true that the Mevotech mount from Rockauto doesn't need to be modified?
    Quote Originally Posted by 91parkave View Post
    They need to be modified difference with those is you don't need to cut the isolator any.
    This right here.

    Quote Originally Posted by 4THGENCAMAROFAN View Post
    Okay. I said I wasn't going to cover mounts, but 91parkave has some info on mounts i'll post if he doesn't mind. But in the meantime i'll post some stuff from R.S. Hutchinson on ClubGP.

    This is copied and pasted from his coilover thread. I don't take any credit for this. All credit goes to him.
    - a perfect 2" round hole - best, the spring bushing fits right over this

    That first one. The perfect 2" round hole. That one i've been told is a Mevotech mount. So someone making their own mounts would be best off starting with that one because that would allow the bushing between the spring and mount to not be modified. You would simply slide the bushing on, opposed to cutting part of it off like I had to.


    This is a better donor for a mount-the Mevotech with the 2" hole.


    And here's why it's the better option.


    2001 Regal GS, PLOG, 3" DP, 1.9's/L76 springs. 21* of timing on a 3.4"
    Reply With Quote  
     

  15. #15 Re: So you want to make your own coilovers? DIY How To 
    GrandPrix Junkie PurpleGuy's Avatar
    Join Date
    Aug 2010
    Location
    Never Never Land
    Posts
    4,864
    Thanks (Received)
    1
    Likes (Received)
    10
    Dislikes (Received)
    1
    Removal/installation and coilover assembly pics added to second post.
    2001 Regal GS, PLOG, 3" DP, 1.9's/L76 springs. 21* of timing on a 3.4"
    Reply With Quote  
     

  16. #16 Re: So you want to make your own coilovers? DIY How To 
    GXP Level Member 91parkave's Avatar
    Join Date
    Aug 2010
    Location
    Arizona
    Posts
    2,930
    Thanks (Received)
    0
    Likes (Received)
    1
    Dislikes (Received)
    0
    Too add to:

    This is what happens frequently when your coilovers are exposed to the elements, around every oil change now i clean out the bearings completley because rocks some how work themselves in that area. another plus with coilovers is dissassembly without affecting your alignment. wana change springs? you can push the strut rod down a inch or so and take the top mount off while still bolted to the strut then you can do whatever you need to do, swap srings clean etc..

    heres what your bearings can look like after a couple of thoushand miles, also note once rocks work on they will make the surface irregular and the spring not able to turn correctly causing premature wear and tear.


    soaked in brake cleaner


    cleaned up


    the aftermath you can see what rocks/dirt will do


    not flat anymore


    hers some pics of dissassembly through the top. after mount removed


    06 GXP | 222/227 cam/cartuning turbo kit on 8psi/meth/e85 coilovers/ still on stock trans at 130k
    Reply With Quote  
     

  17. #17 Re: So you want to make your own coilovers? DIY How To 
    GrandPrix Junkie PurpleGuy's Avatar
    Join Date
    Aug 2010
    Location
    Never Never Land
    Posts
    4,864
    Thanks (Received)
    1
    Likes (Received)
    10
    Dislikes (Received)
    1
    Those bearing pics are exactly why I have the covers LOL And I was not aware of being able to swap springs like that. Cool!
    2001 Regal GS, PLOG, 3" DP, 1.9's/L76 springs. 21* of timing on a 3.4"
    Reply With Quote  
     

  18. #18 Re: So you want to make your own coilovers? DIY How To 
    GrandPrix Junkie Sandman's Avatar
    Join Date
    Jan 2009
    Location
    Tallahassee, FL
    Posts
    3,538
    Thanks (Received)
    0
    Likes (Received)
    0
    Dislikes (Received)
    0
    I just sprayed mine with some WD40 and they've been real happy.

    And I'm glad I'm not the only one whose springs rub on the strut
    05 Saab 9-2X Linear (Saabaru)
    77 Morris Garage B
    Quote Originally Posted by TLSheff View Post
    You said "I'm done with it"... car says "Oh, really? *trollface*"
    Reply With Quote  
     

  19. #19 Re: So you want to make your own coilovers? DIY How To 
    GXP Level Member GrandPrix06GT's Avatar
    Join Date
    Feb 2013
    Location
    Detroit, MI
    Posts
    2,800
    Thanks (Received)
    0
    Likes (Received)
    0
    Dislikes (Received)
    0
    So I figured I'd share this, I have sealed bearings and the guy I bought my coilovers off said he searched and searched and only found one supplier and got the last 4 they had of these. Now if it's true or not, who cares, but these are the measurements for the rubber seals. I was messing with my coilovers today and thought that there has to be something that you can find these off of. Or make somehow, so these are the measurements that mine are. So hopefully these could be gotten and help prevent with the whole rusting and debris getting inside. Now I'm sure it won't fully prevent but I'm sure it does help dramatically.
    What they look like closely

    1/4 inch thick

    Outer diameter is 3.5

    inner diameter are about 3 inches. Now that could be smaller as well, but nothing less than 2.5 (although it could be and it could be cut out)
    2006 GT - SD Headers, Overkill, 3.4, ZZP FSIC, Retrofit, Borla Pro XS-DD 09 G8 GT MGM, Kooks Mids Headers, Rotofab, MagnaFlow Exhaust, 3.5" Solo Performance Tips, VMS Tune, 20" Camaros, Quad Retrofit w. Amber Halos, MM CF Grilles, Gxp Diffuser, Red/Onyx Seats & Shifter
    Reply With Quote  
     

  20. #20 Re: So you want to make your own coilovers? DIY How To 
    GXP Level Member 91parkave's Avatar
    Join Date
    Aug 2010
    Location
    Arizona
    Posts
    2,930
    Thanks (Received)
    0
    Likes (Received)
    1
    Dislikes (Received)
    0
    your mounts are better cause they cut the center out and used spring perches which allow the bearings to be up top, virtually no dirt goes up top as compared to the bottom, so you have a longer service life, however welding the perches on the top leaves alot of room for error plus finding complete steel perches isnt exactly cost effective, regardless you have great quality pieces
    06 GXP | 222/227 cam/cartuning turbo kit on 8psi/meth/e85 coilovers/ still on stock trans at 130k
    Reply With Quote  
     

Page 1 of 3 123 LastLast

Similar Threads

  1. Given up on coilovers
    By carcrobatics in forum Brakes/Suspension/Chassis
    Replies: 17
    Last Post: 06-10-2013, 12:33 AM
  2. coilovers
    By 99blkgtp in forum Brakes/Suspension/Chassis
    Replies: 25
    Last Post: 05-28-2012, 11:12 AM
  3. Coilovers
    By betz in forum Brakes/Suspension/Chassis
    Replies: 2
    Last Post: 05-14-2012, 08:34 AM
  4. coilovers? again?
    By biggt in forum Brakes/Suspension/Chassis
    Replies: 6
    Last Post: 12-30-2011, 02:04 PM
Bookmarks
Bookmarks
Posting Permissions
  • You may not post new threads
  • You may not post replies
  • You may not post attachments
  • You may not edit your posts
  •