Thread: Upgraded UIM/LIM gasket time

Page 1 of 2 12 LastLast
Results 1 to 20 of 21
  1. #1 Upgraded UIM/LIM gasket time 
    SE Level Member
    Join Date
    Mar 2012
    Location
    Wichita Falls, Texas
    Posts
    35
    Thanks (Received)
    0
    Likes (Received)
    0
    Dislikes (Received)
    0
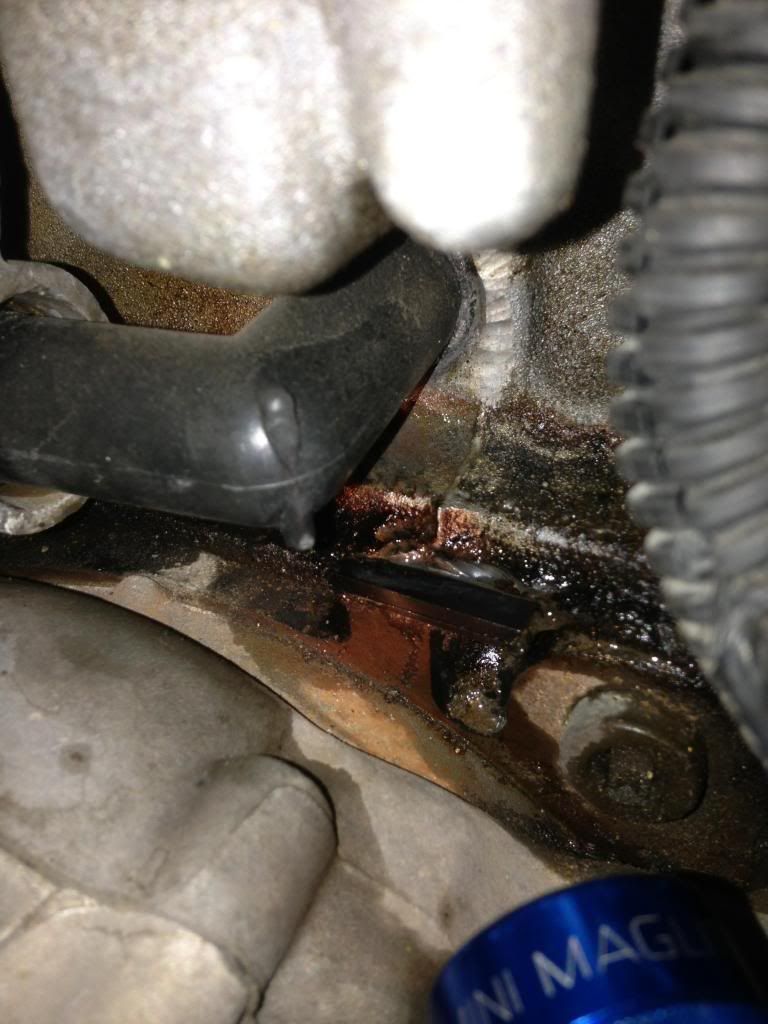
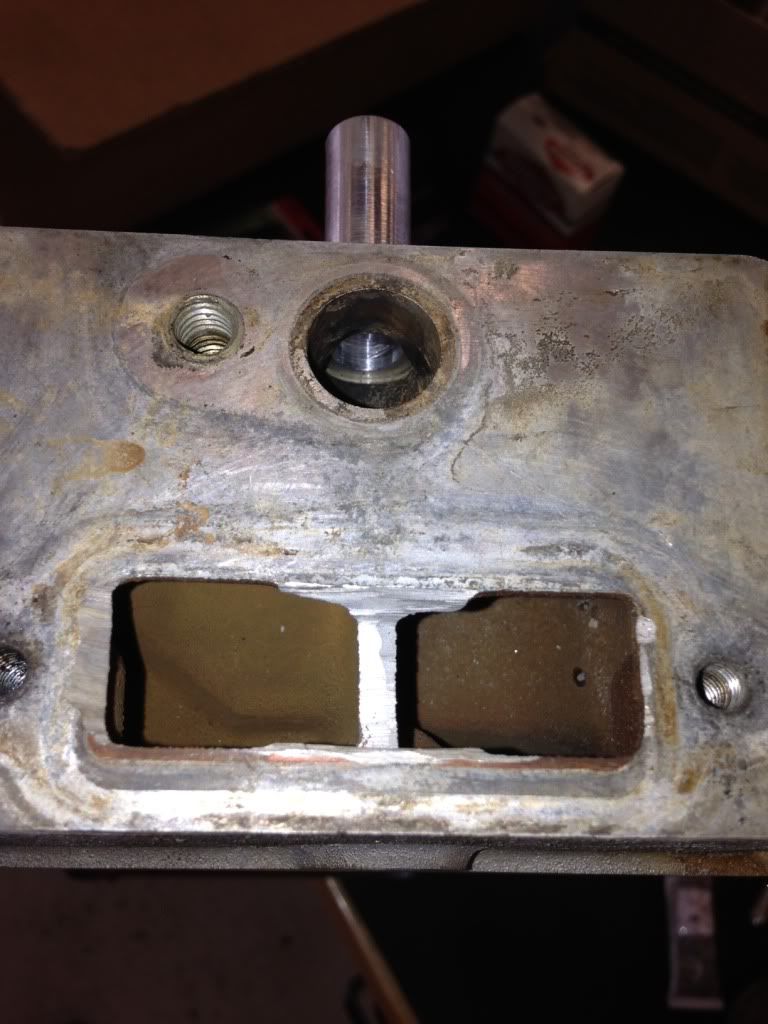
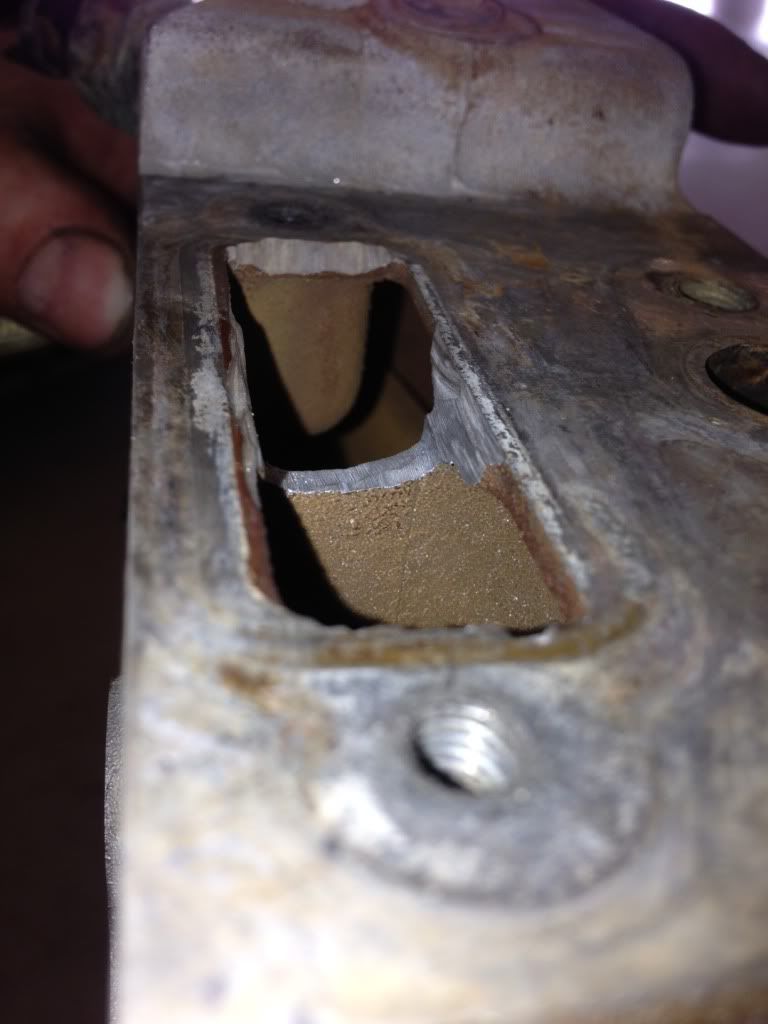
    After a TON of reading and research on here, I've decided it's finally time to tackle the UIM/LIM project. Noticed earlier today that I've got what appears to be oil seeping from the LIM gasket area right beneath one of the coolant elbows. The moisture does not appear to be coolant, but rather oil.


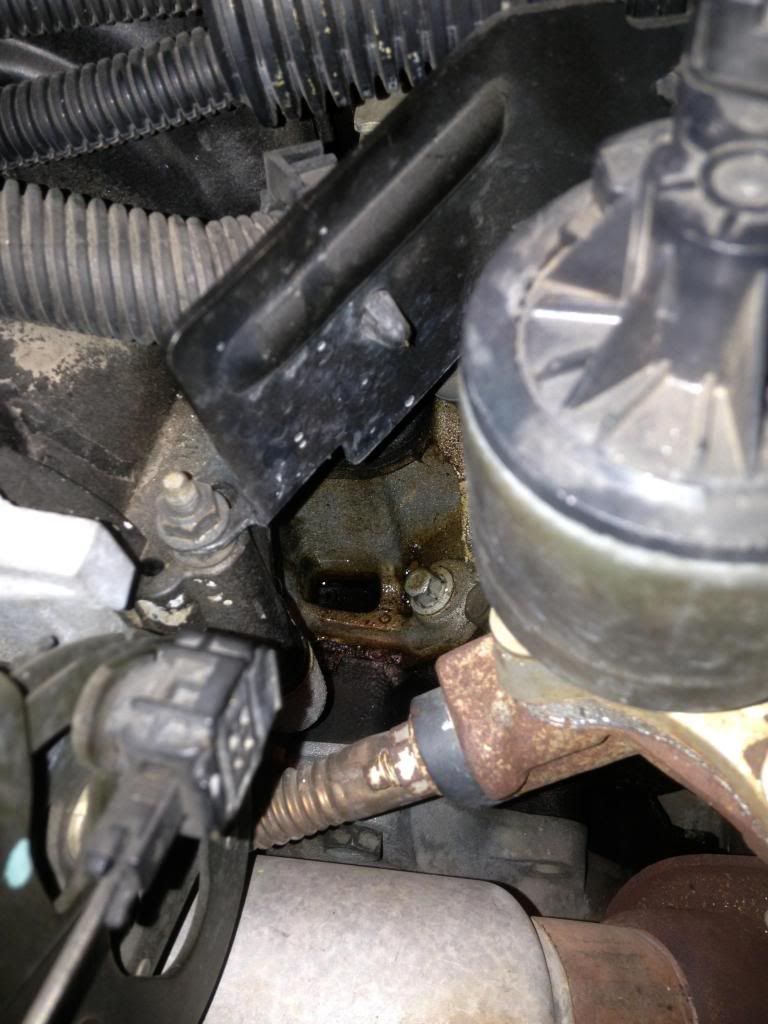
    It can also be seen on the other side (driver's side) of the engine below the EGR (possibly leaking from UIM?)


    I figure after 231,000 miles they've earned a change. Had the LIM gasket replaced just before I bought the car in 2003 at 44,000 miles but don't know if they used another plastic one (I suspect they did) or the better one.

    I just ordered the Dorman Upgraded UIM kit and a Fel Pro LIM gasket from RockAuto. Total cost was $115.00... not bad. I paid extra for 2-day deilvery (jacked the price up to $150.00!) because I have to have them by Monday. Got a trip coming up next weekend and I will only have Tuesday to do the job. I will try to post some pics of the process even though Bill Boost and maybe a few others have already done a great job of documenting this task. Been thinking reeeeeaaaaallll hard about blocking off the coolant passages to the TB (like Bill Boost did) but I'm not sure how long this job is going to take and time will be critical. We'll see. I've seen others do this job on here, and I figure it's my turn to just jump in there and do it. We'll see how it goes.

    Sorry about the orientation of the pics... they should each be rotated 90* to the left.
    Reply With Quote  
     

  2. #2 Re: Upgraded UIM/LIM gasket time 
    Turbo is the way to go. BillBoost37's Avatar
    Join Date
    Jul 2009
    Location
    W Spfld
    Posts
    26,833
    Thanks (Received)
    53
    Likes (Received)
    90
    Dislikes (Received)
    1
    If you have the drill, tap and plug it only adds about another 20 minutes of time.

    On that oil.. Make sure you also feel under the edge of the valve cover and see if it's wet. If so, you may want to add the valve cover gaskets into the work.
    I drink..so consider that when reading my posts.

    2010 Audi A6 Dual IC's
    Reply With Quote  
     

  3. #3 Re: Upgraded UIM/LIM gasket time 
    SE Level Member
    Join Date
    Mar 2012
    Location
    Wichita Falls, Texas
    Posts
    35
    Thanks (Received)
    0
    Likes (Received)
    0
    Dislikes (Received)
    0
    Thanks Bill. I will be sure to check the valve covers. BTW, on your LIM, what did you use to hog out the area under that cap to increase coolant flow between the heads? I'm going to be using the Auto Skills Shop at Lackland AFB to do this job on Tuesday and the more I think about it the more I think I should go ahead and do your little LIM fix. Since I'll be at the Auto Shop I should have pretty much any tool I could possibly need. Thanks in advance.
    Reply With Quote  
     

  4. #4 Re: Upgraded UIM/LIM gasket time 
    SE Level Member
    Join Date
    Mar 2012
    Location
    Wichita Falls, Texas
    Posts
    35
    Thanks (Received)
    0
    Likes (Received)
    0
    Dislikes (Received)
    0
    Also, Bill I assume you are the one who fixed the orientation of the pics. Much appreciated!
    Reply With Quote  
     

  5. #5 Re: Upgraded UIM/LIM gasket time 
    Turbo is the way to go. BillBoost37's Avatar
    Join Date
    Jul 2009
    Location
    W Spfld
    Posts
    26,833
    Thanks (Received)
    53
    Likes (Received)
    90
    Dislikes (Received)
    1
    I didn't touch nothing! lol

    I use a carbine bit and or a small cutting wheel. Pretty much whatever you have available that'll cut/hog that area.
    I drink..so consider that when reading my posts.

    2010 Audi A6 Dual IC's
    Reply With Quote  
     

  6. #6 Re: Upgraded UIM/LIM gasket time 
    SE Level Member
    Join Date
    Mar 2012
    Location
    Wichita Falls, Texas
    Posts
    35
    Thanks (Received)
    0
    Likes (Received)
    0
    Dislikes (Received)
    0
    Awesome. I don't want to bug you too much but in your thread "How to mod a LIM" you said: "You drill with the proper drill, then tap with 1/4" NPT tap." What is the "proper drill" or I guess you mean bit size? Just want to get all the questions out of the way before I begin this job.
    Reply With Quote  
     

  7. #7 Re: Upgraded UIM/LIM gasket time 
    SE Level Member
    Join Date
    Mar 2012
    Location
    Wichita Falls, Texas
    Posts
    35
    Thanks (Received)
    0
    Likes (Received)
    0
    Dislikes (Received)
    0
    Also, do you have to seal the plugs with pipe sealer or will RTV silicone work? I know these questions might be pretty basic but.... better to ask than guess.
    Reply With Quote  
     

  8. #8 Re: Upgraded UIM/LIM gasket time 
    GTX Level Member dbextreme's Avatar
    Join Date
    Nov 2009
    Location
    Tennessee
    Posts
    673
    Thanks (Received)
    0
    Likes (Received)
    0
    Dislikes (Received)
    0
    On the back of the 1/4 tap you'll have to use to thread the two holes, it should say what size drill bit to use. I've done it to two manifolds with no issues, just make sure you don't go in to far with the tap, you want the plugs to sit flush with the LIM. I say flush because the UIM gasket is thick...

    I used Permatex Thread sealant with PTFE on the plugs AND all the LIM bolts. I pulled my old motor apart the other day after 20K after the job with no signs of leaking around the plugs.
    1999 GPGT - L26, Ported Top Swap, XP Cam, 3.2 MPS, 42.5#, N*, LQ4, SD Headers, Double Roller, TEP Race Trans w/Stand alone Cooler, Precision Industries 3000RPM Stall, 75 Shot Nitrous Express Proton Kit w/Purge, 3" Dual Borla Pro XS, Corsa Dual 3.5 Tips, 5% Tint
    1995 Firebird Formula - Under the Knife
    Reply With Quote  
     

  9. #9 Re: Upgraded UIM/LIM gasket time 
    SE Level Member
    Join Date
    Mar 2012
    Location
    Wichita Falls, Texas
    Posts
    35
    Thanks (Received)
    0
    Likes (Received)
    0
    Dislikes (Received)
    0
    Thanks DB, that's exactly what I wanted to know. Great point about sealing the LIM bolts as well. I had read that elsewhere and will be sure to do it. Thanks for the input. I will post some more pics next week when I actually do the job.
    Reply With Quote  
     

  10. #10 Re: Upgraded UIM/LIM gasket time 
    Turbo is the way to go. BillBoost37's Avatar
    Join Date
    Jul 2009
    Location
    W Spfld
    Posts
    26,833
    Thanks (Received)
    53
    Likes (Received)
    90
    Dislikes (Received)
    1
    See you guys don't even need me. I'm gonna go get a beer.
    I drink..so consider that when reading my posts.

    2010 Audi A6 Dual IC's
    Reply With Quote  
     

  11. #11 Re: Upgraded UIM/LIM gasket time 
    SE Level Member
    Join Date
    Mar 2012
    Location
    Wichita Falls, Texas
    Posts
    35
    Thanks (Received)
    0
    Likes (Received)
    0
    Dislikes (Received)
    0
    Well, I was supposed to do this job today (Tuesday) but the parts got here too late. So I changed the driver's side axle and tie rod end instead. Will have to do the UIM and LIM gaskets when I get back from Talladega. Will let y'all know how it goes.
    Reply With Quote  
     

  12. #12 Re: Upgraded UIM/LIM gasket time 
    Turbo is the way to go. BillBoost37's Avatar
    Join Date
    Jul 2009
    Location
    W Spfld
    Posts
    26,833
    Thanks (Received)
    53
    Likes (Received)
    90
    Dislikes (Received)
    1
    Sounds like you did a decent amount anyhow. Have fun and holler when you are back.

    (PARTY AT HIS PLACE!!!!!!)
    I drink..so consider that when reading my posts.

    2010 Audi A6 Dual IC's
    Reply With Quote  
     

  13. #13 Re: Upgraded UIM/LIM gasket time 
    GTX Level Member dbextreme's Avatar
    Join Date
    Nov 2009
    Location
    Tennessee
    Posts
    673
    Thanks (Received)
    0
    Likes (Received)
    0
    Dislikes (Received)
    0
    ^^^ Driving there now (to his house), got four kegs and girls on call.. All are welcome!!!

    We might even change out the gaskets for ya while we are there!!!
    1999 GPGT - L26, Ported Top Swap, XP Cam, 3.2 MPS, 42.5#, N*, LQ4, SD Headers, Double Roller, TEP Race Trans w/Stand alone Cooler, Precision Industries 3000RPM Stall, 75 Shot Nitrous Express Proton Kit w/Purge, 3" Dual Borla Pro XS, Corsa Dual 3.5 Tips, 5% Tint
    1995 Firebird Formula - Under the Knife
    Reply With Quote  
     

  14. #14 Re: Upgraded UIM/LIM gasket time 
    Killa Bee Scottydoggs's Avatar
    Join Date
    Aug 2010
    Location
    new jersey
    Posts
    39,997
    Thanks (Received)
    63
    Likes (Received)
    166
    Dislikes (Received)
    5
    Quote Originally Posted by 4fanintexas View Post
    Well, I was supposed to do this job today (Tuesday) but the parts got here too late. So I changed the driver's side axle and tie rod end instead. Will have to do the UIM and LIM gaskets when I get back from Talladega. Will let y'all know how it goes.
    Quote Originally Posted by BillBoost37 View Post
    Sounds like you did a decent amount anyhow. Have fun and holler when you are back.

    (PARTY AT HIS PLACE!!!!!!)
    Quote Originally Posted by dbextreme View Post
    ^^^ Driving there now (to his house), got four kegs and girls on call.. All are welcome!!!

    We might even change out the gaskets for ya while we are there!!!

    theres only one reason to be going to talladega this weekend, you guys can party at his place, im jumping out of the bushes and taking his tickets. lmao!


    have a good time, i wish i was going.

    98 Buick Regal GS, F body brakes, Caddy STS wheels, tinted tails L36 bottom end, lightly ported heads, 1.95 roller rockers, headers, gen 5 N* 3.0 pulley, FSIC, 42 lb injectors, a BrandonHall rebuilt trans, DHP tuned and AEM water/Meth injection https://goo.gl/gpV5kW
    Reply With Quote  
     

  15. #15 Re: Upgraded UIM/LIM gasket time 
    SE Level Member
    Join Date
    Mar 2012
    Location
    Wichita Falls, Texas
    Posts
    35
    Thanks (Received)
    0
    Likes (Received)
    0
    Dislikes (Received)
    0
    DB, I couldn't let you change the gaskets man... I would miss out on all the fun. Y'all are welcome to use the house, just clean up before leave. Scotty, no tickets for me man. I actually work here at Talladega Superspeedway. I'm the Area Supervisor over the entire Tri-Oval section of the track and I get PAID to be here brother. It ain't much but $150 bucks a day to stand here and watch the race helps offset my travel costs.
    Reply With Quote  
     

  16. #16 Re: Upgraded UIM/LIM gasket time 
    Killa Bee Scottydoggs's Avatar
    Join Date
    Aug 2010
    Location
    new jersey
    Posts
    39,997
    Thanks (Received)
    63
    Likes (Received)
    166
    Dislikes (Received)
    5
    thats one cool job, id do it for free one in a while.

    98 Buick Regal GS, F body brakes, Caddy STS wheels, tinted tails L36 bottom end, lightly ported heads, 1.95 roller rockers, headers, gen 5 N* 3.0 pulley, FSIC, 42 lb injectors, a BrandonHall rebuilt trans, DHP tuned and AEM water/Meth injection https://goo.gl/gpV5kW
    Reply With Quote  
     

  17. #17 Re: Upgraded UIM/LIM gasket time 
    GTX Level Member dbextreme's Avatar
    Join Date
    Nov 2009
    Location
    Tennessee
    Posts
    673
    Thanks (Received)
    0
    Likes (Received)
    0
    Dislikes (Received)
    0
    1999 GPGT - L26, Ported Top Swap, XP Cam, 3.2 MPS, 42.5#, N*, LQ4, SD Headers, Double Roller, TEP Race Trans w/Stand alone Cooler, Precision Industries 3000RPM Stall, 75 Shot Nitrous Express Proton Kit w/Purge, 3" Dual Borla Pro XS, Corsa Dual 3.5 Tips, 5% Tint
    1995 Firebird Formula - Under the Knife
    Reply With Quote  
     

  18. #18 Re: Upgraded UIM/LIM gasket time 
    SE Level Member
    Join Date
    Mar 2012
    Location
    Wichita Falls, Texas
    Posts
    35
    Thanks (Received)
    0
    Likes (Received)
    0
    Dislikes (Received)
    0
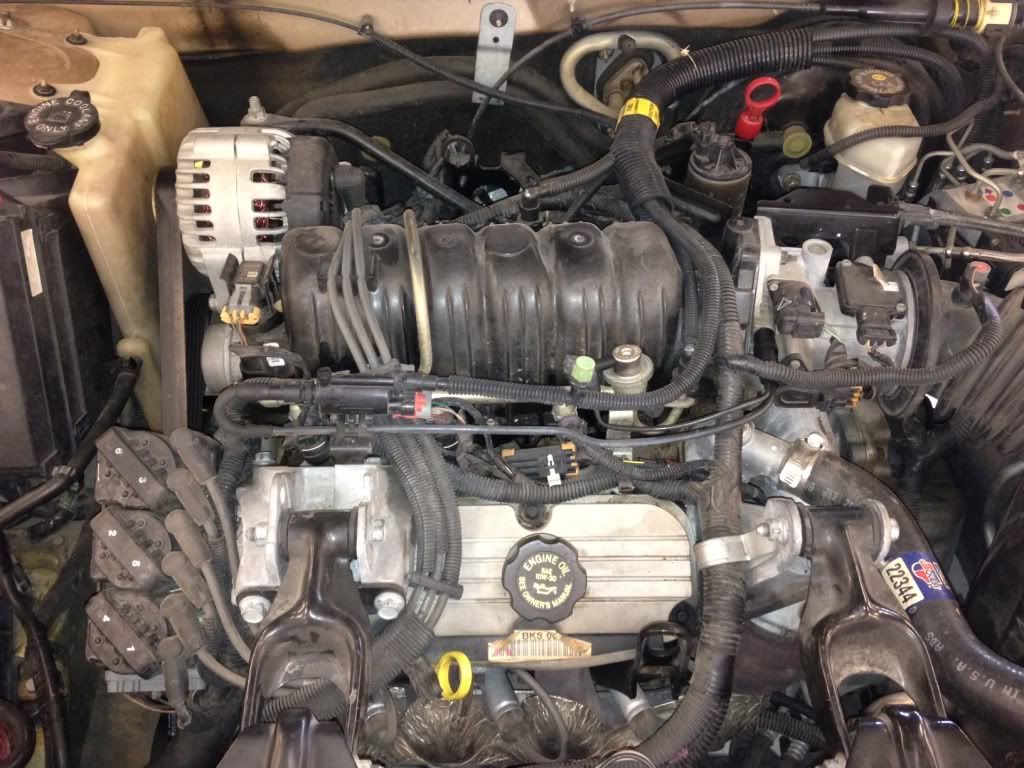
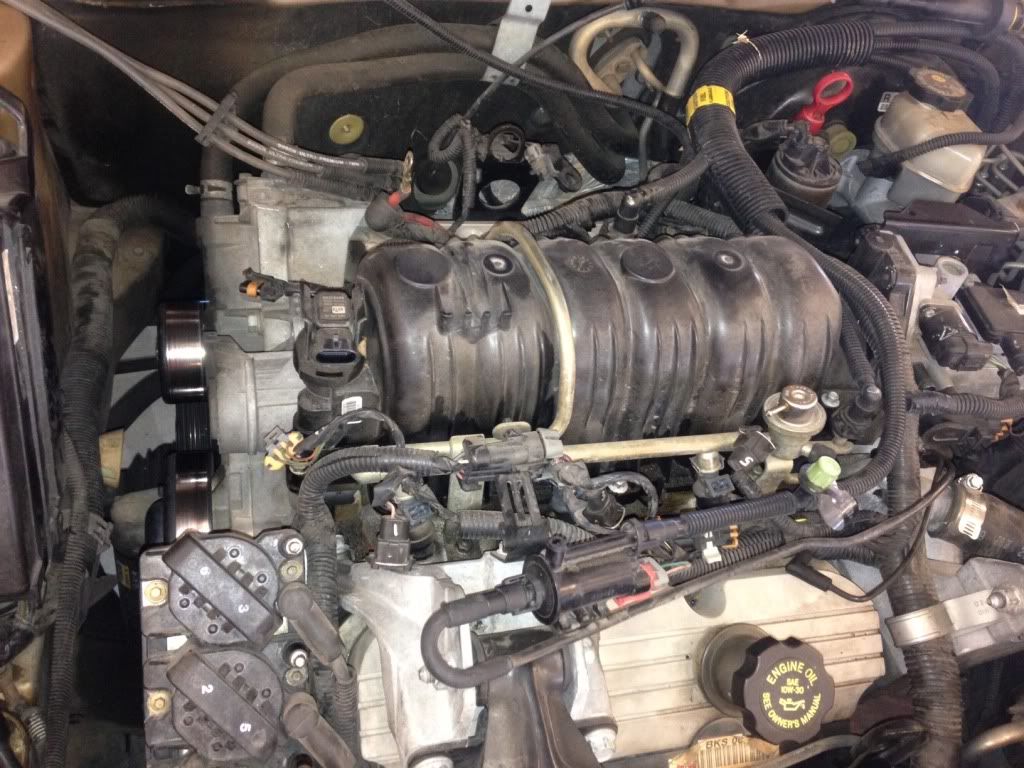
    Well, I made it back from a cold, wet weekend at Talladega a few weeks ago and did the UIM/LIM job. Here are some pics of what I did and what I found when I got inside.


    Prepped and ready for surgery.


    Coolant reservoir, belt, alternator, and rear plug wires removed.


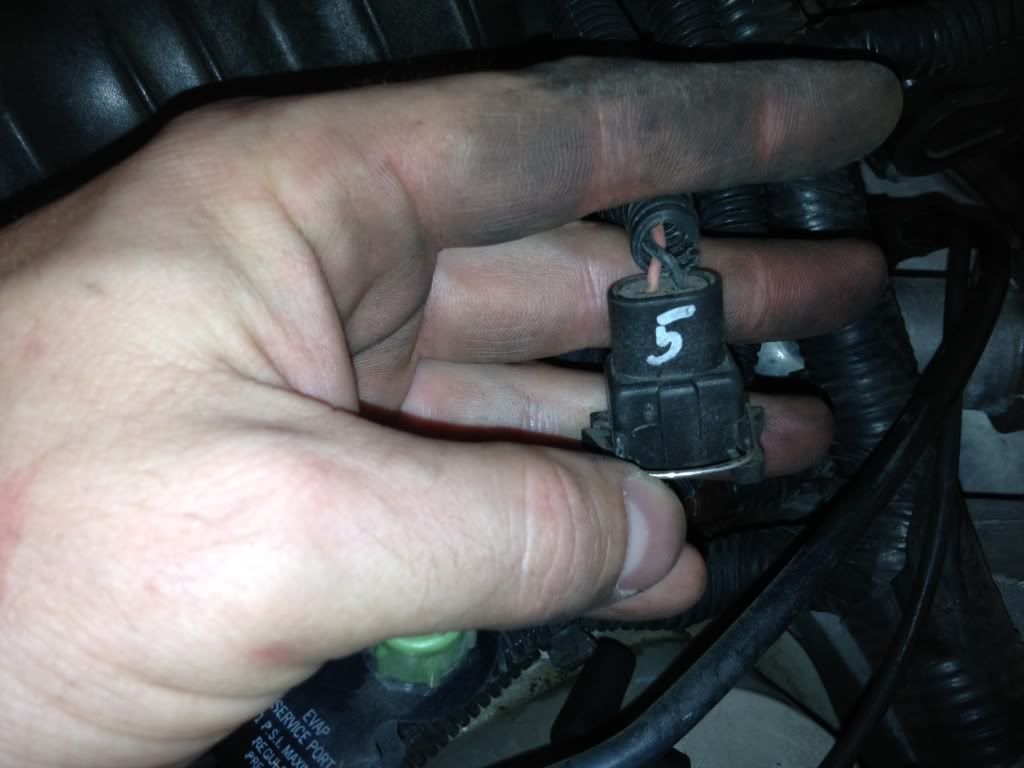
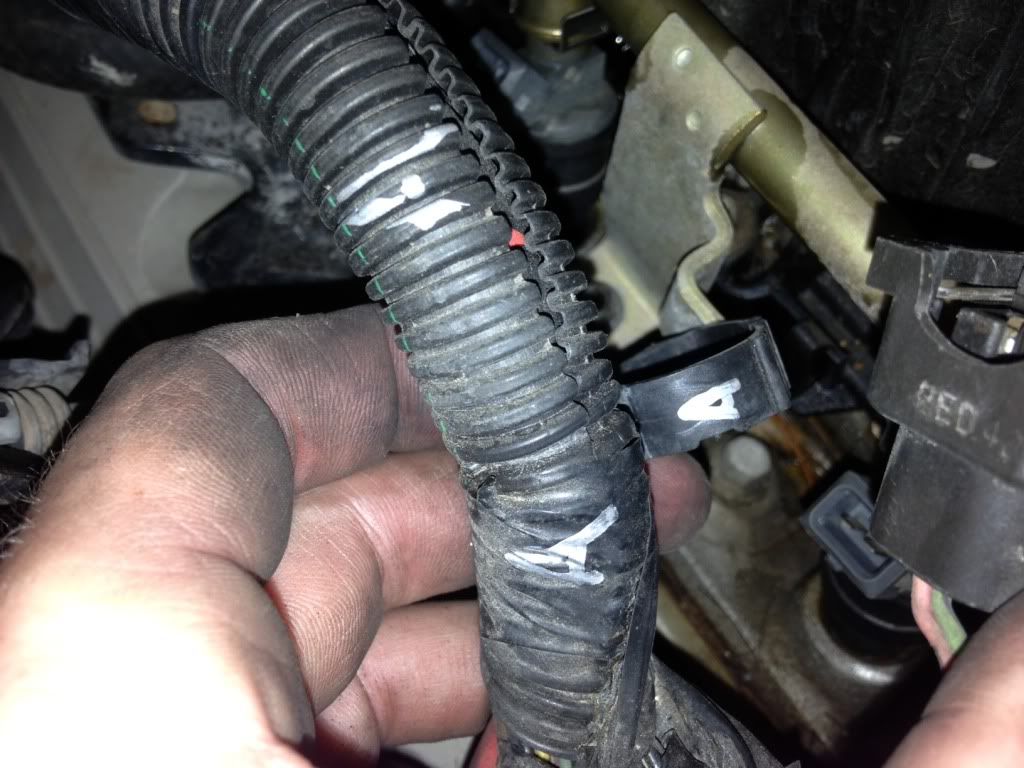
    I numbered the fuel injectors, electrical connectors, and wire harnesses mainly for demonstrative purposes. Each connector only fits in its assigned spot so there really aren't many ways you can screw it up. On bigger, more complicated jobs this is a good habit to be in. ALWAYS a good idea to keep a silver sharpie/paint pen in your tool box. I number the electrical connections beginning with 1 and assign letters to each wire harness beginning with A. If nothing else I know exactly how many I have to put back together when I'm done.


    All electrical connectors disconnected, alternator and fuel rail removed. Still have to remove the top radiator hose and thermostat. Ready to remove the UIM.


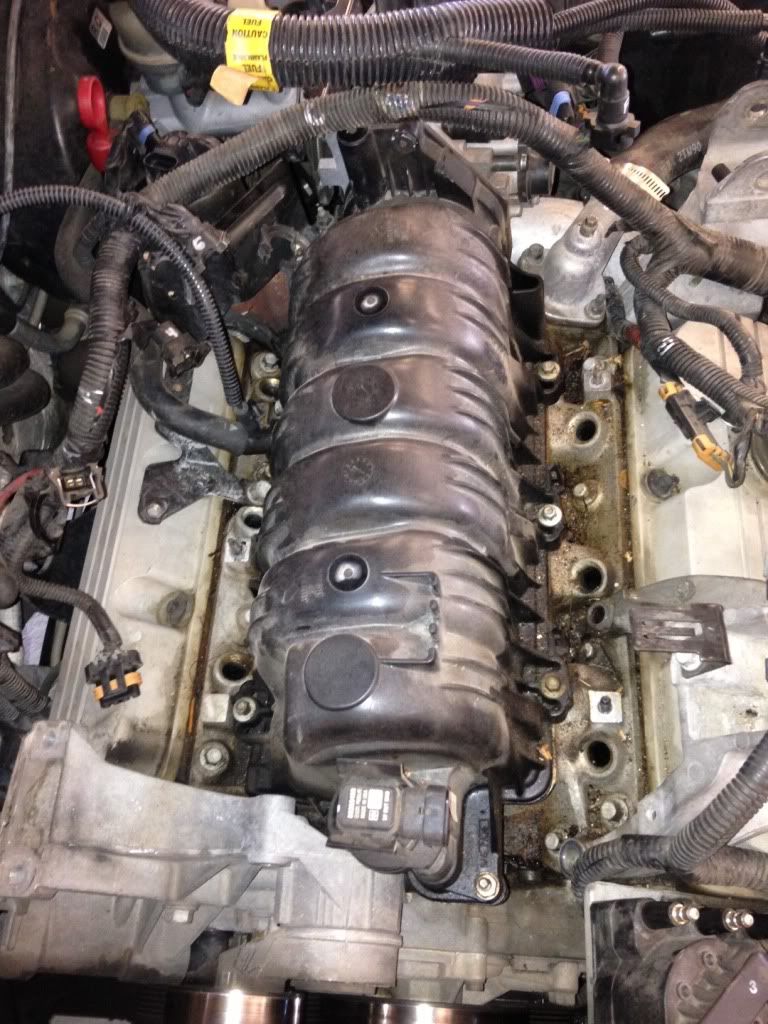
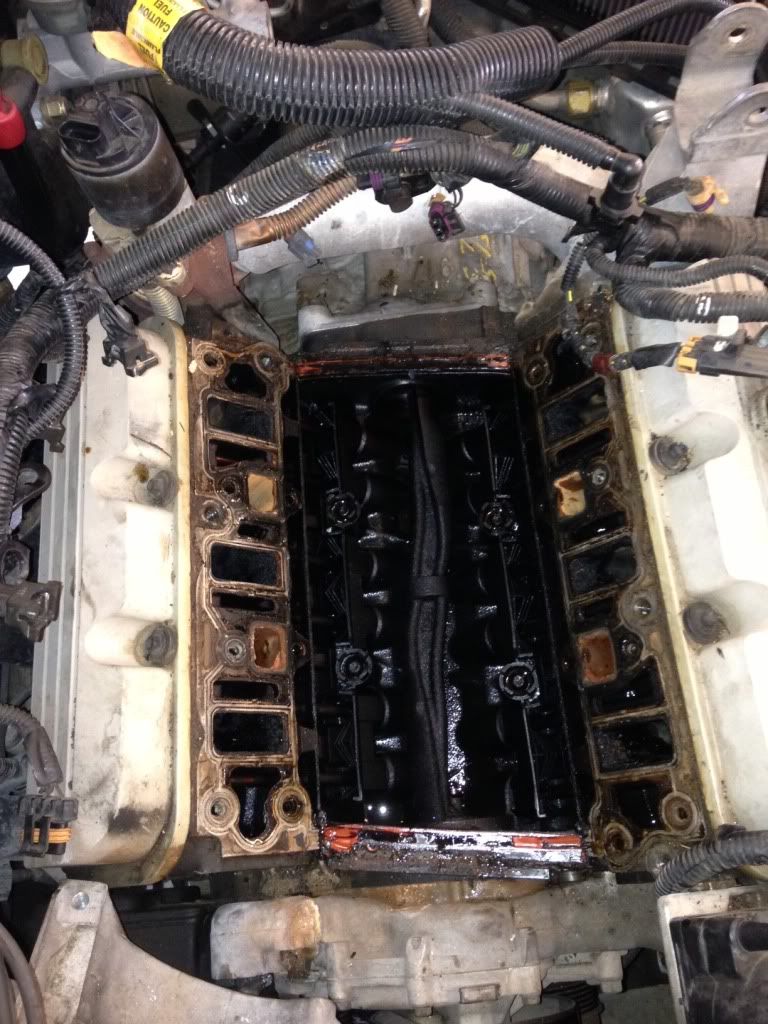
    UIM removed. Pretty nasty but not terrible. The real trouble for my car lies below...


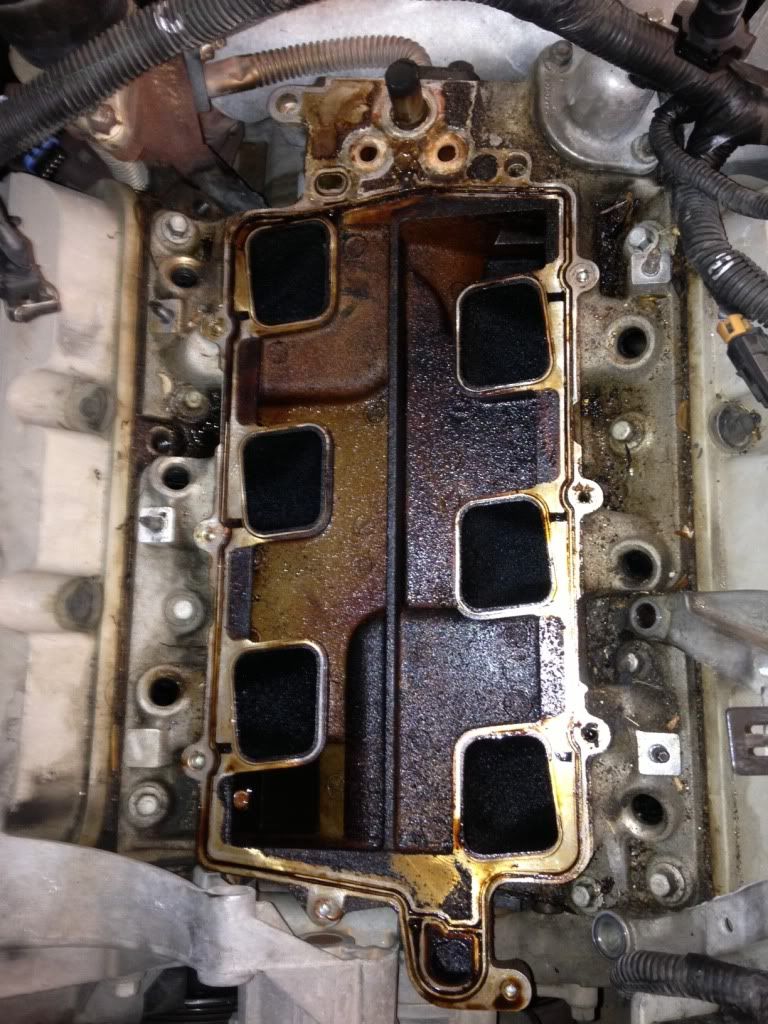
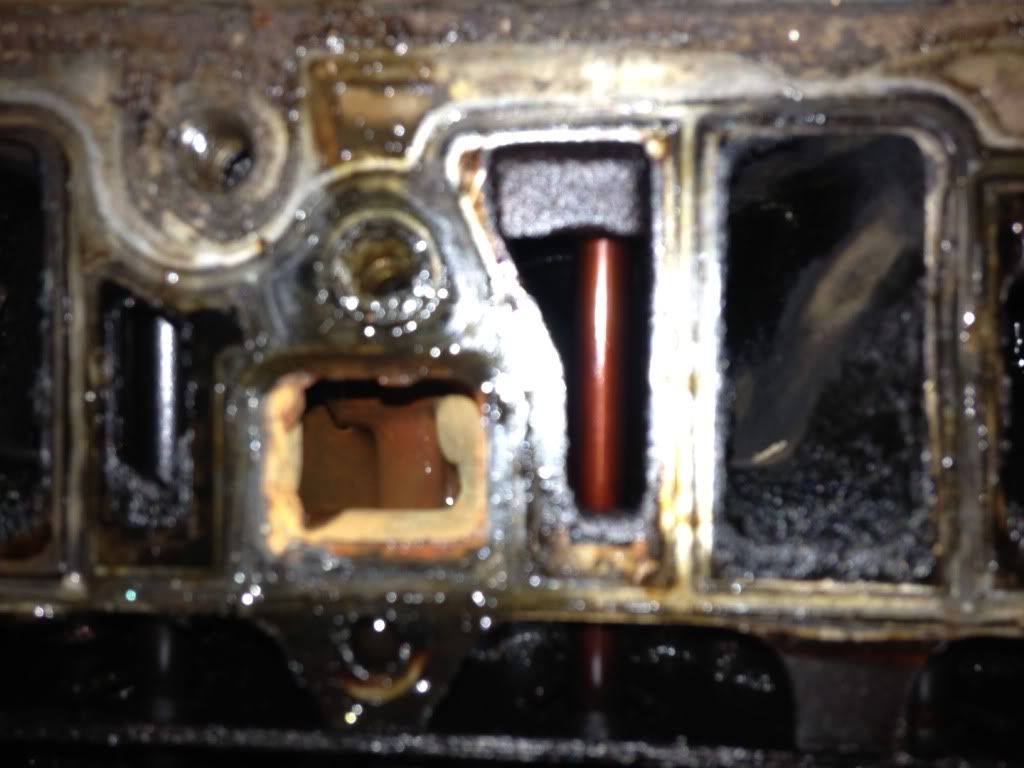
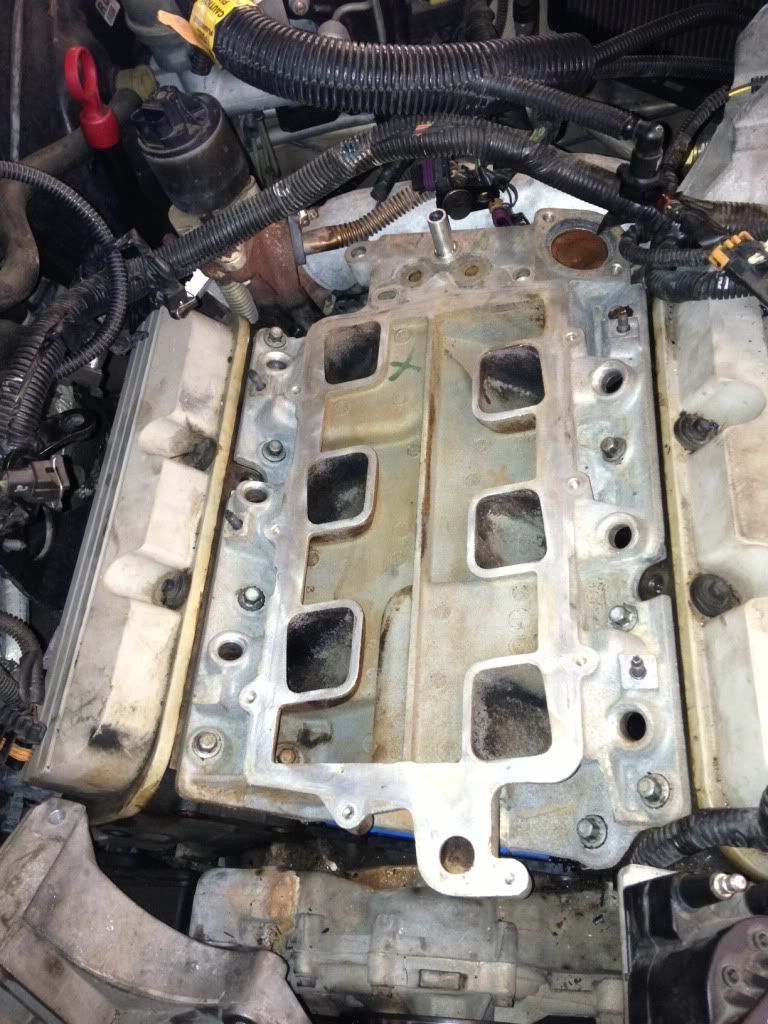
    LIM removed. First time it's been off since I had the gaskets changed at 44k. Now it's at 230k. Lots of carbon and general nastiness.


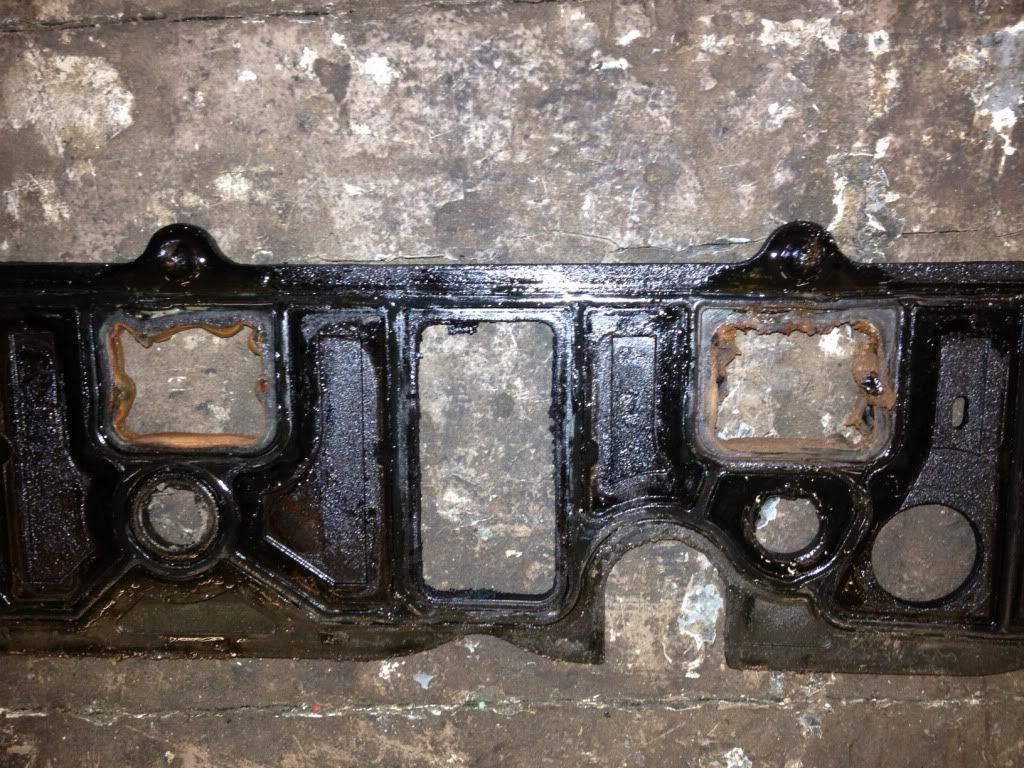
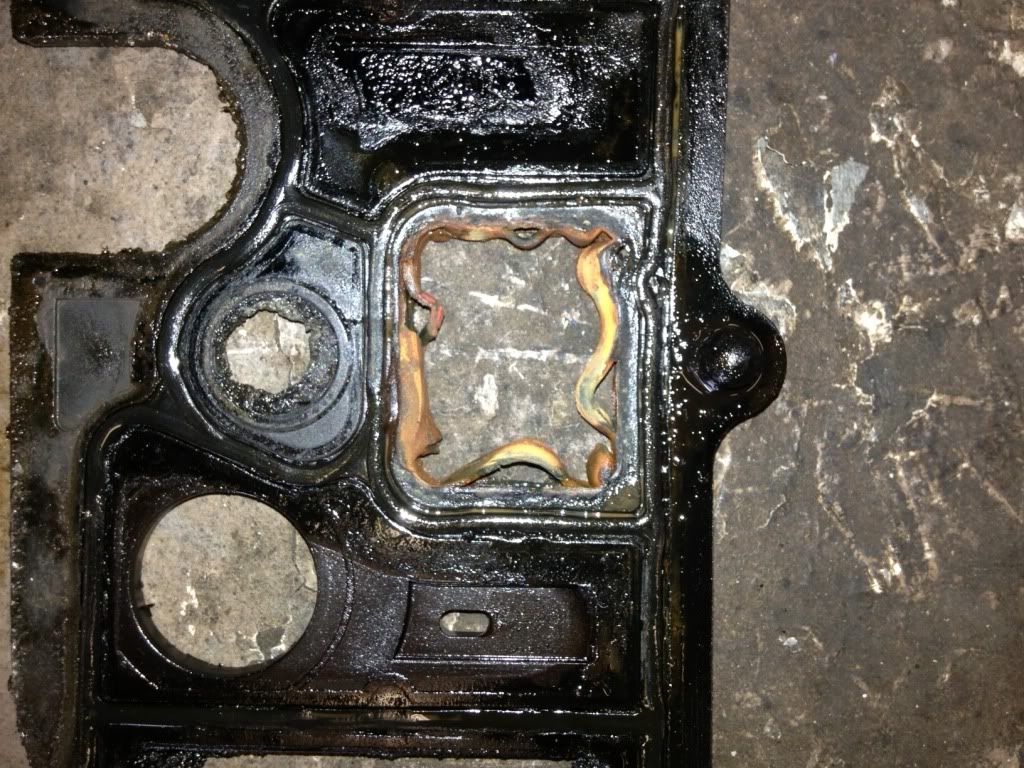
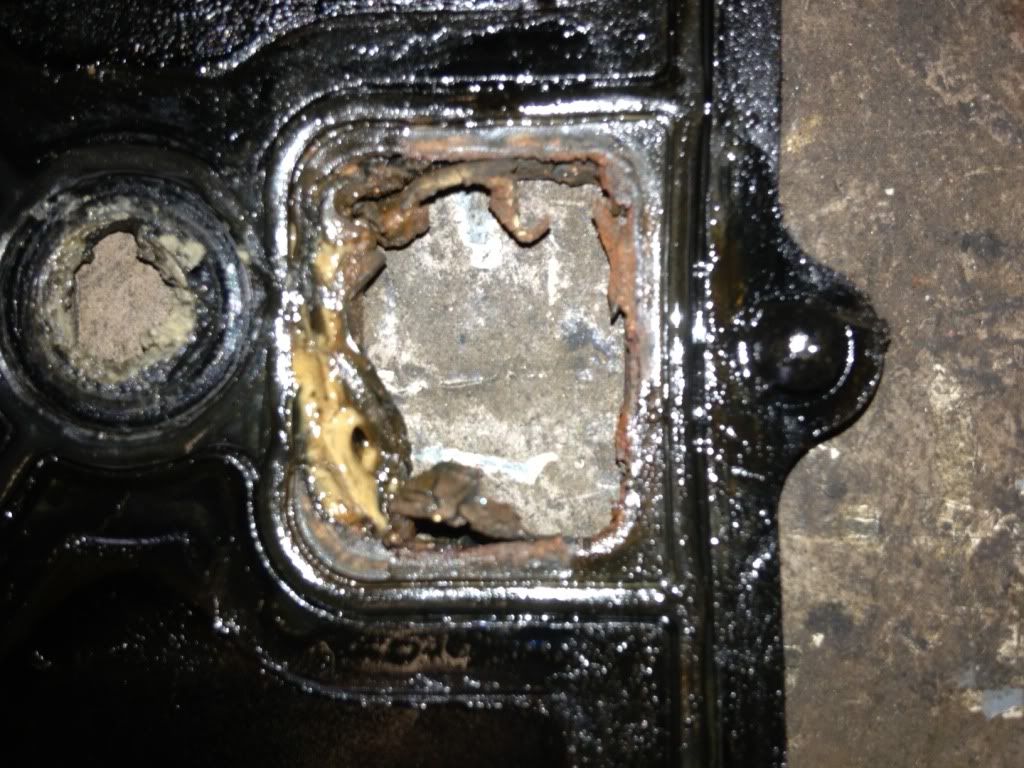
    Oh my freakin gosh! Carmax told me they put the good gaskets on (when I had them changed upon purchase in 2003) but nope... it's the cheap plastic pieces of crap... FOR 190,000 MILES. The mystery of the disappearing coolant has been solved.


    Never in my life have I seen gaskets as used up as these are. Made me sick to look at this.


    Hey, while I've got the LIM off I want to be sure and hog out the coolant passage under the EGR stovepipe. Thanks for the awesome idea Bill! I didn't block off the coolant passages to the TB (even though I had everything I needed to do it with) because when I got in there I realized that the NA LIM isn't deep enough. There is just a sort of lip and if you drill past that it opens up into an open area. Decided to hold off on this for now. With the upgraded UIM I should be okay for awhile anyway.


    LIM all cleaned up and back on the engine. I didn't take any pics of the new metal gaskets or the new UIM but they are the FelPro gaskets and Dorman UIM. I was really on a tight schedule otherwise I would have taken more/better pics. Car runs much better but now I've got a p0171 code (Lean condition). I suspect a vacuum leak or perhaps I mucked up the PCV when I put it on. Remember I was in a hurry. I will get that fixed pretty quick and then I'll be in good shape.

    Well, that's all the fun for this time boys and girls. Be sure to join me next time when I replace that stupid fuel sending unit.
    Last edited by 4fanintexas; 06-04-2013 at 06:30 PM.
    Reply With Quote  
     

  19. #19 Re: Upgraded UIM/LIM gasket time 
    SE Level Member
    Join Date
    Mar 2012
    Location
    Wichita Falls, Texas
    Posts
    35
    Thanks (Received)
    0
    Likes (Received)
    0
    Dislikes (Received)
    0
    BTW, sorry the pics didn't load right. All I have are the links. I'm used to loading them from my PC and apparently I'm having trouble loading them from my iPhone. I will have my PC back this weekend and will try to fix the pics then.
    Last edited by 4fanintexas; 05-31-2013 at 01:52 PM.
    Reply With Quote  
     

  20. #20 Re: Upgraded UIM/LIM gasket time 
    SE Level Member
    Join Date
    Mar 2012
    Location
    Wichita Falls, Texas
    Posts
    35
    Thanks (Received)
    0
    Likes (Received)
    0
    Dislikes (Received)
    0
    Pics fixed!
    Reply With Quote  
     

Page 1 of 2 12 LastLast

Similar Threads

  1. 01 grandprix Lim gasket time!!! :(
    By chevy350 in forum General Tech Discussion
    Replies: 14
    Last Post: 03-26-2013, 08:30 PM
  2. Upgraded Reverse lights
    By Doc Banger in forum Visual/Body Modifications
    Replies: 24
    Last Post: 12-18-2012, 01:57 PM
  3. Hud and upgraded dic install for '04 Gt1
    By Riviera in forum General Tech Discussion
    Replies: 3
    Last Post: 12-27-2010, 02:37 PM
  4. Upgraded to an A2A IC System.
    By Silver2kgtp in forum Turbo
    Replies: 26
    Last Post: 11-14-2010, 06:08 PM
  5. for those of you that changed. upgraded rad
    By kuntzie in forum General Tech Discussion
    Replies: 4
    Last Post: 07-04-2010, 09:24 PM
Tags for this Thread

View Tag Cloud

Bookmarks
Bookmarks
Posting Permissions
  • You may not post new threads
  • You may not post replies
  • You may not post attachments
  • You may not edit your posts
  •