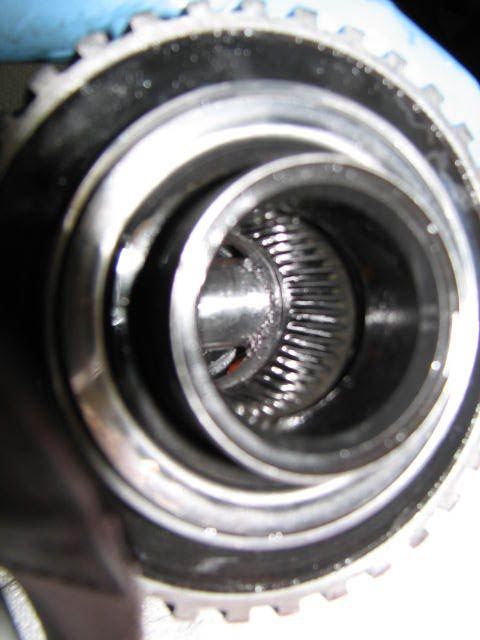
This pic shows us the internal splines in the diff that the axle is driven by

|
|


This pic shows us the internal splines in the diff that the axle is driven by


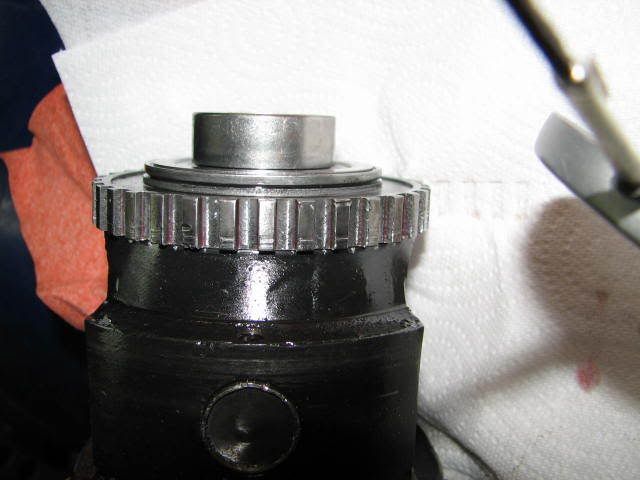
Better pic of the bearing and washer
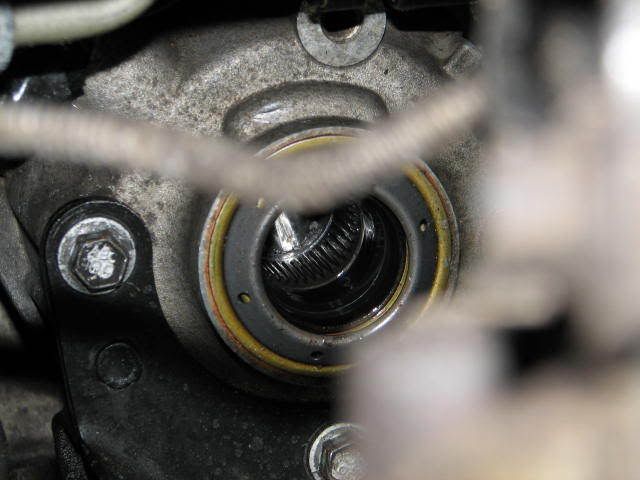
Looking in at an installed diff. We can see it's not flopping or out of alignment. This is because the diff cover holds the diff at the passenger end. Then the pinion holes the diff's planetaries and the output shaft is also clipped into the diff.
ps chuck... you'd be the guy to notice the diff cover has a lower mount on it in the pic. Bonneville.

So with the output shaft on the other side being held up by the guts the diff should be up and square?
So he can just push the diff all the way to the driver's side and pry it toward the passenger's side for the measurement?
I still don't know why the book says to make the measurement with the transmission vertical. I think it might just be a little more accurate and doesn't really matter.

Yea that mount looks way out of place for us GP owners.
The book also IIRC has you do that first before anything else besides the pinion is in the casing. In reality...it's going to be a pain to pry it forward with the trans in the vehicle. Maybe they suggest it then so there is no weight or drag from the output shaft.

Thanks Bill, this sounds like progress. I have HD and doing OE to OE replacment. In general, I want to measure existing, and then match new to that measurement. Simple, make sense. But I'm dense, so...
1st, do you recommend measuring on-car, or off w/ diff vertical?
2nd, what am I measuring and matching? eg, outside face of thr brg (715) to what? or other?
BTW, I'm learning stuff
Stand both diffs on their planetary end with the noses up. Measure from flat surface they are sitting on to the top of the diff where the bearing and washer would sit. That should tell you how long the diffs are. If they are the same, then reuse your bearing and washer for the easy install.
I would think that the majority of the difference and reason for the washers is the diff cover. As long as you are reusing..you should be fine.
Got it. Thanks for help!
I'll follow up w/ progress.
To follow up. GMpartsgiant took 1 wk to ship parts. Then 1 wk for UPS to get parts to me. 1st hiccop, I had remove what I think is the oil pressure sensor & oil filter to get to case extension bolts, so had to make a trip to store for oil & filter-$25, but thats ok--time for change anyway. 2nd speed bump, TRANSAXLE BRACE, diagram ref # (9)! Those 2 bolts are not easy to get to. 3rd road block, VEHICLE SPEED SENSOR RELUCTOR WHEEL, diagram ref # (713)!!!! I could use some adivce here.
This is 1st time I've held a diff in my hand, I failed to research this part, I assumed it would slip onto diff (700). Once I had old diff off, I learned how wrong I was. GM service manual says, do NOT remove wheel (713) unless it is damaged. & install procedure is to hammer it onto diff.
I have a generic puller, I could try to get wheel (713) off old diff, but I would rather keep old part in good condition unless I have reason not to. & I REALLY do NOT want to put on old wheel (713) on new diff, then have it not work properly and have to take it off again.
So, can wheel be removed without damaging it & reused? Or am I stuck w/o my dd until I can get new wheel (713) delivered?
Hiccup #1 Odd, I think I've done this w/o pulling it. But I do have a swivel 13mm.
Speed Bump #2. Reach in and make it happen. BTW you can also reach down in back of the motor to get these. Not great either way, but you get used to it.
Road block #3 I've removed the reluctor plenty of times. Usually I use a block of wood to get it started or a puller (moving it around to keep the reluctor from getting bent too far in any one direction. Then reinstall with block of wood. That way you don't marr it up.
You are perfectly fine.. use your puller/wood and get it done. And know that when swapping my motor this past Friday I dealt with that lovely little diff to engine bracket as well. It's not so bad when you have been in there 10 times or so.
Thanks Bill, again!
Got to work 2 gigs today, but looking forward to getting home and taking a shot at getting that wheel off.
hiccup-- I did get 4 case ext bolts off, but when I got to 2 bracket bolts it seemed like time to make some room, filter and sensor were easy to remove, just not on my pre-game checklist. Speed bump-- ya, man vs machine, lol--I looked at it from top, but was worried I would round off bolt heads, you really need full compliment of wrenchs, rachets, extensions, adapters to get in there.
And sorry about your motor, are you back on the road already?
FWIW I almost exclusively use my craftsman long pivot head ratchet. For those bolts add on the deep 13mm socket and maybe a 3" extension if working from the top. From the side, short ratched, lots of hand strength and the 13mm deep socket, maybe even unbolt the ps pump and hold it up higher with a bungee.
Yeah.. I'd have been on the road Friday night, (it blew Thurs night, Friday I picked up the motor at noon) except I needed an NA fuel rail to finish the conversion from SC to NA.
Alright, again, Bill, you are a hero.
W/ the pointers & a little confidence I was not wrecking my parts, I got the reluctor wheel off in about 10 min, that includes cutting a corner off a piece of scrap wood & digging out an loose piece of steel strap--& tapped it on new diif in about 2 min.
& glad you're back on the road! man, thats nascar quick
BTW, the last/most difficult bolt for me was the upper transaxle brace bolt. I was finally able to break it free by taking a long screw driver and prying all the wires aside & used a 1/2" ratchet-3/8" adapter-3/8" 13mm socket.
I might have made a deal w/ the devil along the way. But I didn't take it out, just loosened it...
Whatever works. Mechanic buddy of mine taught me a lot of stuff. The best thing you can learn is take things off in as big of chunks as possible and don't take stuff that isn't needed. If you got past it w/o taking it off and didn't have issues, then you did just fine.
On the car.. ehhh not my best time. Had to wait on some parts though.
I have to ask another q. The reason for all this was vibration on accel, so it would be stupid of me not to pause and confirm.
So I have diff out, I'm looking at final drive/sun gear shaft w/ sun gear on it & parking gear & behind that, & I'm checking things for damage. I notice final drive/sun gear shaft has noticable play at the exposed end--ie I can move the end up/down/left/right.
Is this ok--ie the end of shaft will be supported by diff when diff is reinstalled? Or is shaft supposed to be supported by something inside trans?
Another day of working 2 gigs, but looking forward to putting it back together, filling fluids, & hitting the road--Thanks
At my last big meet, the first 3-4 guys where there and helped me clean up a mess in the garage. One of the things we cleaned up were a few spare transmissions. Of course everyone wants to see transmission guts and we pulled a few apart. The thing that stuck out to the guys the most was how if the parts are loose and sloppy, that's correct for our transmissions. Buickman104 can confirm that slop, play and wiggly is how the parts in the trans should be.
Ready for the tip that will save you a lot of hair pulling? Behind the park gear is a bearing. It rides in the back of the park gear and if the gear comes forward at all the bearing falls. This makes it so the diff cover won't sit flush by itself. Never use the bolts to try and pull it on. Me, I almost always pull the park gear and glue (with grease or trans grease) the bearing to the park gear. Then reinstall. By doing so, you know that bearing isn't going to mess with you once you are ready for the diff cover.

Yup, I can confirm. It is surprising the amount of slop on these transmissions.
Thanks for the tip! I read about this along the way. I slid off sun gear to get a good look at it. Then slid off park gear, b/c I was curious. & sure enough, the washer & bearing came unseated. lol.
I think I read this along the way too, but vasoline petroleum jelly works to HARMLESSLY "glue"/hold these parts in place during reinstall too, right?
| « Previous Thread | Next Thread » |
| Tags for this Thread |
| Bookmarks |
Bookmarks |


