Thread: 4T65E Differential INSTALL PICS!!!

Page 2 of 2 FirstFirst 12
Results 21 to 40 of 40
  1. #21 Re: 4T65E Differential INSTALL PICS!!! 
    SE Level Member Metallistar's Avatar
    Join Date
    Jan 2008
    Posts
    20
    Thanks (Received)
    0
    Likes (Received)
    0
    Dislikes (Received)
    0
    Ok, I just lightly tightened the bolts on the diff cover and it closed up nicely without binding anywhere. I tried it with out the o-ring and the gap was still there but it closes up with very little pressure. And the trans spins freely in neutral.

    I know all the bearings are in place correctly because I printed the pics and info from this thread and had them sitting right next to me

    Also, what should I torque the housing bolts to and should I use some threadlocker on them?
    Reply With Quote  
     

  2. #22 Re: 4T65E Differential INSTALL PICS!!! 
    Transmission Expert Trannyman95's Avatar
    Join Date
    Dec 2007
    Location
    Fort Wayne, IN
    Posts
    1,858
    Thanks (Received)
    0
    Likes (Received)
    0
    Dislikes (Received)
    0
    I have a complete list of torque specs on my 4T65E info page, here is the link.... 4T65E Transmission Info

    The correct torque spec for those bolts is 26 ft lbs, no threadlocker.
    Reply With Quote  
     

  3. #23 Re: 4T65E Differential INSTALL PICS!!! 
    GT Level Member tylerbinski's Avatar
    Join Date
    May 2009
    Location
    Canada
    Posts
    245
    Thanks (Received)
    0
    Likes (Received)
    0
    Dislikes (Received)
    0
    Hey Guys, great info here, thanks Trannyman.

    Tonight I have done quite a bit of reading and here is my question.

    Current Vehicle: 2004 Grand Prix GT (L26) 3.05 final drive ratio

    I have a 2002 GTP (4T64E-hd) at home.

    I plan to use this to swap the diff and passenger side axle.

    Is there any reason why i have to also swap the output shaft? any advantage?

    Thanks.

    '04 BLK GP - .. Turbo :P
    GTP SIC - '02GTP | XP Cam | Intercooled Turbo Kit | Cutout....Fire mod 9/11
    GTPSIC '02 | Twin charge, XP cam et
    Reply With Quote  
     

  4. #24 Re: 4T65E Differential INSTALL PICS!!! 
    Your ClubGP Liason copgtp's Avatar
    Join Date
    Mar 2008
    Location
    Orange County, NY
    Posts
    1,101
    Thanks (Received)
    0
    Likes (Received)
    0
    Dislikes (Received)
    0
    can i use petroleum jelly to hold the bearing on the parking gear?? Or should I use some regular assembly lube that I have?
    For all your 3800 needs:
    Reply With Quote  
     

  5. #25 Re: 4T65E Differential INSTALL PICS!!! 
    Turbo is the way to go. BillBoost37's Avatar
    Join Date
    Jul 2009
    Location
    W Spfld
    Posts
    26,833
    Thanks (Received)
    53
    Likes (Received)
    90
    Dislikes (Received)
    1
    You can use petroleum jelly.
    I drink..so consider that when reading my posts.

    2010 Audi A6 Dual IC's
    Reply With Quote  
     

  6. #26 Re: 4T65E Differential INSTALL PICS!!! 
    SE Level Member
    Join Date
    Feb 2013
    Location
    Alberta, Canada
    Posts
    1
    Thanks (Received)
    0
    Likes (Received)
    0
    Dislikes (Received)
    0
    Hey Trannyman, great looking thread you made. Sure would appreciate if the title matched the rest of it, all your pic links have gone bad however.

    Anyway I'm new here and I'm havin noise/loose passenger side CV Axle at the extension housing. It can be wiggled while parked - up, down, forward, and back about 3/4 to a full inch from center and I'm kinda wondering what to replace. I bought myself the GM manuals of that year in effort of not doing the work twice, leaving it parked too long one spot, or replace wrong stuff.

    I've read the forum rules, this should be the right spot to post this? PM me if not, whomever it concerns
    Reply With Quote  
     

  7. #27 Re: 4T65E Differential INSTALL PICS!!! 
    GTX Level Member
    Join Date
    Aug 2010
    Location
    Minnesota
    Posts
    1,409
    Thanks (Received)
    0
    Likes (Received)
    0
    Dislikes (Received)
    0
    This is a long shot but I wonder if Dave could re-upload the pictures to this post if he still has them. It would be a huge help.
    Reply With Quote  
     

  8. #28 Re: 4T65E Differential INSTALL PICS!!! 
    Turbo is the way to go. BillBoost37's Avatar
    Join Date
    Jul 2009
    Location
    W Spfld
    Posts
    26,833
    Thanks (Received)
    53
    Likes (Received)
    90
    Dislikes (Received)
    1
    If not.. I think I'll be able to get them this weekend.
    I drink..so consider that when reading my posts.

    2010 Audi A6 Dual IC's
    Reply With Quote  
     

  9. #29 Re: 4T65E Differential INSTALL PICS!!! 
    GTX Level Member
    Join Date
    Aug 2010
    Location
    Minnesota
    Posts
    1,409
    Thanks (Received)
    0
    Likes (Received)
    0
    Dislikes (Received)
    0
    Quote Originally Posted by BillBoost37 View Post
    If not.. I think I'll be able to get them this weekend.
    I doubt he is going to get the pix back so if you can do that it would be awesome!
    Reply With Quote  
     

  10. #30 Re: 4T65E Differential INSTALL PICS!!! 
    Turbo is the way to go. BillBoost37's Avatar
    Join Date
    Jul 2009
    Location
    W Spfld
    Posts
    26,833
    Thanks (Received)
    53
    Likes (Received)
    90
    Dislikes (Received)
    1
    Ok.. I will probably be able on Thurs or Fri
    I drink..so consider that when reading my posts.

    2010 Audi A6 Dual IC's
    Reply With Quote  
     

  11. #31 Re: 4T65E Differential INSTALL PICS!!! 
    GTP Level Member
    Join Date
    Jun 2016
    Location
    Cleveland ohio
    Posts
    891
    Thanks (Received)
    1
    Likes (Received)
    9
    Dislikes (Received)
    0
    Anyway to refresh the pictures? I can not see them. I have a hell of a knock from my new ZZP trans from drive to reverse and vise versa. I think it's the differential as I have replaced multiple cv axles. I know it's an old post
    Reply With Quote  
     

  12. #32 Re: 4T65E Differential INSTALL PICS!!! 
    Killa Bee Scottydoggs's Avatar
    Join Date
    Aug 2010
    Location
    new jersey
    Posts
    39,997
    Thanks (Received)
    63
    Likes (Received)
    166
    Dislikes (Received)
    5
    pics are likely gone for good.

    pop the hood, watch the engine as you shift it in and out of gear, if its moving all over the place the mounts are dead and can make a clunk sound.

    98 Buick Regal GS, F body brakes, Caddy STS wheels, tinted tails L36 bottom end, lightly ported heads, 1.95 roller rockers, headers, gen 5 N* 3.0 pulley, FSIC, 42 lb injectors, a BrandonHall rebuilt trans, DHP tuned and AEM water/Meth injection https://goo.gl/gpV5kW
    Reply With Quote  
     

  13. #33 Re: 4T65E Differential INSTALL PICS!!! 
    GTP Level Member
    Join Date
    Jun 2016
    Location
    Cleveland ohio
    Posts
    891
    Thanks (Received)
    1
    Likes (Received)
    9
    Dislikes (Received)
    0
    That sucks the pictures are gone. Was such a great write up.

    Everything is tight. I have all solid mounts. The dog bones are Wbodystore urathane and the lowers are solid rubbers. No movement at all. Talking with Tim at ZZP he though maybe the axles. I've replaced them several times with autozone axles. It still made the noise. I ended up putting the stock back in the passenger side and I am waiting for a brand new AC Delco for the left front because the bands were off of the boots and I used hose clamps to put them back on and did not like the looks of it. Zip ties did not hold tight enough. Thanks for the reply
    Reply With Quote  
     

  14. #34 Re: 4T65E Differential INSTALL PICS!!! 
    Killa Bee Scottydoggs's Avatar
    Join Date
    Aug 2010
    Location
    new jersey
    Posts
    39,997
    Thanks (Received)
    63
    Likes (Received)
    166
    Dislikes (Received)
    5
    sounds like its internal then. chances that you got two new bad axles are rare.

    98 Buick Regal GS, F body brakes, Caddy STS wheels, tinted tails L36 bottom end, lightly ported heads, 1.95 roller rockers, headers, gen 5 N* 3.0 pulley, FSIC, 42 lb injectors, a BrandonHall rebuilt trans, DHP tuned and AEM water/Meth injection https://goo.gl/gpV5kW
    Reply With Quote  
     

  15. #35 Re: 4T65E Differential INSTALL PICS!!! 
    GTP Level Member
    Join Date
    Jun 2016
    Location
    Cleveland ohio
    Posts
    891
    Thanks (Received)
    1
    Likes (Received)
    9
    Dislikes (Received)
    0
    That's what I thought. I want the stock cv axle anyways. Looks like I will end up pulling the diff and sending it in for a replacement. Do you know of any write ups floating around with pictures? I have both shafts and output shaft off right now. I just don't want to screw it up.
    Reply With Quote  
     

  16. #36 Re: 4T65E Differential INSTALL PICS!!! 
    Killa Bee Scottydoggs's Avatar
    Join Date
    Aug 2010
    Location
    new jersey
    Posts
    39,997
    Thanks (Received)
    63
    Likes (Received)
    166
    Dislikes (Received)
    5
    id try for some youtube vids.

    98 Buick Regal GS, F body brakes, Caddy STS wheels, tinted tails L36 bottom end, lightly ported heads, 1.95 roller rockers, headers, gen 5 N* 3.0 pulley, FSIC, 42 lb injectors, a BrandonHall rebuilt trans, DHP tuned and AEM water/Meth injection https://goo.gl/gpV5kW
    Reply With Quote  
     

  17. #37 Re: 4T65E Differential INSTALL PICS!!! 
    GTP Level Member
    Join Date
    Jun 2016
    Location
    Cleveland ohio
    Posts
    891
    Thanks (Received)
    1
    Likes (Received)
    9
    Dislikes (Received)
    0
    I haven't seen any that would help. I'll just wait to hear from Tim at ZZP. Thanks for your help.
    Reply With Quote  
     

  18. #38 Re: 4T65E Differential INSTALL PICS!!! 
    Killa Bee Scottydoggs's Avatar
    Join Date
    Aug 2010
    Location
    new jersey
    Posts
    39,997
    Thanks (Received)
    63
    Likes (Received)
    166
    Dislikes (Received)
    5
    what ya talkin bout willis? tons of vids.


    98 Buick Regal GS, F body brakes, Caddy STS wheels, tinted tails L36 bottom end, lightly ported heads, 1.95 roller rockers, headers, gen 5 N* 3.0 pulley, FSIC, 42 lb injectors, a BrandonHall rebuilt trans, DHP tuned and AEM water/Meth injection https://goo.gl/gpV5kW
    Reply With Quote  
     

  19. #39 Re: 4T65E Differential INSTALL PICS!!! 
    GTP Level Member
    Join Date
    Jun 2016
    Location
    Cleveland ohio
    Posts
    891
    Thanks (Received)
    1
    Likes (Received)
    9
    Dislikes (Received)
    0
    Lol. Sorry. I scanned through that one and seen it said something about Fbody and skipped past. Thanks for the help. If that's all it is then I'm not sure what I am worried about. I was reading all the comments about lining everything up and bearings falling etc..... He just pulled it apart with nothing falling apart. I guess I will pull it apart tomorrow and see if anything is shady. I took the output shaft out with the cv axle so I don't have to worry about that dreaded clip from the video.
    Last edited by rickisrad; 08-07-2016 at 08:11 PM.
    Reply With Quote  
     

  20. #40 Re: 4T65E Differential INSTALL PICS!!! 
    SE Level Member
    Join Date
    Jan 2017
    Location
    xx
    Posts
    91
    Thanks (Received)
    0
    Likes (Received)
    0
    Dislikes (Received)
    0
    Fixed Images - 23 March 2017

    I went and found the original pictures from Dave's thread and mirrored them on my own server so hopefully they should never be lost again. Dave, if you'd prefer I did not do that, please let me know.

    Also, Photobucket is the biggest piece of f'ng trash I've had to work with in forever. Thanks for being the reason so much content has disappeared from forums over the years. Assholes.


    Quote Originally Posted by Trannyman95 View Post
    A few threads have had questions pertaining to the proper order of install for the associated parts with the differential. These steps apply to 98+ 4T60E/4T65E transmissions though 97 and earlier models are the same with the exception of the snap ring on the output shaft where it goes into the diff is a different style. These are assembly pics starting with the parts removed showing the order things go together and in which direction though I did add a pic of where to use a chisel in the center of the diff for removal. Enjoy!

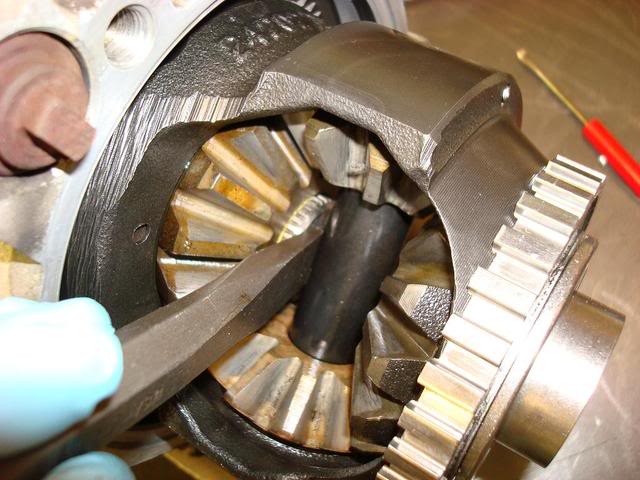
    Pic#1 - Here is a pic for disassembly reference for 98+ models. You will need to use a wedge shaped chisel and a hammer to crack it lose. This is required to unseat the snapring on the end to allow the diff to pull/slide off of the output shaft.


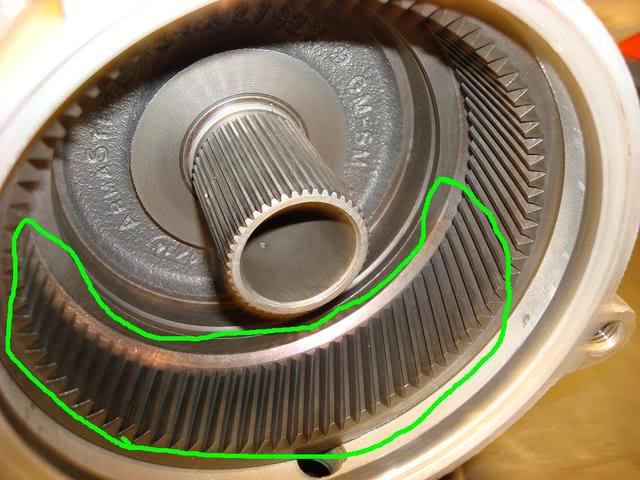
    Pic#2 - This is a pic of the internal ring gear for the final drive/differential and the teeth MUST be in excellent condition!!! NO chips or nicks allowed here as damage to a new diff will occur!


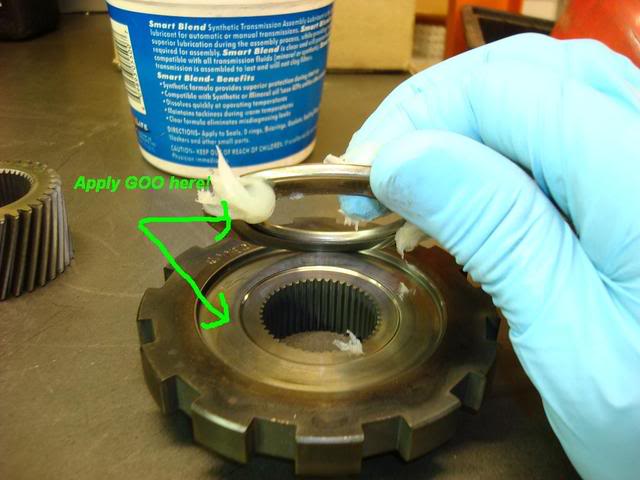
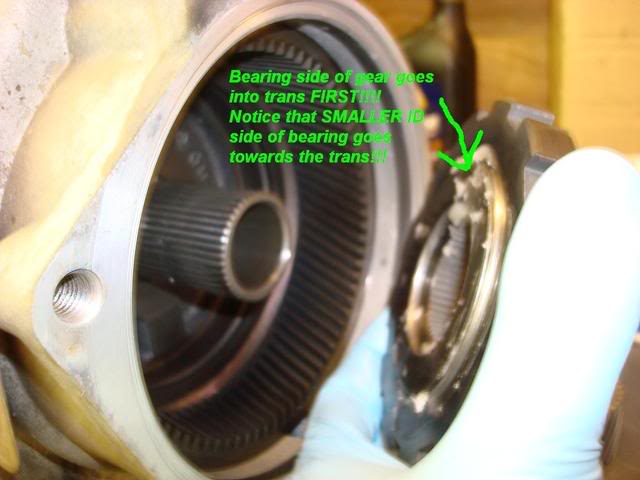
    Pic#3 - IMPORTANT STEP!!! DO NOT SKIP!!! You MUST put some type of assembly lube on the bearing to hold it to the park gear. If the bearing falls out of place OR you didn't take this gear out and don't know the bearing fell and try to bolt the diff housing back down it can BREAK because it is sticking out too far and the weak aluminum ears for the bolt holes on the housing will snap off! Make sure you put the bearing on the gear in the correct direction, larger-outer side surface goes towards park gear, smaller-inner race goes against internal ring gear-trans side!


    Pic#4 - Proper direction for park gear to be installed into trans


    Pic#5 - View of installed park gear
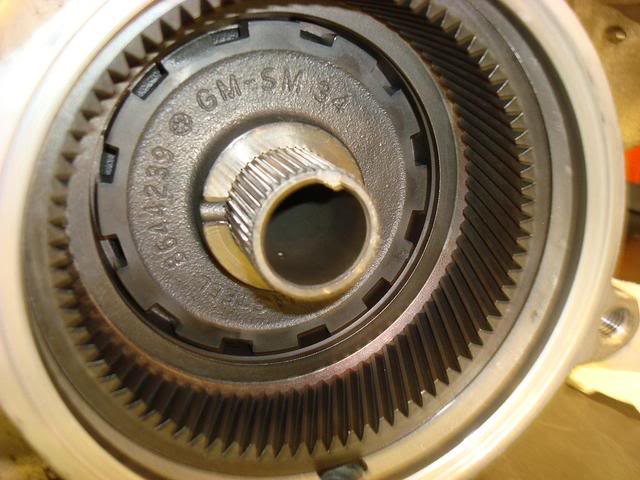


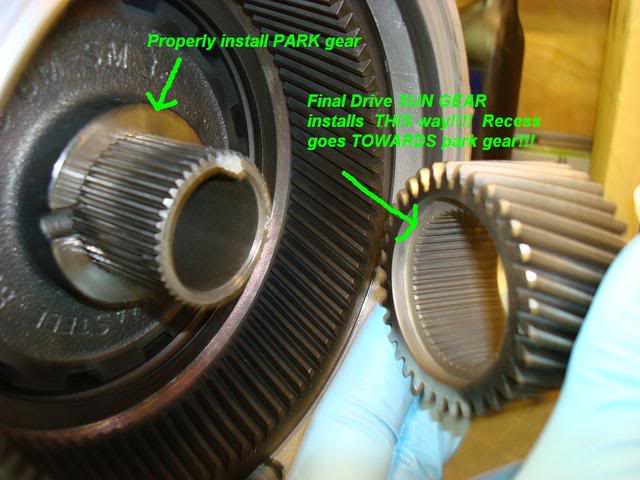
    Pic#6 - Proper install direction for final drive sun gear. Recessed end goes TOWARDS transmission against park gear!


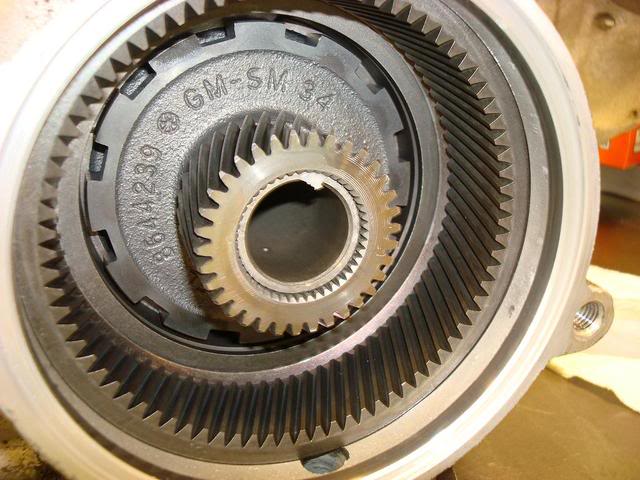
    Pic#7 - View of installed sun gear


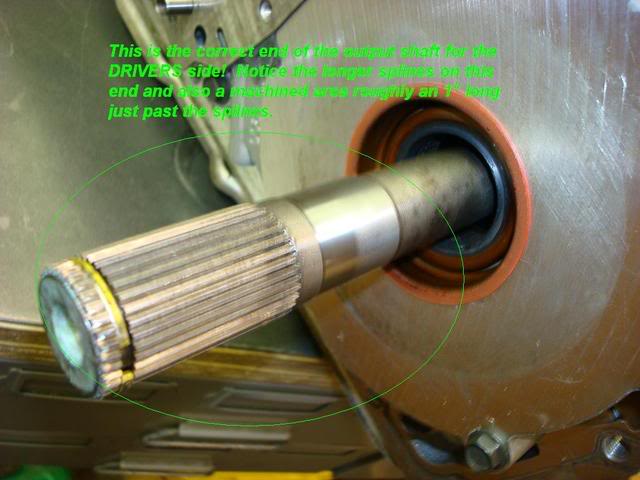
    Pic#8 - Correct DRIVERS side output shaft install


    Pic#9 - Correct PASSENGER side output shaft install
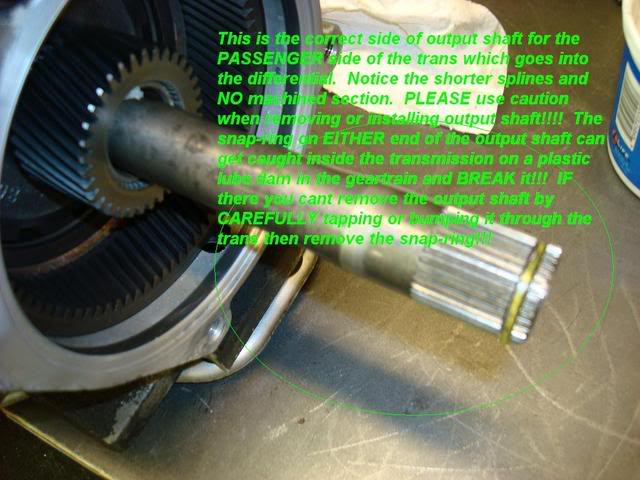


    Pic#10 - Diff installed into transmission. Sometimes this can take a little wiggling and spinning to get it seating all the way as the gears all need to line up properly for it to fall into place. Notice the order on the housing end of the diff.... Shim first, then bearing with the ID of the bearing towards the differential
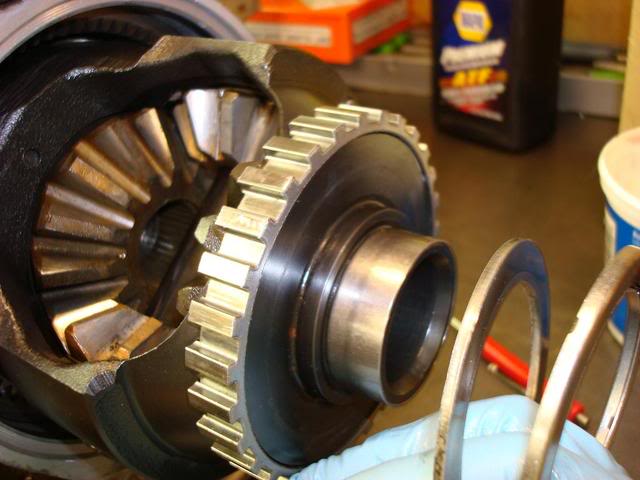


    Pic#11 - Use a hammer to give the output shaft a good sharp tap to seat it into the diff (98+ models only!) If you are doing this IN the car then you will need to hold the drivers side CV tightly into the trans and tap the diff into the shaft while keeping the gears lined up. This is sorta hard to explain without pics or without you laying under the car to understand what I am referring to and I dont have pics of that in this thread.
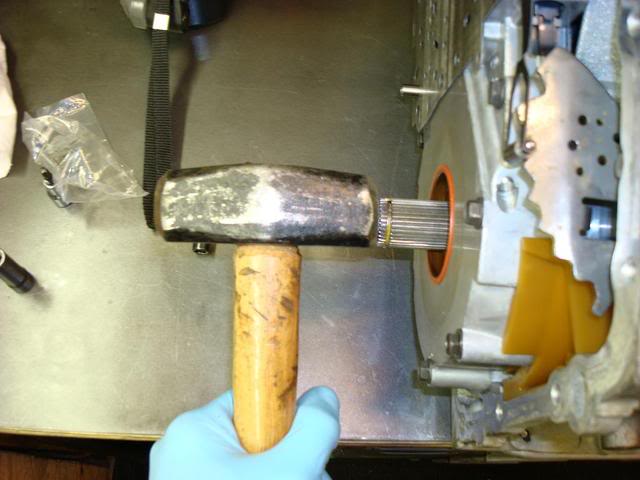


    Pic#12 - View of properly seated output shaft in the differential. Notice the snap ring is visible sticking roughly half way out of the gear.
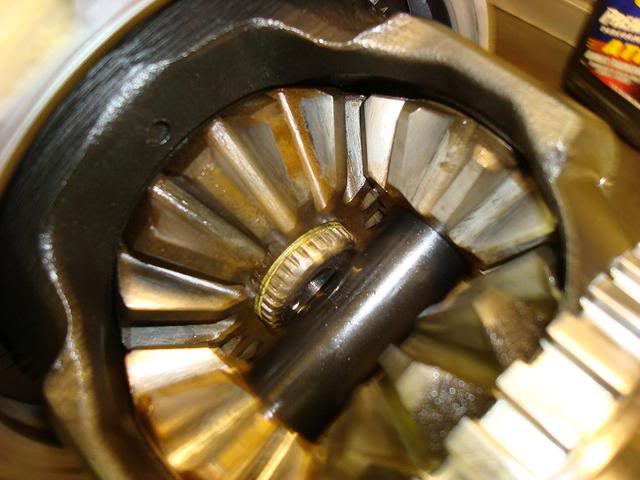


    At this point you are ready to put the diff cover/ housing back on the tail end of the transmission and if doing this in the car you are ready to reassemble all other parts on the outside of the trans. I hope these pics and info help out! If anyone has any questions or want me to add more to this please let me know

    Dave
    Reply With Quote  
     

Page 2 of 2 FirstFirst 12

Similar Threads

  1. EP Differential??
    By Iron Indian in forum 1997-2007 4 speed Automatic (4T65E) (4T65E-HD)
    Replies: 18
    Last Post: 05-01-2020, 07:46 PM
  2. 4T60/E/4T65E Sprocket Ratio Swap !!! [*]
    By Trannyman95 in forum How To Write-Ups/Tech Tips
    Replies: 8
    Last Post: 04-08-2015, 10:14 AM
  3. Gear Swap PICS now up in the 4T60/4T65E section!!!
    By Trannyman95 in forum Off Topic Discussion
    Replies: 3
    Last Post: 12-31-2007, 02:07 PM
  4. 4T65E Trans Info Link
    By Trannyman95 in forum 1997-2007 4 speed Automatic (4T65E) (4T65E-HD)
    Replies: 0
    Last Post: 12-13-2007, 04:01 PM
Tags for this Thread

View Tag Cloud

Bookmarks
Bookmarks
Posting Permissions
  • You may not post new threads
  • You may not post replies
  • You may not post attachments
  • You may not edit your posts
  •